
Storing, constructing, and deploying code utilizing cloud providers has turn into ubiquitous. You may have many choices to select from. The choices turn into far more restricted if you wish to construct and deploy from your individual server. Positive, you possibly can set up and configure a number of instruments your self, however it may be troublesome to recreate these wealthy developer ecosystems supplied by GitHub, GitLab, and different well-liked cloud service suppliers. That is the place OneDev might help.
OneDev is an all-in-one, open supply DevOps system which you could host by yourself server. It contains among the most typical capabilities that builders have turn into accustomed to on well-liked DevOps platforms together with:
- Git-based supply management together with pull requests, code comparability instruments, and commenting capabilities
- Situation monitoring system, together with boards to visualise points
- Automated job system to run construct and deployment jobs
On this article, we’ll discover OneDev from a React net developer’s perspective. We’ll arrange a brand new OneDev occasion, push React net app supply code to it, and arrange some construct and deploy jobs to deploy to Azure App Service.
Bounce forward:
Stipulations
To observe together with this tutorial, you’ll want the next:
Arrange OneDev
The official OneDev set up information describes the way to arrange OneDev as a standalone Docker container, as a node in a Kubernetes cluster or put in straight onto a server with out utilizing container know-how.
The simplest option to get began is to run OneDev as a standalone Docker container. In actual fact, the next Docker compose file makes it so simple as working a single command:
model: '3.8'
providers:
  onedev:
    picture: 1dev/server
    ports:
      - 6610:6610
      - 6611:6611
    volumes:
      # enable Docker to speak with host
      - /var/run/docker.sock:/var/run/docker.sock
      - onedev_data:/choose/onedev
volumes:
  onedev_data:
This pattern Docker compose file takes care of some issues for you:
- Exposes the required ports
- Ensures that the Docker put in inside the OneDev container can talk with the Docker put in in your native system
- Shops all OneDev knowledge in a persistent quantity referred to as
onedev_datain order that your knowledge just isn’t misplaced when your restart the container
Save the pattern Docker compose file to docker-compose.yml in your system. Then, open a brand new command shell in the identical folder and run the next command to start out the container in indifferent mode:
docker compose up -d
After the container begins, entry OneDev within the browser at http://localhost:6610. Chances are you’ll want to attend a couple of minutes for OneDev to initialize earlier than it masses within the browser. The very first thing you will note is the Server Setup display; it can information you thru the preliminary setup.
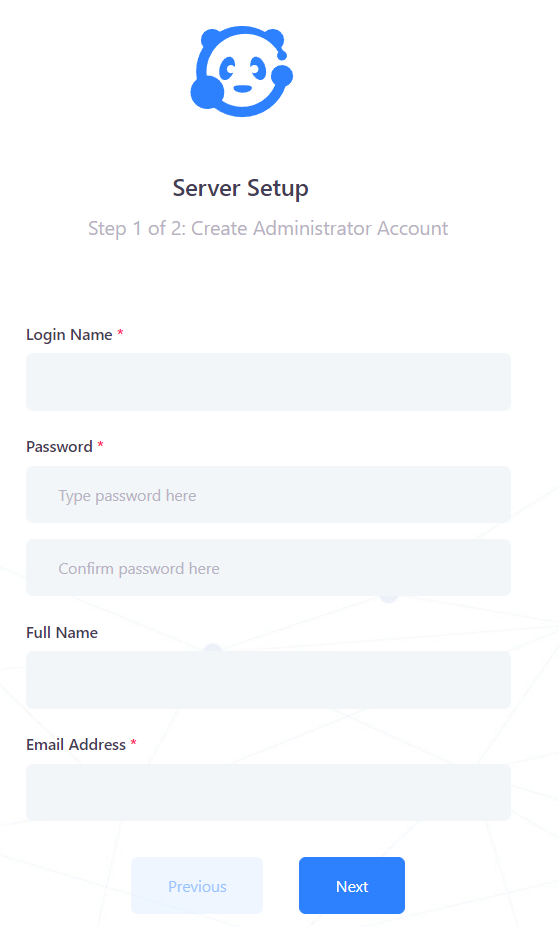
Full the fields within the Server Setup screens. On the second display, depart the server URL as default. OneDev will ask you to confirm your e mail handle after the server setup is full, so make sure to use an actual e mail handle.
OneDev has its personal inbuilt authentication and person retailer. For those who have been to delete the Docker container and volumes, your account and knowledge could be misplaced. Exterior authentication sources might be arrange within the Administration space in case you desire to not use the inbuilt person retailer.
Take a couple of minutes to discover the OneDev person interface. On the left, you’ll discover a navigation menu that gives entry to most options. Within the top-right, you’ll discover a menu with quite a lot of user-specific choices.
Create a challenge
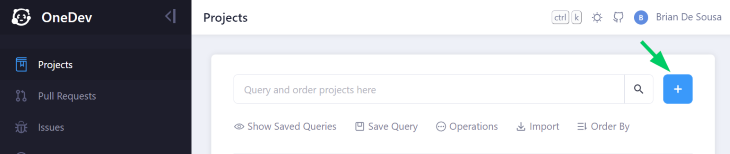
Earlier than you can begin working in OneDev, you’ll have to create a challenge. A challenge incorporates a Git repository, a difficulty tracker, and a number of automation (construct) jobs.
To create a brand new challenge, click on Tasks within the left navigation menu after which click on the + (add) button:
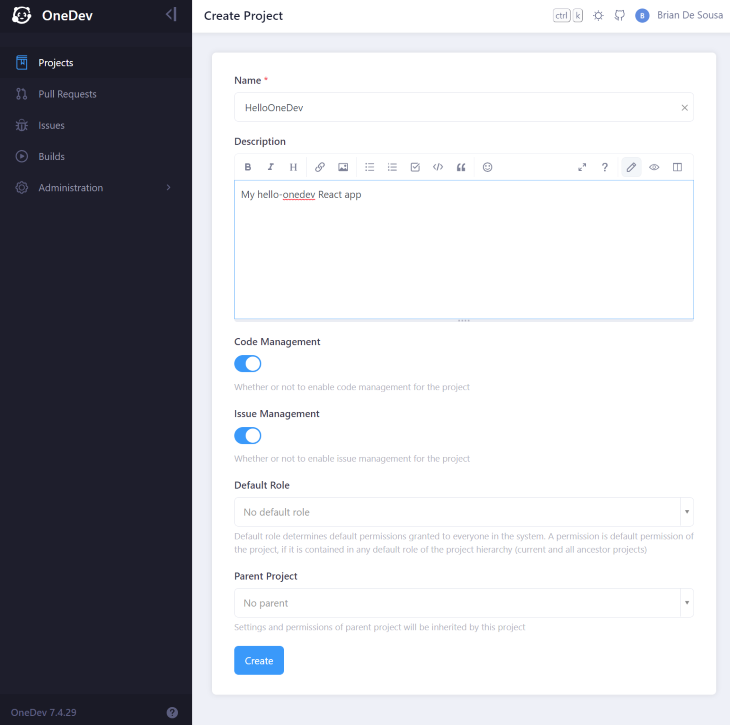
Specify a Title and Description on your challenge. Go away all different choices as default:
Now that you’ve a challenge to work in, you’ll want some code to work with.
Create a pattern React app
So as to preserve issues easy, use create-react-app to generate a brand new pattern React net app:
Extra nice articles from LogRocket:
npx create-react-app hello-onedev
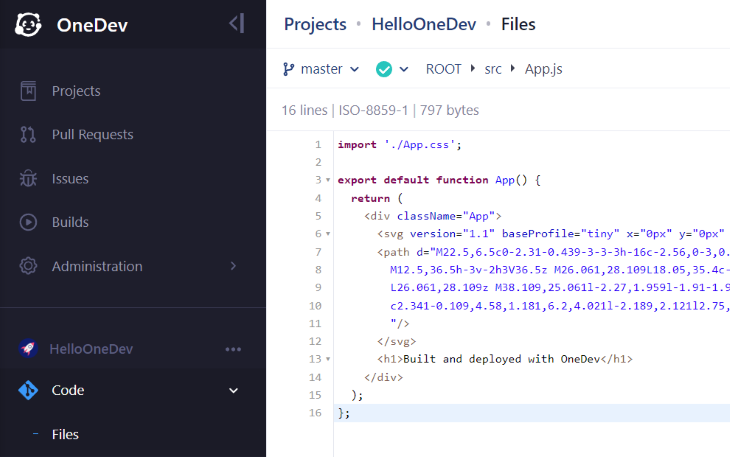
To make issues a little bit extra attention-grabbing, substitute the contents of src/App.js with this code:
import './App.css';
export default perform App() {
return (
<div className="App">
<svg model="1.1" baseProfile="tiny" x="0px" y="0px" width="200px" peak="200px" viewBox="-0.5 0.5 42 42">
<path d="M22.5,6.5c0-2.31-0.439-3-3-3h-16c-2.56,0-3,0.69-3,3v29c0,2.5,0.62,3,3,3h10v-2l9-8V6.5z M5.5,8.5h12v24h-12V8.5z
M12.5,36.5h-3v-2h3V36.5z M26.061,28.109L18.05,35.4c-1.04,1.108-2.7,2.01-1.16,3.898c1.28,1.57,2.969,0.12,3.93-0.898l7.99-7.41
L26.061,28.109z M38.109,25.061l-2.27,1.959l-1.91-1.97L34.8,22.9l-2.14-2.682c0,0-4.16-3.31-9.36-0.05
c2.341-0.109,4.58,1.181,6.2,4.021l-2.189,2.121l2.75,2.629l1.799-1.619l2.201,1.93L32.3,30.93l2.14,2.16l5.761-5.58L38.109,25.061z
"/>
</svg>
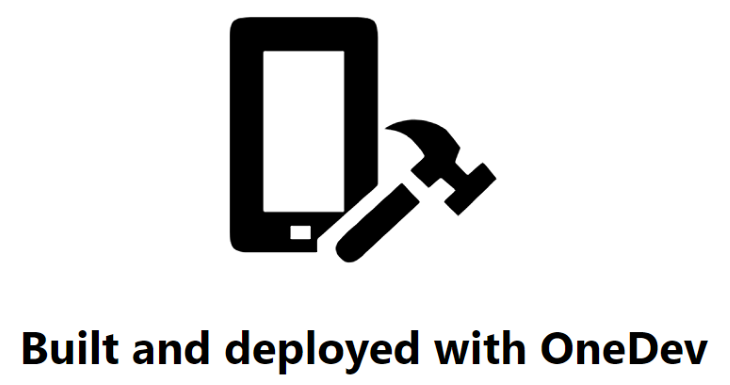
<h1>Constructed and deployed with OneDev</h1>
</div>
);
};
Delete the src/App.take a look at.js file to keep away from take a look at failures.
The create-react-app command initialized an area Git repository. Don’t overlook to commit the adjustments you simply made:
git add *
git commit -m "make issues attention-grabbing"
Run your app with npm begin to substantiate that it’s working as anticipated. It’s best to see the under icon and message:
Push your code
OneDev features a absolutely featured Git server. To push code to it, you’ll want so as to add OneDev as a distant to your native repository.
Navigate to the challenge you created beforehand. Click on on pushing an present repository and run the instructions proven towards your native repository. When prompted for credentials on git push, use the OneDev account you simply created.
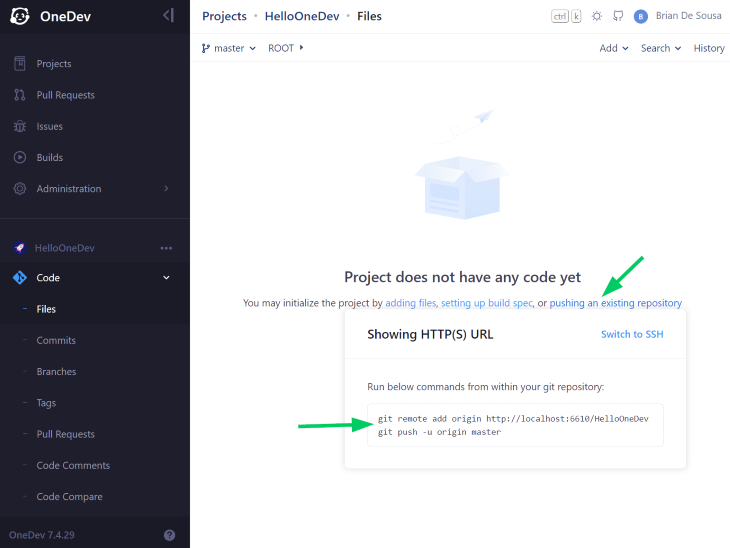
Reload the web page to see your code in OneDev. Though your code is now within the OneDev container, you should still wish to think about pushing it to an alternate, distant location for backup functions. For instance, you might add a second distant Git repository to push your code to GitHub.
Create a job to construct and take a look at your code
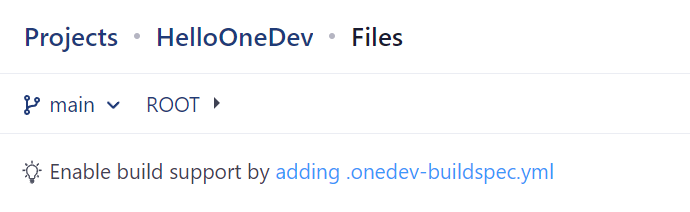
OneDev has an inbuilt automation job engine that lets you outline jobs and chain them collectively. Jobs are outlined in a construct spec file, named .onedev-buildspec.yml, that’s saved within the root of the Git repository. You possibly can edit this file as code, however it’s a lot simpler to make use of the inbuilt construct spec editor.
In case your Git repository doesn’t include a construct spec file, OneDev will immediate you to create one. To take action, click on on including .onedev-buildspec.yml:
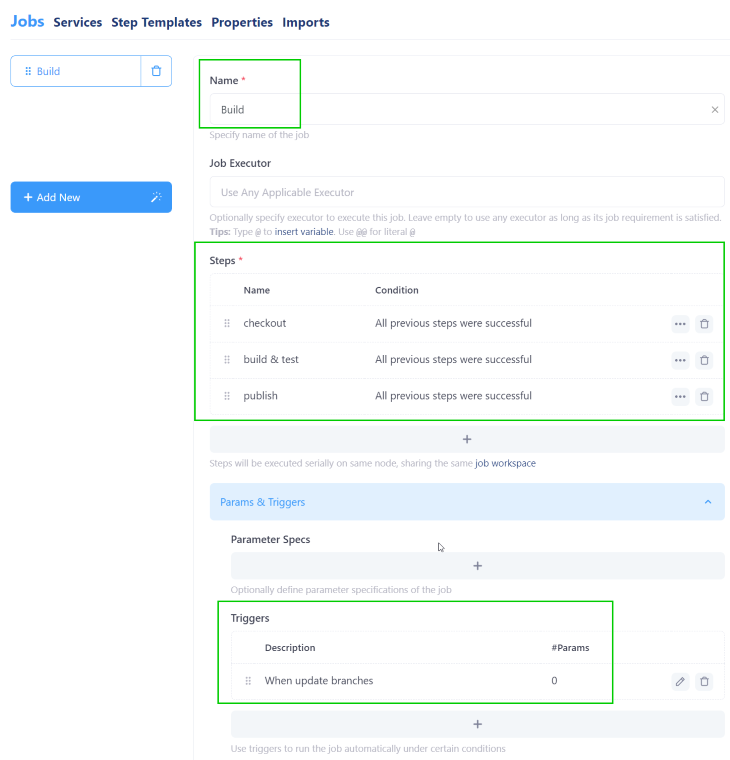
Click on the + (add) button on the Jobs tab so as to add a brand new job. Title the job Construct.
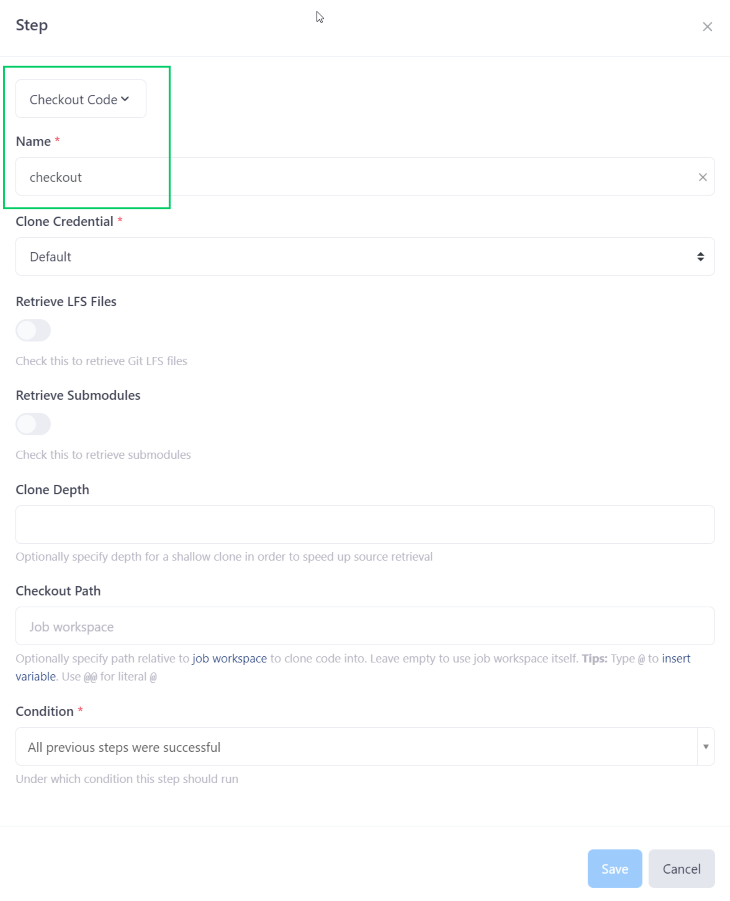
Jobs include a sequence of steps which are executed in a job workspace. Add the next three steps to take a look at the code, construct and take a look at it, and publish a construct artifact in order that it may be deployed by a subsequent deploy job.
- Add a Checkout Code step named
checkout. Go away all different choices as default:
- Add an Execute Instructions step named
construct & take a look at. Set the picture property tonode:current-alpineand the instructions to the next:
npm set up
export CI=TRUE
npx react-scripts construct
npx react-scripts take a look at --passWithNoTests
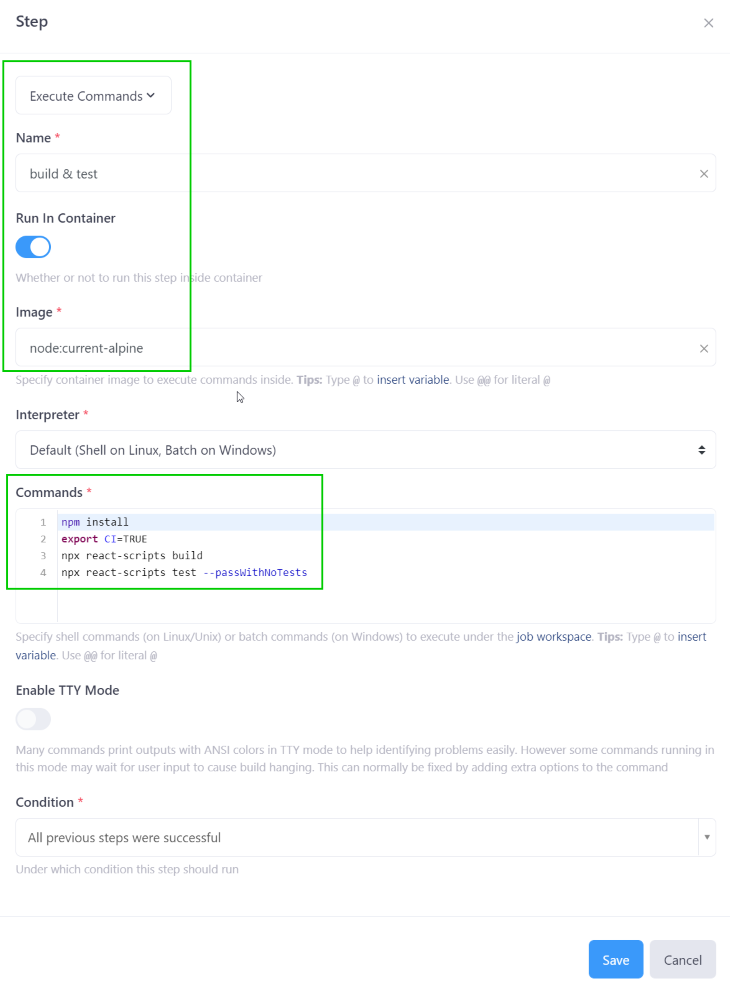
This step will create a brand new Docker container based mostly on the Node.js picture and execute the construct inside the container.
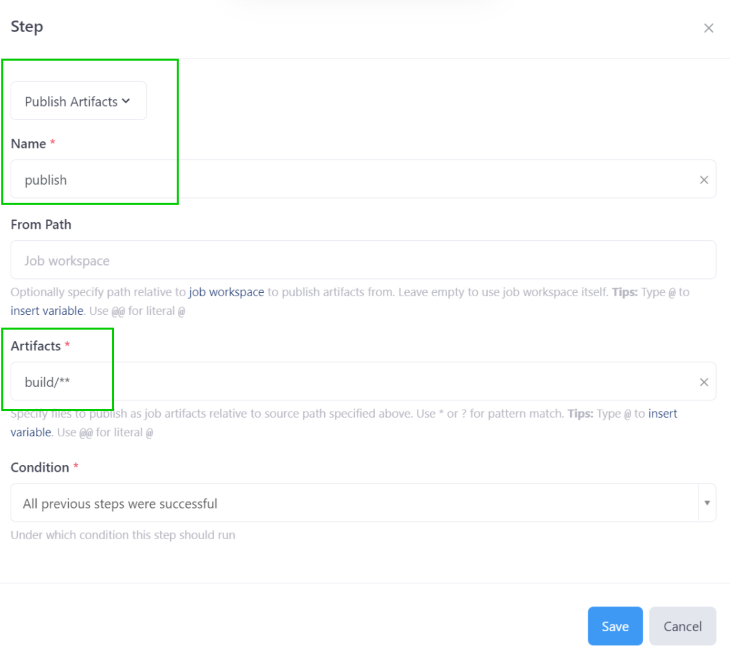
- Add a Publish Artifacts step named
publish. Set the Artifacts property toconstruct/(that is the place the construct output from the earlier step is situated). These artifacts might be out there to future jobs within the construct spec:
Now that you’ve specified all of the steps, you’ll want to inform OneDev when this job ought to run.
Below the Params & Triggers part, add a brand new department replace set off. Go away all choices as default. This job will set off each time a commit is pushed to any department.
Your job ought to appear like this to this point:
Click on the Save button to commit all of your configuration to construct spec file on the at present chosen department. After committing, the job will begin working.
After a number of moments, the job ought to full efficiently:
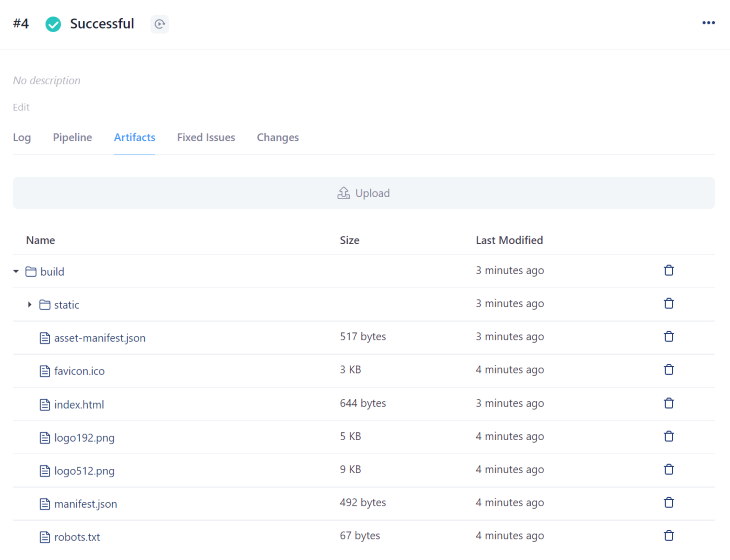
Click on the inexperienced checkmark to view the construct. Then click on the Artifacts tab to view the revealed artifacts:
Nice! You may have a profitable construct job working in OneDev. Let’s take this a step additional and arrange a deploy job.
Create a job to deploy your code
Subsequent, we’ll display the way to deploy your app to Azure utilizing the Azure CLI; we’ll present all required Azure CLI instructions and scripts.
N.B., Azure sources which are deployed by these scripts are free however, as famous beforehand, you will have to have a free Azure account
The deployment job will take the artifacts generated from the construct job and deploy them to the Azure App Service utilizing the Azure CLI. You’ll create and use a service principal on your deploy job to log in to your Azure account.
From a safety perspective, we’re following the precept of least privilege entry. You possibly can limit permissions on the service principal to solely what your deploy job completely requires.
Run the next instructions in a Bash window to create a brand new service principal. You have to to specify your individual Azure subscription ID. This command requires an area set up of the Azure CLI. Alternatively, observe these directions to create a service principal within the Azure portal:
# log in to your Azure account
az login

# set the ID of the Azure subscription to make use of
SUBSCRIPTION_ID="a123b456-7cde-8fgh-901234i5678j"

# create the service principal
MSYS_NO_PATHCONV=1 az advert sp create-for-rbac -n onedev-azure-cd --role Contributor --scopes /subscriptions/$SUBSCRIPTION_ID
Copy the worth of appId, password, and tenant from the command output. You have to these shortly.
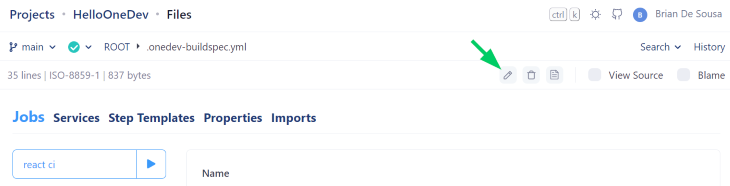
Navigate to Code > Information within the left navigation. Open .onedev-buildspec.yml and click on the Edit button to open the construct spec editor:
Use the + (add) button so as to add a brand new job named Deploy. Then, add a step to the job with the next settings:
- Set the step Sort to
Execute Command - Set the step Title to
deploy to Azure - Choose the Run in Container choice and set the Picture to
mcr.microsoft.com/azure-cli; this step will execute in a container that has the Microsoft Azure CLI put in - Add the under script to the Instructions subject, however make the next adjustments to the script:
-
- On strains 2-4, specify the small print of the service principal you beforehand created
- One line 7, specify two or three characters for use to make your Azure useful resource names globally distinctive
# fill in your service principal particulars:
APPID='YOUR_APP_ID'
PASSWORD='YOUR_PASSWORD'
TENANT='YOUR_TENANT_ID'

# Azure useful resource configuration
UNIQUE_SUFFIX='abc'
RESOURCEGROUPNAME='onedev'
LOCATION='eastus'
APPSERVICEPLANNAME="onedev-react-asp-$UNIQUE_SUFFIX"
APPNAME="onedev-react-app-$UNIQUE_SUFFIX"

# Login with service principal
az login --service-principal -u $APPID -p $PASSWORD --tenant $TENANT

# Create useful resource group if it does not exist
if [ $(az group exists --name $RESOURCEGROUPNAME) = false ]; then
    az group create --name $RESOURCEGROUPNAME --location $LOCATION
else
        echo "Useful resource group exists already: $RESOURCEGROUPNAME"
fi

# Create app service if it does not exist
appServicePlans=$(az appservice plan record -g $RESOURCEGROUPNAME --query "[?name=='$APPSERVICEPLANNAME']")
if [ $appServicePlans = "[]" ]; then
        az appservice plan create -n $APPSERVICEPLANNAME -g $RESOURCEGROUPNAME --sku F1
else
         echo "App service plan exists already: $APPSERVICEPLANNAME"
fi

# Create app if it does not exist
webapps=$(az webapp record -g $RESOURCEGROUPNAME --query "[?name=='$APPNAME']")
if [ $webapps = "[]" ]; then
         az webapp create -n $APPNAME -p $APPSERVICEPLANNAME -g $RESOURCEGROUPNAME
else
        echo "App service exists already: $APPNAME"
fi

# Deploy React app
(cd ./construct && zip -r ../app.zip .)
az webapp deploy -g $RESOURCEGROUPNAME -n $APPNAME --src-path app.zip
This script will log into Azure together with your service principal (line 14), create all required sources (strains 17-37), create a zipper archive containing your React construct artifacts (line 40), and deploy it (line 41)
-
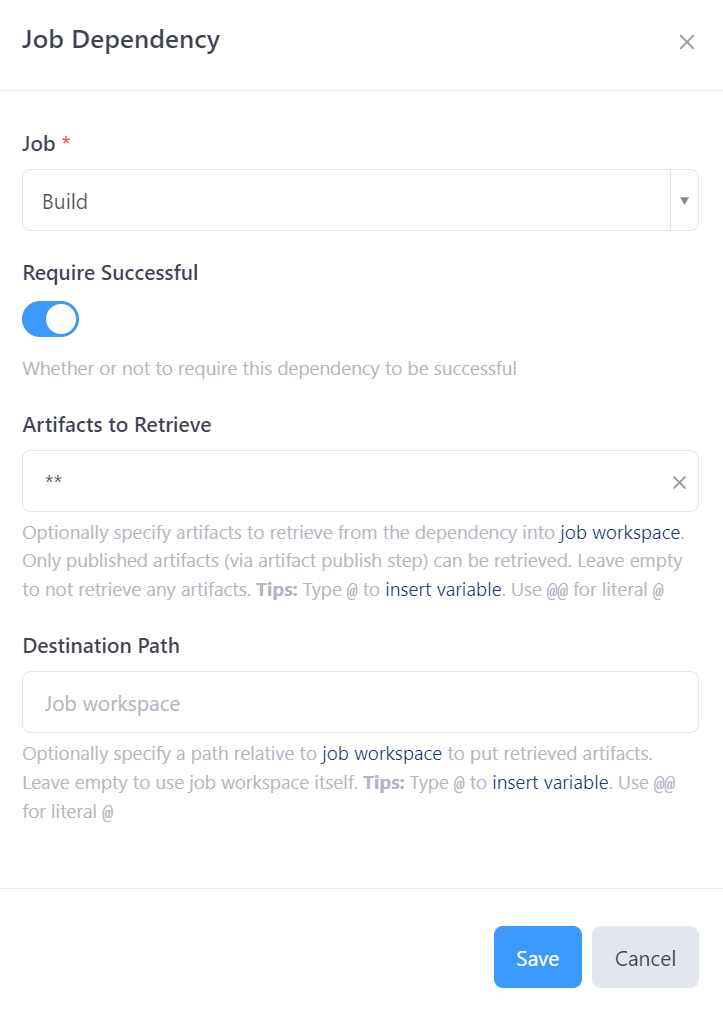
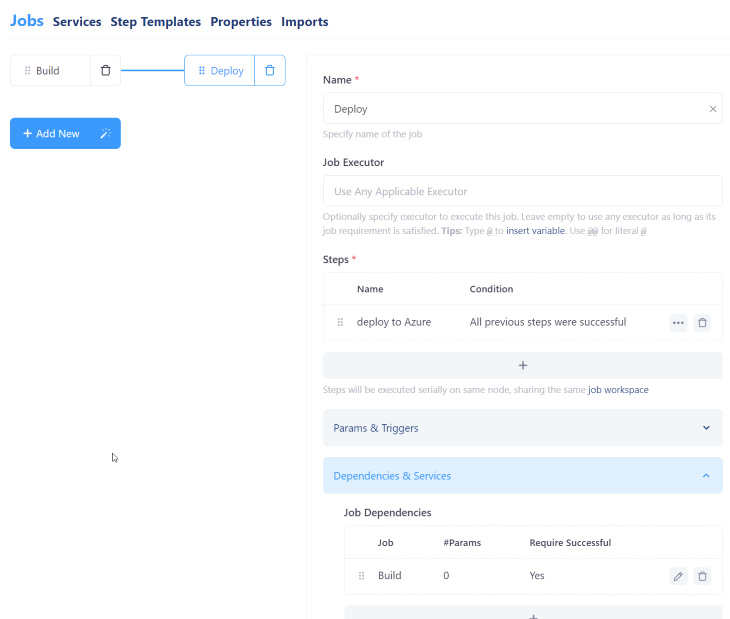
- Add a brand new Job Dependency on the Construct job. Go away all different fields as default. Go away the default worth for the Artifacts to Retrieve property to make sure that all artifacts revealed within the Construct job can be found to this job:
Lastly, you possibly can depart all different choices as default.
Your job ought to appear like this:
Click on the Save button to commit adjustments to the construct spec file.
Because you didn’t specify a set off on the Deploy job, it received’t run but. To repair that, re-open the construct spec editor and click on the Construct job to edit it.
Below the Extra Settings part, add a brand new Submit Construct Motion to run the Deploy job, however with a Situation to restrict it to adjustments dedicated to the primary department of your Git repository solely. The Submit Construct Motion ought to appear like this:
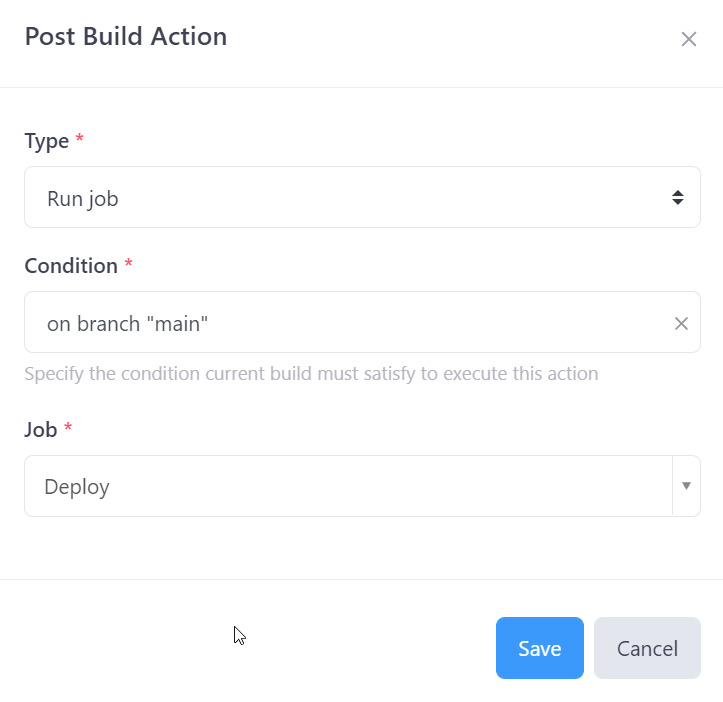
Save and commit your adjustments to the construct spec file as soon as extra.
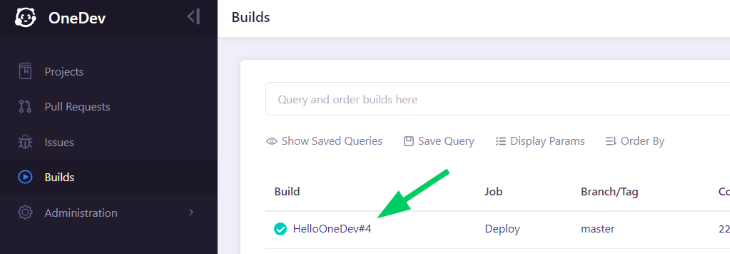
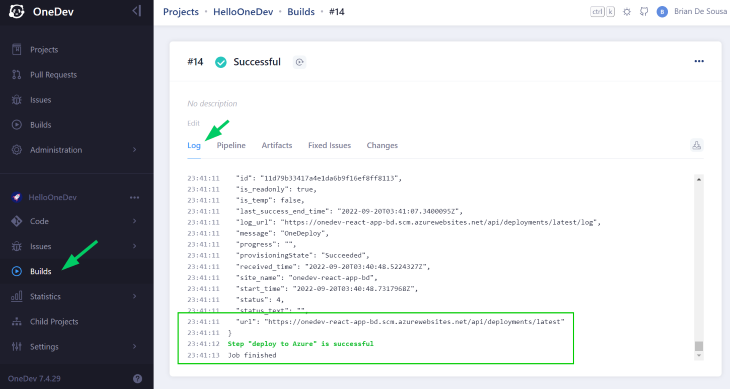
After a number of moments, your construct and deploy jobs ought to full efficiently. To view job output, click on Builds within the left navigation. To view the output of the Deploy job, click on on its construct identify, on this case, HelloOneDev#4, beneath the Construct column:
Then, scroll right down to the underside of the Log tab to see output that signifies the Azure deployment was profitable:
Now that your React app is deployed to Azure App Service, you possibly can view it within the browser. The default web site URL might be https://APPNAME.azurewebsites.internet, the place APPNAME is the worth from line 11 of the Azure CLI script used within the Deploy job.
If you end up prepared to wash up Azure sources created by the Deploy job, run the next Azure CLI instructions in a Bash window:
az group delete -g $RESOURCEGROUPNAME --yes
az advert sp delete --id $APPID
What’s subsequent?
There are many enhancements that might be made to the construct and deploy jobs. For instance, hardcoding the Azure service principal password within the Deploy job means it is going to be saved as plain textual content within the construct spec file in your GitHub repo. It’s best to create a Job Secret as a substitute to retailer the password safely in challenge settings and reference it within the construct spec file.
On this article, we arrange a easy construct, take a look at, and deploy workflow in OneDev for a React net app, however there are such a lot of extra potentialities. You possibly can mix numerous sorts of steps and jobs collectively to type extra advanced CI/CD workflows.
Remember to try OneDev’s official documentation on GitHub or the firm web site for extra inspiration.
Full visibility into manufacturing React apps
Debugging React functions might be troublesome, particularly when customers expertise points which are laborious to breed. For those who’re desirous about monitoring and monitoring Redux state, routinely surfacing JavaScript errors, and monitoring sluggish community requests and part load time, attempt LogRocket. 

LogRocket is sort of a DVR for net and cellular apps, recording actually every thing that occurs in your React app. As an alternative of guessing why issues occur, you possibly can combination and report on what state your software was in when a difficulty occurred. LogRocket additionally displays your app’s efficiency, reporting with metrics like shopper CPU load, shopper reminiscence utilization, and extra.
The LogRocket Redux middleware package deal provides an additional layer of visibility into your person periods. LogRocket logs all actions and state out of your Redux shops.
Modernize the way you debug your React apps — begin monitoring totally free.
