I ended the final article with a functioning block that reveals one factor within the editor and one other factor on the frontend. The explanation for doing so was so we may see the best way to put collectively the fundamental basis of a plugin for the Block Editor.
Now that we’re at this level, it’s a lot simpler to begin speaking about issues associated to the Editor, issues associated to the frontend, the best way to begin serializing knowledge, the best way to begin studying knowledge, and so forth. However as a result of I’m attempting to do that whole collection as a backend engineer creating blocks – which is usually delegated to frontend growth – I need to take it step-by-step.
Within the final article, I wrote:
[T]he factor we’re going to have a look at doing subsequent is including types for each the frontend and the editor and a few primary performance to the block.
As I proceed to put in writing about studying to construct block editor blocks, we’ll proceed with taking a look at including types to each the backend and the frontend.
On this article, we’re going to cowl:
- including controls to the block within the editor so we are able to management its placement inside WordPress itself (and even take away it from the editor),
- making certain what we see within the editor is what we see on the frontend
Like final time, there are going to be issues we’ve got to dive into that can require reference materials and hyperlinks to exterior sources. However contemplate that a part of the journey of studying to construct blocks.
Block Editor Blocks: Enhancing and Saving (Or Viewing)
The very first thing I need to point out is, as I wrote about within the first article, the 2 features with which we’ll be working are edit and save.
Personally, I feel the features are sadly named. It’s not that they don’t characterize what they do, however they don’t characterize simply what they do. In different phrases, they do extra than simply enable us to edit and save content material.
 A Digression on Operate Names
edit truly isn’t all of that unhealthy since that’s the operate accountable for permitting us to truly edit content material. However save is overloaded. Not solely does it learn saved content material, it renders it, too. And, as we’ll see in future posts, different performance.
So if you happen to’re used to considering when it comes to how backend performance works then you definitely wouldn’t be far off in considering one thing like:
editis for modifying the content material that’s saved in some sort of knowledge retailer,saveis the place the info is sanitized and written into mentioned knowledge retailer,learnis the place the info is retrieved and validated earlier than displaying it,- and
renderorshowis a operate for lastly displaying it to the consumer.
However that’s now how blocks work. At the very least, not on the time of this writing. As a substitute, we simply work with edit and save. In order that’s what I’m going to make use of in the remainder of the article. You may learn extra about this within the Reference materials on the finish of the article.
 The place We’re Going
For starters, we’re going to do the next:
- add performance to permit the block to be manipulated inside WordPress,
- write types to type our block,
- introduce them to the editor,
- introduce them to the frontend
The explanation for doing that is to offer a concrete instance as to how numerous information and features play a task in block growth. Granted, there could be a time by which you need one thing within the editor to look a technique and never on the frontend however the purpose I’m working in direction of with this collection of articles getting performance added to the editor and presentation the identical throughout what the creator sees and what the consumer sees.
Performance
Recall that within the final article, the edit operate regarded like this:
edit: () => {
    return (
        "That is content material from the editor."
    );
},
And this was adequate for the demo however it solely renders a string. Let’s make it somewhat extra superior such that it renders an HTML component. To that although, we’re going to should get extra into WordPress-specific block growth.
As common, I’ll hyperlink to all of this within the reference materials on the finish of the article however I’ll clarify every step as I work by means of it.
First, I’m going so as to add some performance to my block. Particularly, I’m going to the block the flexibility to be eliminated, to be moved, or to extra typically be modified the within the context of the editor.
To this, I would like so as to add just a few issues. On the high of index.js, I would like:
import { useBlockProps } from '@wordpress/block-editor';
Then, within the edit operate, replace it to appear like this:
edit: () => {
    const blockProps = useBlockProps({
        className: 'tm-block-demo-container'
    });
    return (
        <div {...blockProps}>
            That is content material from the editor.
        </div>
    );
}
Clearly, there are some things within the code above that aren’t but defined (resembling blockProps and className) however I’ll get the reason momentarily.
Types
Let’s introduce some primary types to the Editor. For instance, let’s have the block embrace the next:
- a background coloration,
- a border and border coloration,
- a selected font coloration,
- a selected width,
- some padding
First, let’s create an index.scss file within the src listing. This file will belong with different information like block.json, block.php, and index.php. Earlier than including any types, although, we want to verify we’ve got the correct selector.
So at this level, go forward and write the next code in index.scss:
.tm-block-demo-container {
    coloration: #fff;
    background: #0d63fd;
    border: 1px stable #0a58ca;
    font-weight: daring;
    padding: 0.5em;
    width: 100%;
}
Then in the identical file, embrace the next (I like to position it above the registerBlockType operate name):
import './index.scss';
The Code Thus Far
Notice at this level, the next is going on within the code:
- We’re now utilizing
@wordpress/block-editorwhich is a package deal that enables us to work with blocks inside the context of the block editor (it appears a bit redundant, I do know ).
). - I’m passing a category title to the
useBlockPropsoperate inside an object, - I’m including the
blockPropsto thedivcomponent together with the JavaScriptunfoldsyntax, - I’ve take away the quotes type the string as a result of it’s customary textual content that shall be rendered and I’d choose it not embrace quotes.

It is best to have the ability to construct the property and see some adjustments within the editor resembling controls and, if you happen to open your developer instruments, you’ll see that there’s a customized class title included along with your block.
I’ll share a concrete clarify of this in a second together with full code and screenshots, however I need to get into the reason first.
Rationalization
Recall from the primary publish that we’re utilizing JavaScript destructuring in opposition to to realize entry to useBlockProps from the @wordpress/block-editor package deal. This specific operate permits us to learn the props right into a variable (which I’ve as const blockProps above) which, in flip, offers the Block Editor the flexibility to govern the block inside the editor.
Wait, although. What are props and why are we seeing them all through all of this block-specific code? They’re a central concept to React.
They’re a part of the idea of reusability. Props take the place of sophistication attributes and assist you to create constant interfaces throughout the part hierarchy.
And since we’re passing a customized className into the operate, it can get added to the div, as nicely.
After specifying the category title however earlier than creating the block, we’re importing the types that shall be utilized to the block. Whether or not or not the types are already written doesn’t matter; the contents of the file shall be included. So if the file is empty, nothing shall be there; if the file consists of types, they are going to be utilized (assuming that you’ve got what it is advisable goal your block – extra on this in a second).
Anyway, the entire {...blockProps} is what is going to convey up the controls so we are able to transfer or delete the block. Extra subtly, this additionally provides extra attributes to the component in order that WordPress can manipulate it in no matter approach it wants inside the context of the applying.
Lastly, the className we’ve specified is what is going to give us the flexibility to type the component as a result of it offers us a category title with a selected selector that we are able to goal utilizing CSS. That is purely optionally available, although. Living proof: Perhaps you desire a block that doesn’t want any particular concentrating on. In that case, don’t move something to the operate.
A Working Demo
Assuming that you simply’ve utilized the entire code that I’ve shared above, your index.json ought to at the moment appear like this:
import { registerBlockType } from '@wordpress/blocks';
import { useBlockProps } from '@wordpress/block-editor';

import metadata from './block.json';
const { title } = metadata;

import './index.scss';

registerBlockType(title, {
    edit: () => {
        const blockProps = useBlockProps({
            className: 'tm-block-demo-container'
        });
        return (
            <div {...blockProps}>
                That is content material from the editor.
            </div>
        );
    },
    save: () => {
        return (
            "That is content material from the frontend."
        );
    }
});
The index.scss file ought to embrace the next:
.tm-block-demo-container {
    coloration: #fff;
    background: #0d63fd;
    border: 1px stable #0a58ca;
    font-weight: daring;
    padding: 0.5em;
    width: 100%;
}
And the final factor we have to replace is block.php in order that it truly consists of the Block Editor property that we see. To do that, add the next to that file:
add_action(
    'enqueue_block_assets',
    operate () {
        wp_enqueue_style(
            'tm-block-demo-styles',
            plugins_url('construct/index.css', dirname(__FILE__)),
            ['wp-edit-blocks']
        );
    }
);
This leverages the enqueue_block_assets operate for including the types listed above.
Now, in your terminal, subject the next command:
$ npm run construct
And assuming you haven’t modified something along with your set up for the reason that final article, you need to see one thing like this in your editor:
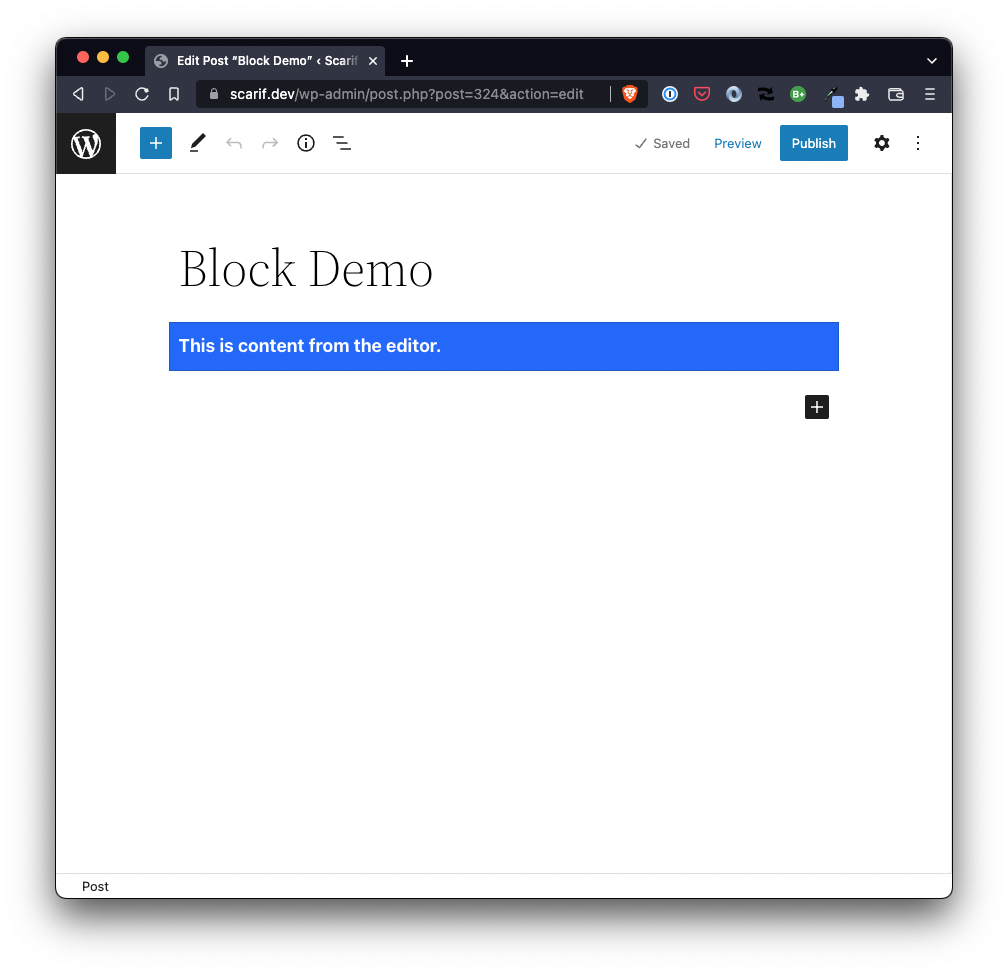
However the frontend nonetheless seems like this:
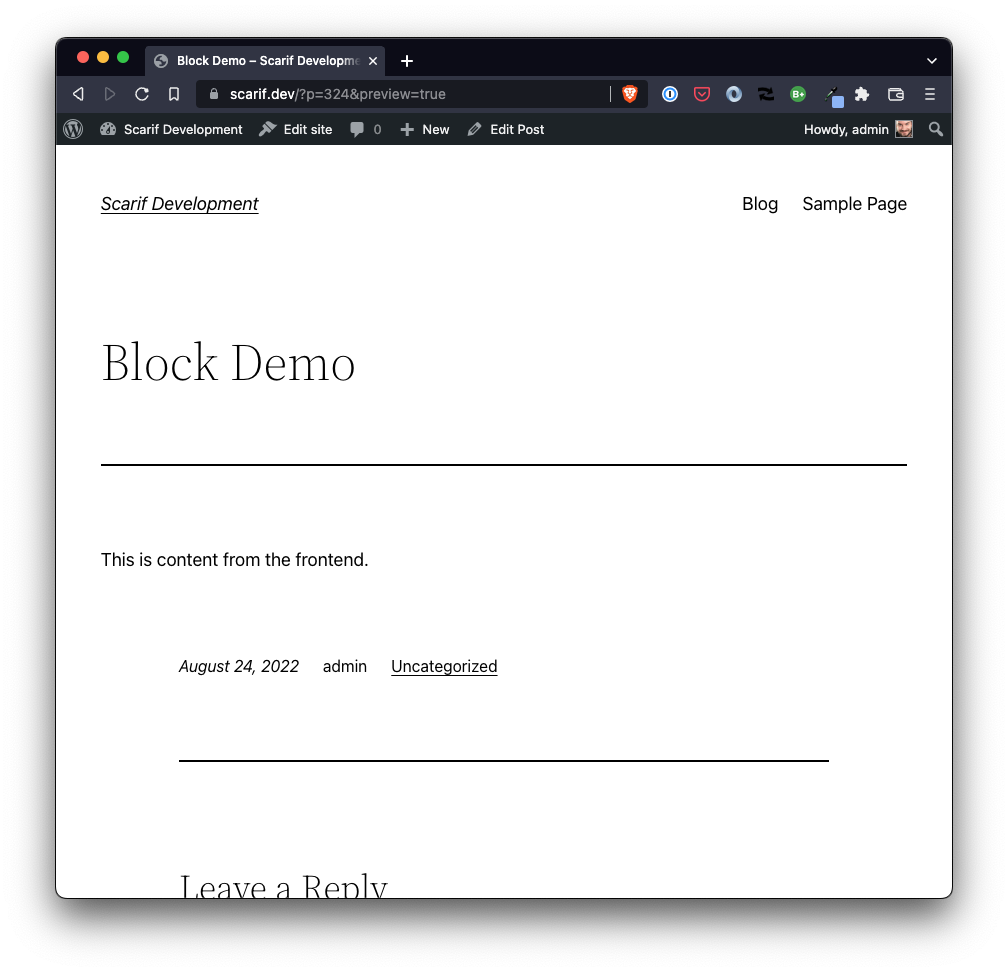
So what now?
The Frontend
The good factor is that we’ve already talked about each performance, implementation and the reason so including related performance to the frontend is trivial. At the very least at this level.
So the factor we have to do now could be add the code mandatory for the frontend.
For this instance, it’s not a lot completely different from what we have already got. The truth is, I’d argue that it’s somewhat less complicated since there aren’t precise controls that the frontend. As a substitute, it’s a matter of updating the save operate to replicate the textual content that’s within the editor (must you select to do that) and to use the correct types.
And keep in mind, to use the types we want to verify:
- we’re together with the proper
blockPropsso the category title is added for the CSS, - and we’re included the stylesheet on the frontend of the block.
Notice that on this instance, I’m not going so as to add performance for modifying the textual content. I’ll do this within the subsequent article. I’ll, nevertheless, be introducing the flexibility to verify the frontend seems like what we see within the editor and that the frontend renders no matter textual content is ready within the code.
To do that, let’s add the next to the save operate simply above the return assertion:
const blockProps = useBlockProps.save();
Discover that is similar to what’s completed in edit with one exception: We’re retrieving values from useBlockProps by way of its save operate. However what does that operate truly do?
This ensures that the block class title is rendered correctly along with any HTML attribute injected by the block helps API.
In different phrases, no matter attributes are injected into the block by way of the editor are utilized to the block when rendered. That is far more helpful when block begin getting extra difficult.
For now, although, we merely have a brand new class title to introduce. So, as soon as once more with the unfold syntax, let’s replace the save operate:
save: () => {
    const blockProps = useBlockProps.save();
    return (
        <div {...blockProps}>
            That is content material from the frontend.
        </div>
    );
}
It will apply sure selectors that we are able to goal by way of CSS however we’ll have to replace the index.scss to guarantee that we achieve this. In the event you view the block within the frontend by way of your developer instruments, you’ll discover that the category title on the block is .wp-block-tm-tm-block-demo.
So replace index.scss to appear like this:
.tm-block-demo-container,
.wp-block-tm-tm-block-demo {
    coloration: #fff;
    background: #0d63fd;
    border: 1px stable #0a58ca;
    font-weight: daring;
    padding: 0.5em;
    width: 100%;
}
Since we’ve already added an nameless operate for including our stylesheet to the editor utilizing a hook designed only for that, we get the performance on the frontend as nicely.
Now run the next command in your terminal to replace the property:
$ npm run construct
Then add a brand new copy of the block to your editor. It is best to see the next:
Now both click on Save Draft or Publish and consider the publish in your browser. While you do, you need to see precisely what you see within the editor aside from the content material of the block itself:
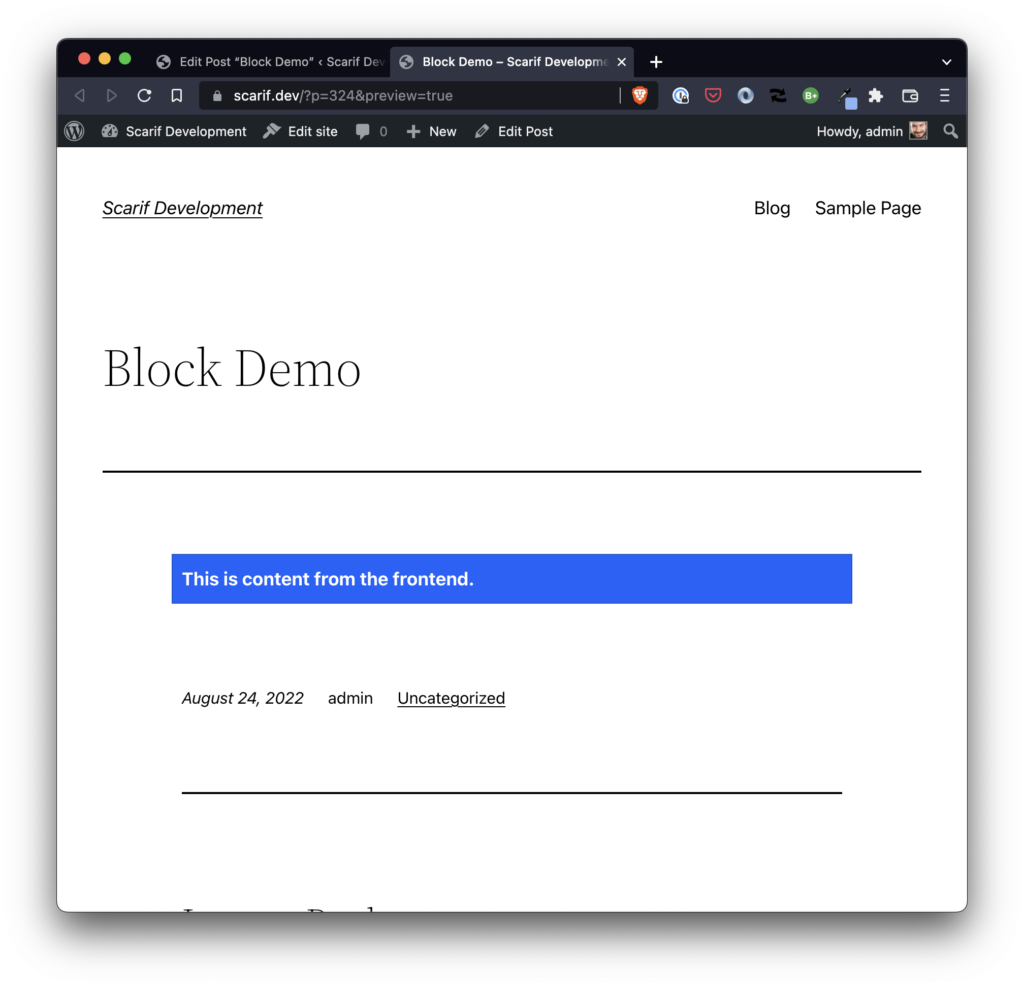
Discover right here the one distinction is that the general public going through model of the block reads: “That is content material from the frontend.” The editor variation of the block reads “That is content material from the editor.”
 TODO
TODO
Within the final article, I outlined out to arrange the fundamental performance of a block in order that it may be added to the Editor and rendered on the frontend. This text lined the best way to type the article in addition to add some customary performance and ensure the block seems the identical each within the editor on the frontend and the backend.
Within the subsequent article, we’ll begin speaking about how we are able to edit textual content inside the context of the Block Editor, the best way to save the adjustments, after which view them on the frontend.
 Reference
- Edit and Save. When registering a block, the
editandsavefeatures present the interface for the way a block goes to be rendered inside the editor, the way it will function and be manipulated, and the way will probably be saved. @wordpress/block-editor. This module permits you to create and use standalone block editors.enqueue_block_assets. Fires after enqueuing block property for each editor and front-end. This permits us so as to add our personal property after WordPress has added its personal property.- How Props Work in React – A Newbie’s Information. Props are used to retailer knowledge that may be accessed by the kids of a React part.
- Unfold Syntax . Unfold syntax permits an iterable, resembling an array or string, to be expanded in locations the place zero or extra arguments (for operate calls) or parts (for array literals) are anticipated.
- Block Wrapper Props. This ensures that the block class title is rendered correctly along with any HTML attribute injected by the block helps API.
