Ts.ED is a Node.js framework for constructing scalable server-side purposes with a easy setup. Developed with TypeScript, Ts.ED lets you construct your purposes with object-oriented programming, purposeful programming, or decorators. You possibly can both select between the entire out-of-the-box venture or customise your venture your self.
On this article, we’ll learn to construct a server-side utility with Ts.ED and MySQL by constructing a easy weblog publish database. To comply with together with this tutorial, you’ll want the next put in in your machine:
- Node.js v14.x
- MySQL database
- Postman
The builders of Ts.ED have supplied wealthy documentation that will help you get arrange shortly. I positively suggest checking it out earlier than getting began with the tutorial. As well as, the total code for this tutorial is accessible on GitHub. Be happy to clone it to comply with alongside. Let’s get began!
Desk of contents
Ts.ED advantages
Earlier than we start coding, let’s think about among the the explanation why Ts.ED is a good Node.js framework for internet builders. For one, it lets you create REST APIs sooner with OpenSpec and JSON Schema complaints. The wealthy CLI software lets you create a pre-configured server, saving you a while, and it has a lot of plugins that you would be able to select from to create your stack.
Ts.ED is a class-based framework, subsequently, controllers, pipes, and middlewares are created as a category. Lastly, it has some embedded options that make testing your purposes a lot simpler. As we transfer via the tutorial, we’ll see these options in motion. Let’s get began!
Scaffold a brand new venture
To arrange our new venture, we’ll first want to put in the Ts.ED CLI with the command beneath:
npm set up -g @tsed/cli
As soon as the set up is full, create a folder and initialize a brand new venture with the next command:
mkdir tsed-demo && cd tsed-demo
tsed init .
The command above will create a brand new folder known as tsed-demo. The tsed init . command will immediate you to pick your required configurations. Choose the next:
- Goal platform: Categorical
- Structure for the venture: Ts.ED
- Conference file styling: select Ts.ED
- The options wanted on your venture: Database
- The ORM for the database: TypeORM
- The TypeORM to put in: MySQL
- The package deal supervisor: Yarn
Ts.ED will create a brand new venture within the root listing of the folder, denoted by the . within the init command. Wait whereas Yarn installs the packages required to run the appliance; as soon as the set up is accomplished, Ts.ED will create the next folder construction:
tsed-demo
┣ node_modules
┣ src
┃ ┣ config
┃ ┃ ┣ envs
┃ ┃ ┃ ┗ index.ts
┃ ┃ ┣ logger
┃ ┃ ┃ ┗ index.ts
┃ ┃ ┗ index.ts
┃ ┣ controllers
┃ ┃ ┗ relaxation
┃ ┃ ┃ ┣ HelloWorldController.ts
┃ ┃ ┃ ┗ index.ts
┃ ┣ datasources
┃ ┃ ┗ MysqlDatasource.ts
┃ ┣ Server.ts
┃ ┗ index.ts
┣ .DS_Store
┣ .barrelsby.json
┣ .dockerignore
┣ .gitignore
┣ Dockerfile
┣ README.md
┣ docker-compose.yml
┣ package deal.json
┣ processes.config.js
┣ tsconfig.compile.json
┣ tsconfig.json
┗ yarn.lock
Let’s overview a very powerful information:
Server.ts: The primary server configuration file the place all of the configurations required to run the appliance are configuredindex.ts: The basis file the place the appliance is bootstrappedsrc/config: The configuration folder for every Ts.ED venturesrc/datasource: The configuration for the chosen database administration systemsrc/controllers/relaxation: The controllers folder. By default, Ts.ED listens on the/relaxationendpoint to entry the routes within the controllers
Replace the datasource
With the venture created, let’s create and connect with our database. Open the MySQL shell with the command beneath:
mysql -u root -p
Then, create a weblog database with the command beneath:
CREATE DATABASE weblog;
Now, open the src/datasources/MysqlDatasource.ts file and replace the information supply with the code snippet beneath:
...
export const MysqlDataSource = new DataSource({
  kind: "mysql",
  entities: [],
  host: "localhost",
  port: 3306,
  username: "YOUR DATABASE USERNAME",
  password: "YOUR DATABASE USERNAME",
  database: "weblog",
  synchronize: true,
});
...
Within the configuration above, we modified the worth of the information supply to that of our database. We included synchronize: true to permit Ts.ED to generate tables for our database.
Create the entity mannequin
Let’s create an entity mannequin for our weblog database. We are able to accomplish that simply with the command beneath:
tsed generate
Choose mannequin from the listing of suppliers. The command ought to generate a fashions/BlogService.ts file within the src folder. Subsequent, create a mannequin with the code snippet beneath:
import {Property} from "@tsed/schema";
import {Column, Entity, PrimaryGeneratedColumn, CreateDateColumn, UpdateDateColumn} from "typeorm";

@Entity()
export class BlogModel {
  @Property()
  @PrimaryGeneratedColumn()
  id: string;

  @Column()
  title: string;

  @Column()
  content material: string;

  @Column()
  coverImage: string;

  @Column()
  @CreateDateColumn()
  createdAt: Date;

  @Column()
  @UpdateDateColumn()
  updatedAt: Date;
}
To create an entity, we imported the Entity and Column decorators. PrimaryGeneratedColumn will generate a main key for the entity, and CreateDateColumn and UpdateDateColumn will create, auto-generate, date, and replace the date.
Extra nice articles from LogRocket:
Subsequent, you’ll have to make the BlogModel accessible within the entities array within the information supply:
export const MysqlDataSource = new DataSource({
  ...
  entities: [BlogModel],
  ...
});
Configure Multer
Now, let’s configure Multer to permit customers to add the duvet photos for every weblog saved within the database. Ts.ED has the configuration for this setup already. Merely head over to the Server.ts file and append Multer to the configurations with the code snippet beneath:
...
import { diskStorage } from "multer";

...
@Configuration({
  ...
  multer: {
    storage: diskStorage({
      vacation spot: be part of(course of.cwd(), "./public/uploads"),
      filename: (req, file, cb) => {
        const ext = file.mimetype.break up("https://weblog.logrocket.com/")[1];
        cb(null, `${generateName(15)}-${Date.now()}.${ext}`);
      }
    })
  },
  ...
There are a number of methods to add information utilizing Multer. For this demonstration, we’ll retailer the information within the disk storage. We imported diskStorage from Multer, which has been mechanically put in for us by Ts.ED through the venture setup.
Then, we specified the situation within the file system the place the file might be saved within the server and modified the filename of the file by making a generateName operate. The generateName operate will generate 15 random string characters for every file uploaded and append the date to when the file was uploaded to the filename.
Now, create the generateName operate with the code snippet beneath:
operate generateName(size: quantity) {
  let str="";
  const characters="ABCDEFGHIJKLMNOPQRSTUVWXYZabcdefghijklmnopqrstuvwxyz0123456789";
  const charactersLength = characters.size;
  for (let i = 0; i < size; i++) {
    str += characters.charAt(Math.ground(Math.random() * charactersLength));
  }
  return str;
}
You possibly can see different Multer choices within the Ts.ED docs.
Create the app service
With the mannequin entity created, let’s generate a service utilizing the generate command beneath:
tsed generate service
Then, identify the service weblog and hit the enter key. Ts.ED will create one other folder known as providers with a BlogService.ts file. Now, replace the file with the code snippet beneath:
import { Injectable } from "@tsed/di";
import { Inject } from "@tsed/di";
import { MYSQL_DATA_SOURCE } from "../datasources/MySqlDataSource";
import { DataSource } from "typeorm";
import { BlogModel } from "../fashions/BlogModel";

@Injectable()
export class BlogService {
    constructor(@Inject(MYSQL_DATA_SOURCE) non-public dataSource: DataSource) { }

    async getAll(): Promise<BlogModel[]> {
        return await this.dataSource.getRepository(BlogModel).discover();
    }

    async create(weblog: BlogModel): Promise<BlogModel> {
        return await this.dataSource.getRepository(BlogModel).save(weblog);
    }


    async getById(id: string): Promise<any> {
        return await this.dataSource.getTreeRepository(BlogModel).findOne({ the place: { id } });
    }

    async replace(id: string, weblog: BlogModel): Promise<any> {
        return await this.dataSource.getRepository(BlogModel).replace(id, weblog);
    }

    async delete(id: string): Promise<any> {
        return await this.dataSource.getRepository(BlogModel).delete(id);
    }

}
Within the code snippet above, we injected our information supply to the constructor utilizing the Inject decorator. There, we created an occasion variable from the DataSource class, offering entry to the getRepository methodology, which then supplies the strategies we have to carry out CRUD operations on our database.
Create app controllers
Now, we want our API routes to make use of the CRUD service we created for this utility. To do this, we have to generate a controller with the command beneath:
tsed generate controller
Identify the controller weblog, choose relaxation as the popular director, choose /weblog as the basis endpoint, and hit the enter button. Ts.ED will create a BlogService file contained in the controller’s folder.
Subsequent, create the controller for the BlogService with the code snippet beneath:
import { Controller, Inject } from "@tsed/di";
import { Get, Publish, Put, Delete } from "@tsed/schema";
import { BlogService } from "src/providers/BlogService";
import { BlogModel } from "src/fashions/BlogModel";
import { BodyParams, PathParams } from "@tsed/platform-params";
import { MultipartFile, PlatformMulterFile } from "@tsed/widespread";

@Controller("/weblog")
export class BlogController {
  constructor(@Inject(BlogService) non-public blogService: BlogService) { }

  @Get("https://weblog.logrocket.com/")
  get(): Promise<BlogModel[]> {
    return this.blogService.getAll();
  }

  @Publish("https://weblog.logrocket.com/")
  create(@MultipartFile("file") file: PlatformMulterFile, @BodyParams() weblog: BlogModel): Promise<BlogModel> {
    weblog.blogImage = file.filename;
    return this.blogService.create(weblog);
  }

  @Get("/:id")
  getOne(@PathParams("id") id: string): Promise<BlogModel> {
    return this.blogService.getById(id);
  }

  @Put("/:id")
  replace(@PathParams("id") id: string, @BodyParams() weblog: BlogModel): Promise<BlogModel> {
    return this.blogService.replace(id, weblog);
  }

  @Delete("/:id")
  delete(@PathParams("id") id: string): Promise<BlogModel> {
    return this.blogService.delete(id);
  }
}
Within the code snippet above, we injected the BlogService class in our BlogController constructor and created a non-public occasion to the category, enabling entry to the strategy outlined within the BlogService.
Then, we outlined the CRUD routes for the appliance utilizing the GET, POST, PUT, and DELETE decorators. Ts.ED supplies us with two different decorators, PathParams and BodyParams. These two decorators allow us to parse the information from the request physique and the request parameters.
Then, to add information with Multer, we imported the MultipartFile and PlatformMulterFile decorators supplied by Ts.ED.
Serve static information
To serve the duvet photos and information in our utility, we have to configure the appliance to serve static information. We’ll additionally do that within the Server.ts file with the code snippet beneath:
...
@Configuration({
  ...
  statics: {
    "/static": [
      {
        root: `./public`,
        // Optional
        hook: "$beforeRoutesInit" // Load statics on the expected hook. Default: $afterRoutesInit
        // ... statics options
      }
    ]
  }
  ...
Ts.ED makes use of the statics object to configure static information. This object takes a URL path as a required argument. So, we entry the static information from the /static route. The URL path additionally takes an array as key-value pairs. On this array, we specified the situation of the static information. For this demonstration, we would like them within the public folder, which we’ll create shortly.
Now, create a public folder within the root listing of the venture. You could find extra static choices within the docs.
Check the appliance
Now, let’s check our utility utilizing Postman. Earlier than that, begin the server with the command beneath:
yarn begin
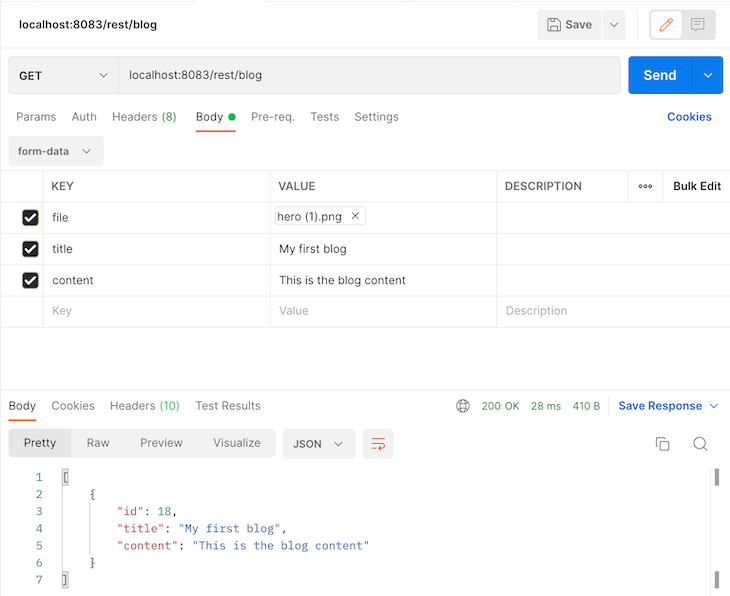
The command above will begin the server on port 8083, which is the default port configured for Ts.ED initiatives. Subsequent, open Postman and check the create route, as proven within the screenshot beneath:

If you happen to open the public and uploads folders, you need to see the uploaded cowl picture:

Then, check the get-all path to get all of the blogs, as proven beneath:
Be happy to check out the opposite routes.
Conclusion
On this tutorial, we explored Ts.ED by constructing a easy weblog database utility. Ts.ED is a contemporary Node.js framework for creating scalable server-side purposes.
With Ts.ED, you may develop server-side purposes with ease and velocity. You possibly can construct and handle small-scale purposes like web sites and blogs with out having to do any preliminary server configurations. Be happy to learn extra about Ts.ED from the official documentation. Blissful coding!
200’s solely  Monitor failed and gradual community requests in manufacturing
Deploying a Node-based internet app or web site is the straightforward half. Ensuring your Node occasion continues to serve assets to your app is the place issues get more durable. If you happen to’re fascinated with making certain requests to the backend or third social gathering providers are profitable, strive LogRocket.  https://logrocket.com/signup/
LogRocket is sort of a DVR for internet and cell apps, recording actually every part that occurs whereas a person interacts along with your app. As an alternative of guessing why issues occur, you may combination and report on problematic community requests to shortly perceive the basis trigger.
LogRocket devices your app to document baseline efficiency timings reminiscent of web page load time, time to first byte, gradual community requests, and likewise logs Redux, NgRx, and Vuex actions/state. Begin monitoring without cost.
