
Being on the Cloud Advocate group at Microsoft, we’re at all times seeking to empower each developer to attain extra on Azure. A method of doing that is by bringing you hands-on content material to ship end-to-end situations utilizing cloud-native and open supply applied sciences.
My colleague on the Cloud Native group, Aaron Wislang has been cooking up a bunch of labs in our Azure Open Supply Labs repo and one space we have been collaborating on is inside the Azure Linux VM house.
You probably have accomplished any work with Azure VMs or have gone by a few of our Microsoft Study content material, you could be acquainted with a number of the choices you must connect with your Linux VM and we cowl a number of of the choices within the lab. One of many best methods to get began is to assign a public IP, open inbound entry to port 22 in your VM, and entry the VM utilizing SSH. It will definitely get the job accomplished, however what in the event you wanted to securely connect with your VM with out exposing it to the web?
On this put up, I’ll stroll you thru one possibility within the linux/vm lab to securely connect with your Linux VM utilizing Open Supply Software program referred to as Tailscale and its Tailscale SSH characteristic.
What’s Tailscale?
Tailscale has glorious documentation on what it’s and the way it works. I extremely suggest you go to their web site to study what makes them particular. At a high-level, Tailscale supplies a peer-to-peer mesh VPN community that enables your gadgets to be added to a non-public community and be accessible from anyplace on this planet. The gadgets that you just add to your non-public community talk with one another over an encrypted point-to-point connection which makes use of the open supply WireGuard protocol. Their resolution gives a “coordination” server (managed by Tailscale) which acts as a management aircraft that enables nodes (your gadgets) in your non-public community to share metadata wanted to determine community connections.
Tailscale additionally gives the power to combine with third occasion id suppliers which might allow groups and enterprises to supply 2-factor authentication and even deal with increased stage safety considerations utilizing Entry Management Lists (ACLs) and safety insurance policies. Once more, please check with this doc for extra data.
On Tailscale’s homepage, they’ve revealed a diagram on how VM connectivity can appear to be with out Tailscale:
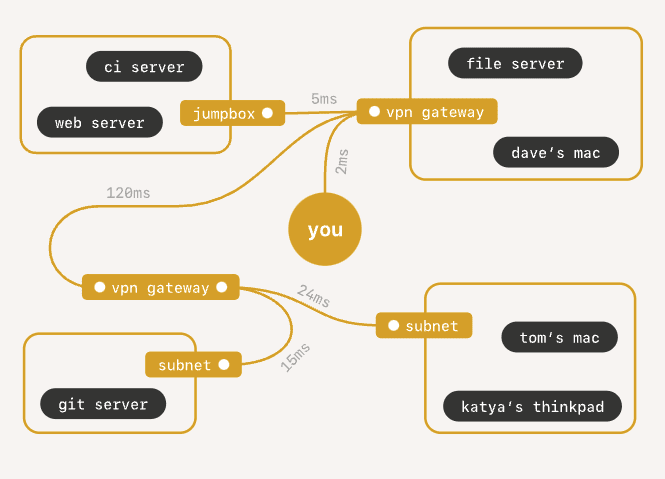
…and here’s a diagram on how VM connectivity seems to be with Tailscale:

Appears a lot easier with Tailscale, proper?
The rationale why I discover Tailscale to be an intriguing resolution is that it’s easy to setup and can be utilized in quite a lot of environments starting from enterprises (with regulatory compliance wants) to hobbyists. Inside a lab setting, it is a nice match for growing safety whereas staying inside price range (particularly my tiny price range 😆).
Tailscale is obtainable on a “freemium” pricing mannequin which suggests for private use, I can use it totally free. I like free issues so this makes it very easy to get began.
Let’s dive in.
Azure Linux VM Lab
Earlier than we start with the lab, remember to evaluate this doc to see all of the endorsed Linux distributions obtainable on Azure. You may selected to make use of any of those distributions for the lab. We opted to go for the ever present Ubuntu picture by Canonical.
If you could discover a totally different Linux picture, you possibly can check with this doc which covers methods to discover particular Azure VM photographs utilizing Azure CLI.
Most of the Azure-endorsed Linux distros are cloud-init-enabled however it’s best to seek the advice of this doc to make sure it’s obtainable on the distro you might be focusing on. We shall be utilizing a cloud-init template to bootstrap the VM with Tailscale put in and configured.
Getting began
Ensure you have the next instruments:
Utilizing your net browser, navigate to https://aka.ms/oss-labs, clone the repo to your native machine, then open the repo utilizing VS Code.
You probably have a dockerd container runtime operating domestically (i.e., Docker Desktop or Rancher Desktop), you possibly can open the repo in a Dev Container (your also needs to see a immediate asking if you would like to reopen the folder in a contianer). This Dev Container contains all of the instruments you could work with the HOL content material.
If you wish to work utterly within the cloud and have entry to GitHub Codespaces, you possibly can open the repo utilizing Codespaces by clicking within the “<> Code” button then clicking on the “Create codespaces on fundamental” button (this may also use the Dev Container configuration talked about above).

The Dev Container incorporates lots of tooling so the preliminary construct of the container can a couple of minutes. Use this time to go get your self a beverage ☕️
As soon as you might be within the repo, use a terminal and drop into the linux/vm listing.
Right here you will notice a README.md file which is your “lab information” and Aaron has additionally included a linked to a fast video walkthrough of the Tailscale implementation utilizing the Azure Portal.
I personally prefer to deploy all my Azure assets utilizing Infrastructure-as-Code (IaC) tooling, we’ll stroll by Azure Bicep implementation and use Azure CLI to deploy the template.
For those who open and look by the vm.bicep file, you will discover code to deploy Azure assets and some cloud-init templates. This lab is supposed for use as a “base” lab for different Azure Linux VM labs, so it’s written to be configurable utilizing parameters. There may be one parameter specifically to convey consideration to. The parameter referred to as cloudInit is used to find out which cloud-init template shall be used. The README.md file covers how every worth is used. For now, we’ll deal with utilizing the tailscale-private possibility (which is Possibility #4 within the lab information) since I wish to deploy a Linux VM in Azure and never expose any of it to the general public web (there’s one exception and I am going to clarify later).
Tailscale
The vm.bicep file has every little thing we have to deploy our Azure VM. All we actually want is a pre-existing Azure Useful resource Group, and to go in some parameters to the deployment template. Within the lab information, we want the next variables set:
-
RESOURCE_GROUP– Title of your pre-provisioned useful resource group -
VM_NAME– Title your new VM -
ENV– Content material in your env.json file loaded as an setting variables for thecloud-initscript to make use of
These values shall be handed into the command that can deploy the Bicep template.
Setting the RESOURCE_GROUP and VM_NAME are straightforward… simply make one thing up and set as setting variables.
The ENV is attention-grabbing as you’ll need to create a env.json file and fill in some JSON content material that appears like this:
{ "tskey": "<YOUR_TAILSCALE_AUTH_KEY>" }
You’re anticipated to have a Tailscale authentication key. You most likely do not have one but, so let’s go get one…
Including your first tailnet system
The steps under are additionally documented in Tailscale’s quickstart information.
In your browser, navigate to https://login.tailscale.com/login to log into the Tailscale Admin console
Select your favourite authentication supplier (I selected GitHub).

Additionally, you will want to put in Tailscale domestically to hook up with your tailnet. Browse to https://tailscale.com/obtain and set up the app based mostly in your working system.
A
tailnetis your non-public community. Any gadgets that you just add is added to yourtailnetand these gadgets can’t be accessed from the web.
With the appliance put in, open it and undergo the configuration wizard and proceed to “Check in to your community” which is basically signing into tailscale.com by way of net browser.
It is possible for you to to handle your Tailscale app, view gadgets in your community, and navigate to the Admin console from the system tray.

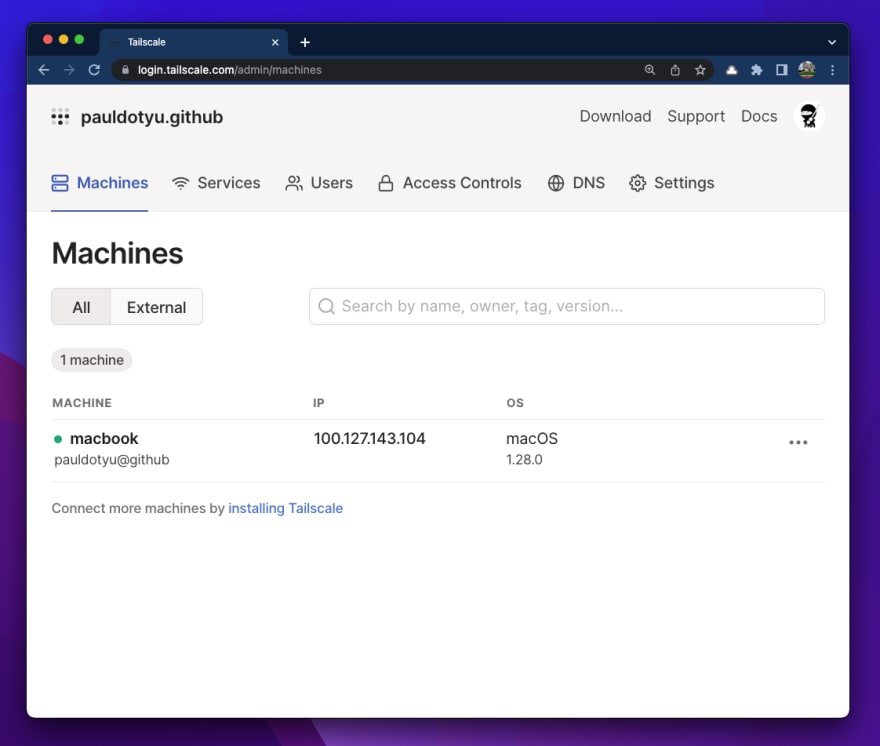
If all went effectively with the native app set up, it’s best to see your machine on the “Machines” web page within the Admin console.
Configure MagicDNS
Subsequent, let’s go configure MagicDNS in order that our native machine can resolve Azure VM names to their tailnet IP.
Within the Tailscale Admin console, click on on the “DNS” hyperlink.

You may see it’s asking you so as to add a world nameserver first, so let’s go and try this.
Click on on the “Add nameserver” button and choose a nameserver (I picked Cloudflare).

Including a world nameserver ought to allow the “Allow MagicDNS” button. Go forward and click on that button and it’s best to see affirmation that MagicDNS has been enabled.

Generate system auth key
Lastly, we have to generate an auth key which is required to register gadgets to our tailscale community. This auth key shall be handed into the cloud-init template and used as Tailscale is initialized by way of the tailscale up command.
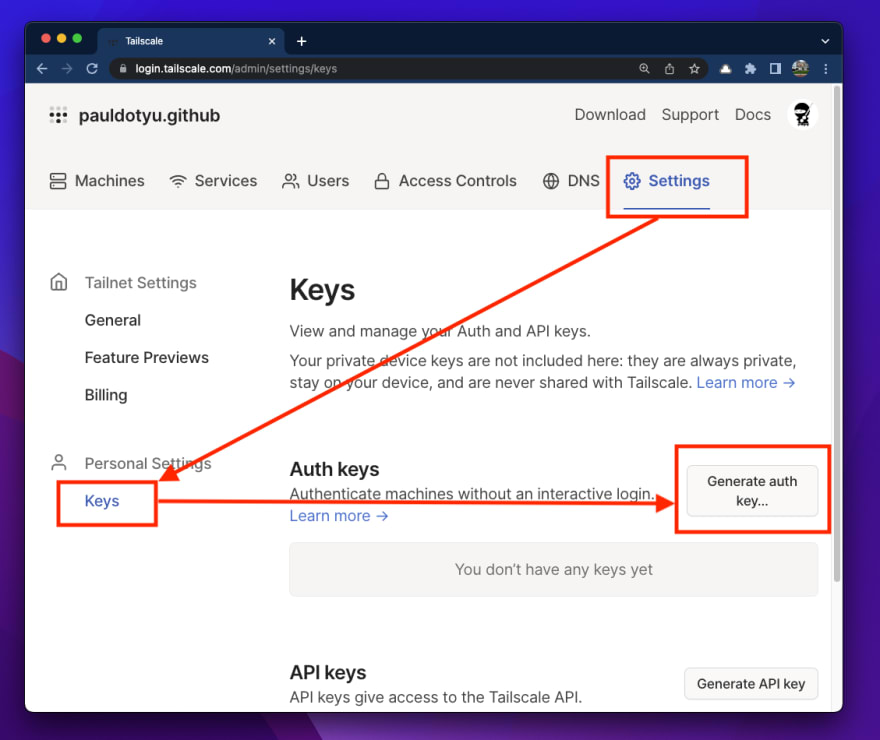
Within the Tailscale Admin console, click on on “Settings“, then click on on “Keys“, then “Generate auth key..“.
Within the modal window that pops up, you will see some extra settings to your auth key. Since we’re in a lab setting, I would like my key and machine shall be eliminated as soon as it goes offline, so I toggled the “Ephemeral” possibility. If you’d like your machine to persist in Tailscale, go away the toggle as-is (within the “off” place).
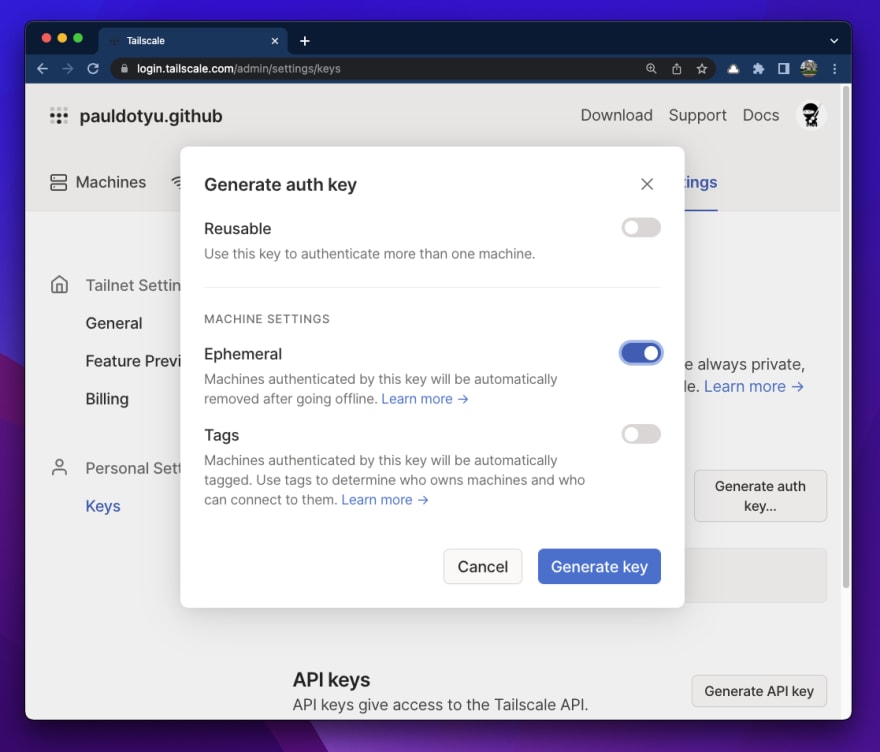
Click on the “Generate key” button then copy the contents to your clipboard.

Deploy Azure Linux VM
Now we now have content material we are able to present within the env.json file.
Utilizing your terminal (this may solely work with Bash), create a brand new file referred to as env.json and paste in your auth key (it ought to nonetheless be in your clipboard from the earlier step).
cat << EOF > env.json
{ "tskey":"<PASTE_IN_YOUR_AUTH_KEY>" }
EOF
Execute the command above within the
linux/vmlisting of the lab repo.
Let’s load the file contents right into a variable so we are able to go it into the Bicep template.
ENV=$(cat env.json)
For those who run echo $ENV within the terminal, you will notice a tiny JSON doc together with your auth key.
With the intention to deploy the vm.bicep template, we have to create an Azure Useful resource Group.
RESOURCE_GROUP=MyResourceGroup
LOCATION=westus3

az group create --name $RESOURCE_GROUP --location $LOCATION
Now we are able to deploy our Bicep template.
VM_NAME=MyAzureVM
az deployment group create
  --resource-group $RESOURCE_GROUP
  --template-file vm.bicep
  --parameters
      vmName="$VM_NAME"
      cloudInit='tailscale-private'
      env="$ENV"
The deployment ought to take a couple of minutes to finish. As soon as the VM has provisioned, it is going to undergo the cloud-init course of and set up/configure Tailscale utilizing the auth key you supplied within the JSON file. As soon as the VM has efficiently deployed to Azure, it usually takes about two minutes for the VM to point out up within the record of VMs.
Whereas we watch for that to finish, let’s speak a bit of bit about what’s deployed.
The assets which are deployed are pretty normal for a digital machine in Azure, you might be getting a digital community, a community interface (non-public IP), the digital machine and its working system disk which, by default on this template, is a 256GiB Premium SSD. There’s additionally a managed id assigned to the digital machine in case you want it to carry out actions towards different Azure assets. The one factor I wish to deal with right here is using a Community Safety Group (NSG).
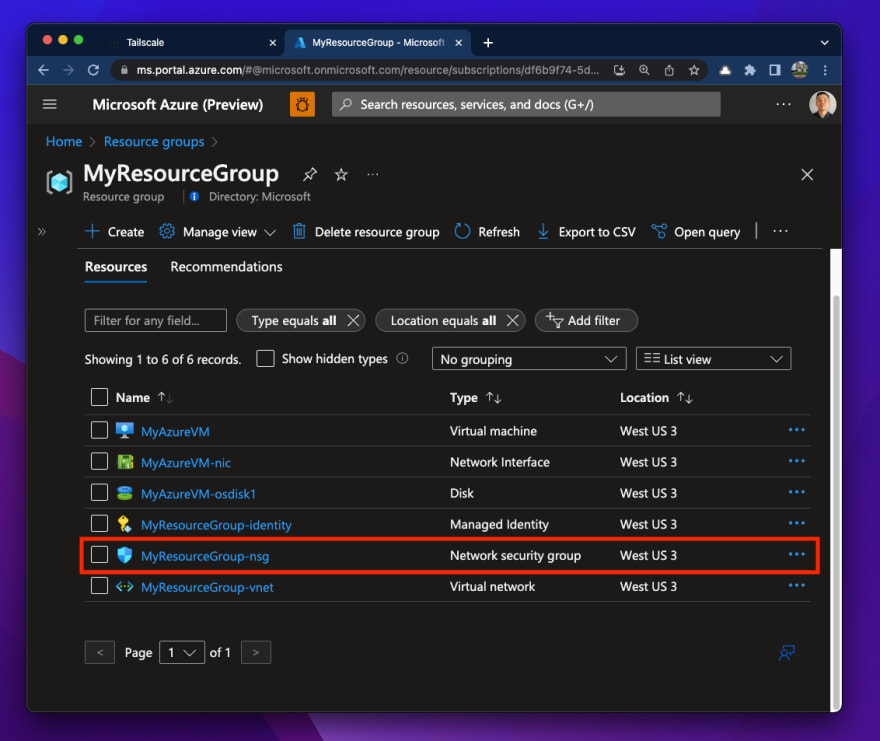
This NSG is basically a easy IP/port-based firewall that permits you to management inbound and outbound guidelines. It may be assigned (related) to a subnet or a community interface in Azure. In our case it’s assigned to the community interface.
For those who click on on the Inbound safety guidelines, you will notice that there’s a single rule which permits UDP visitors on port 41641 from the web.

In response to Tailscale doc, this rule is to “be certain that the Azure nodes could make direct connections by permitting UDP port 41641 to ingress by the firewall.” This direct connection is what minimizes latency. (See How Tailscale works).
That is the one piece of the Azure VM networking that will get uncovered to the web.
Connect with your Azure Linux VM
If we head again to the “Machines” part of the Tailscale Admin console, we should always now see our newly provisioned Azure VM.

The machine has its personal tailnet IP and we might SSH utilizing this deal with (100.69.108.231), however we have configured MagicDNS so let’s give {that a} attempt.
In your native terminal, execute the command:
ssh azureuser@myazurevm
The username is defaulted to
azureuserwithin the Bicep template.

As you possibly can see within the picture above, not solely did Tailscale set up community connectivity utilizing WireGuard, nevertheless it additionally allowed you to determine the connection with out managing SSH keys (sure, we put a default SSH key within the vm.bicep file to avoid wasting you having to specify one at VM creation time, nevertheless it is not actually getting used). Tailscale SSH dealt with the authentication for us when it requested for credentials. Fairly slick 😎
Now that we’re related to the Azure Linux VM, we are able to now deal with performing some growth work and disconnect when accomplished. There may be additionally an choice to run Docker within the VM (which we set up by default alongside Tailscale), or a PostgreSQL database, additionally deployed by way of Docker, so I extremely advise you to check out these lab situations as effectively.
Abstract
Hopefully you had a clean end-to-end expertise and may see how simply you possibly can connect with your Azure Linux VM utilizing SSH in a safe method with out having to open up extra ports or exposing public IPs to the web. This generally is a helpful use case for anybody seeking to do some fast Proof of Idea (PoC) work on Azure Linux VMs or conduct analysis experiments utilizing Azure Linux Information Science Digital Machines photographs, all with out having to fret about implementing difficult community safety guidelines and configurations. Regardless of the case could also be, safety shouldn’t be compromised for comfort. Tailscale SSH is an efficient device to have in your toolbox and I agree with Aaron when he stated, “it is magical 🎉”.
Linux on Azure with Bicep/ARM and Digital Machines (VM) + @Tailscale / Tailscale SSH (by way of: aka.ms/oss-labs ). It is magical 🎉00:07 AM – 03 Aug 2022
We solely coated how to hook up with a Linux VM however the identical will be accomplished for Home windows VMs as effectively (see hyperlinks under).
Earlier than we neglect… if you’re accomplished together with your Azure assets and can now not must entry them anytime quickly, remember to delete your assets to avoid wasting a couple of bucks 😉
Right here, I’m deleting my total useful resource group which is able to delete all assets inside it.
az group delete --name $RESOURCE_GROUP --yes --no-wait
Study Extra
You’ll want to control the https://aka.ms/oss-labs repo as there shall be extra hands-on lab content material and situations so that you can attempt.
If you wish to be taught extra about Azure VMs and cloud-init, verify these assets out:
There’s fairly a little bit of integration that’s attainable from Tailscale to Azure. Listed here are only a few examples:
You probably have any questions or suggestions, please let me know within the feedback under or attain out to me on Twitter @pauldotyu
Cheers!
