
Authentication is among the most essential points of any software. It improves app safety by verifying customers earlier than granting them entry to totally different components of the appliance. Authentication additionally allows corporations to maintain observe of how many individuals are utilizing their merchandise.
It’s vitally essential to configure authentication appropriately. In truth, the Open Net Utility Safety Venture (OWASP) identifies identification and authentication failures in its listing of high ten net software safety dangers.
This tutorial will reveal the step-by-step course of for implementing JWT person authentication in NestJS.
Leap forward:
Stipulations
This tutorial is a hands-on demonstration. To comply with alongside, guarantee you will have the next put in:
What’s NestJS?
NestJS is a server-side software framework for Node.js that permits you to create scalable and environment friendly apps. It’s written in TypeScript and constructed with Categorical.js, a light-weight framework that’s unbelievable by itself however lacks construction.
Nest has help for object-oriented programming, purposeful programming, and purposeful reactive programming. This body work is a good selection if you’d like numerous construction in your app’s backend.
Nest has comparable syntax and construction to Angular, a frontend framework. It additionally employs TypeScript, providers, and dependency injection, similar to Angular. Nest makes use of modules and controllers and permits you to use the command-line interface to create controllers for a file.
Getting began
To arrange the mission, you’ll first want to put in the Nest CLI globally with the next command:
npm i -g @nestjs/cli
As soon as the set up is full, create a brand new mission, like so:
nest new auth-with-nest
Subsequent, you’ll be prompted to decide on a package deal supervisor to put in the dependencies. For this demonstration, we’ll use Yarn.
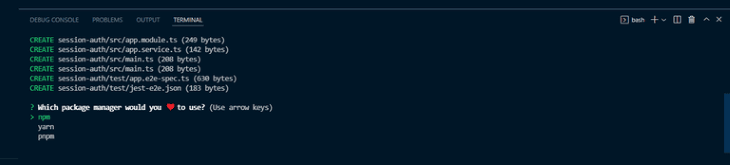
Select yarn and press the Enter key. Now, wait whereas Yarn installs all of the required dependencies required to run the appliance.
Organising the MongoDB database
To arrange and join your database, set up the Mongoose package deal, bcrypt, and the NestJS wrapper with the next command:
npm set up --save @nestjs/mongoose @varieties/bcrypt mongoose bcrypt
Now, replace the app.module.ts file and arrange Mongoose, like so:
import { MongooseModule } from '@nestjs/mongoose';
@Module({
  imports: [MongooseModule.forRoot('mongodb://localhost/authentication')],
})
Within the above snippet, we imported the MongooseModule into the basis AppModule.
Creating the person module
To maintain your code clear and nicely organized, create a module particularly for NestJS CLI customers by working the next command:
Extra nice articles from LogRocket:
nest g module customers
The above code creates a person folder with a customers.module.ts file and an app.module.ts updates file.
Creating the person schema
To create a person schema, create a customers.mannequin.ts file within the src/customers folder and add the next code:
import { Prop, Schema, SchemaFactory } from '@nestjs/mongoose';
import { Doc } from 'mongoose';

export sort UserDocument = Consumer & Doc;

@Schema()
export class Consumer {
  @Prop()
  username: string;

  @Prop()
  password: string;
}

export const UserSchema = SchemaFactory.createForClass(Consumer);
Right here, we’ve outlined the form of our Consumer schema with the @Schema() decorator and the @Prop() decorator.
Mongoose will map the schema to a MongoDB assortment. The schema defines the form of the gathering’s paperwork.
Now, change the code within the person/person.module.ts file and make the userSchema accessible within the imports with the next code:
import { Module } from '@nestjs/widespread';
import { UsersService } from './person.service';
import { UsersController } from './person.controller';
import { MongooseModule } from "@nestjs/mongoose"
import { UserSchema } from "./person.mannequin"

@Module({
  imports: [MongooseModule.forFeature([{ name: "user", schema: UserSchema }])],
  suppliers: [UsersService],
  controllers: [UsersController]
})
export class UserModule {}
Creating the person service
With the person schema created, run the beneath command to create a person service:
nest g service customers
This code creates a customers.service.ts file and updates the app.module.ts file.
N.B., you’ll be able to select to create your information and folders manually, however the NestJS CLI will make your life simpler by mechanically updating the mandatory folders
Now, add the next code to the customers.service.ts file:
import { Injectable } from '@nestjs/widespread';
import { InjectModel } from '@nestjs/mongoose';
import { Mannequin } from 'mongoose';
import { Consumer, UserDocument } from './customers.mannequin';

@Injectable()
export class UsersService {
    constructor(@InjectModel('person') personal readonly userModel: Mannequin<UserDocument>) { }
    async createUser(username: string, password: string): Promise<Consumer> {
        return this.userModel.create({
            username,
            password,
        });
    }
    async getUser(question: object ): Promise<Consumer> {
        return this.userModel.findOne(question);
    }
}
Right here, we used the @InjectModel() decorator to inject the userModel into the UsersService.
Creating the person controller
Now let’s create a person controller to outline the API routes:
nest g service customers
Add the code to the customers.controller.ts file:
import { Physique, Controller, Submit, Get, Param } from '@nestjs/widespread';
import { UsersService } from './customers.service';
import { Consumer } from './customers.mannequin';
import * as bcrypt from 'bcrypt';

@Controller('auth')
export class UsersController {
    constructor(personal readonly usersService: UsersService) { }

    @Submit('/signup')
    async createUser(
        @Physique('password') password: string,
        @Physique('username') username: string,
    ): Promise<Consumer> {
        const saltOrRounds = 10;
        const hashedPassword = await bcrypt.hash(password, saltOrRounds);
        const outcome = await this.usersService.createUser(
            username,
            hashedPassword,
        );
        return outcome;
    }
}
Right here, we outlined two API routes and consumed the providers we created. We used bcrypt to hash the person password.
Creating the auth module
Let’s begin by creating an auth module, like so:
nest g module auth
This command will create a brand new folder, auth, with an auth.module.ts file; it is going to additionally replace the app.module.ts file.
Configuring JWT
Now, let’s implement a JSON net token to authenticate customers into the appliance.
To get began, set up the next dependencies:
npm set up --save @nestjs/jwt passport-jwt
npm set up --save-dev @varieties/passport-jwt
Subsequent, create a brand new file, native.auth.ts, and add the next code:
import { Technique } from 'passport-local';
import { PassportStrategy } from '@nestjs/passport';
import { Injectable, UnauthorizedException } from '@nestjs/widespread';
import { AuthService } from './auth.service';

@Injectable()
export class LocalStrategy extends PassportStrategy(Technique) {
  constructor(personal authService: AuthService) {
    tremendous();
  }

  async validate(username: string, password: string): Promise<any> {
    const person = await this.authService.validateUser(username, password);
    if (!person) {
      throw new UnauthorizedException();
    }
    return person;
  }
}
Right here, we applied a passport-local technique to authenticate the JSON net token. By default, the passport-local technique expects username and password properties within the request physique.
We additionally applied the validate() technique which the Passport middleware will name to confirm the person utilizing an acceptable strategy-specific set of parameters.
Subsequent, change the code within the AuthModule with the next:
import { Module } from "@nestjs/widespread"
import { UserModule } from "src/person/person.module";
import { AuthService } from "./auth.service"
import { PassportModule } from "@nestjs/passport"
import { JwtModule } from '@nestjs/jwt';
import { AuthController } from './auth.controller';
import { UsersService } from "src/person/person.service";
import { MongooseModule } from "@nestjs/mongoose"
import { UserSchema } from "../person/person.mannequin"
import { LocalStrategy } from './local-strategy';


@Module({
  imports: [UserModule, PassportModule, JwtModule.register({
    secret: 'secretKey',
    signOptions: { expiresIn: '60s' },
  }), MongooseModule.forFeature([{ name: "user", schema: UserSchema }])],
  suppliers: [AuthService, UsersService, LocalStrategy],
  controllers: [AuthController],
})
export class AuthModule { }
Right here, we imported the PassportModule and JwtModule into the array of imports. Then we used the register technique to register JWT, offering the key and expiration time.
We additionally made the UserSchema accessible within the imports and added the UserService and our LocalStrategy to the array of suppliers.
N.B., for safety causes, all the time save your JWT secret in an surroundings variable
Creating the auth service and controller
Now, let’s add authentication options to the appliance.
With JWT and Passport configured, run the next command to create auth.service.ts and auth.controller.ts information within the auth folder.:
nest generate service auth
nest generate controller auth
Subsequent, open the auth/auth.service.ts file and authenticate the customers with the next code:
import { Injectable, NotAcceptableException } from '@nestjs/widespread';
import { UsersService } from 'src/person/person.service';
import * as bcrypt from 'bcrypt';
import { JwtService } from '@nestjs/jwt';

@Injectable()
export class AuthService {
    constructor(personal readonly usersService: UsersService, personal jwtService: JwtService) { }
    async validateUser(username: string, password: string): Promise<any> {
        const person = await this.usersService.getUser({ username });
        if (!person) return null;
        const passwordValid = await bcrypt.evaluate(password, person.password)
        if (!person) {
            throw new NotAcceptableException('couldn't discover the person');
        }
        if (person && passwordValid) {
            return person;
        }
        return null;
    }
    async login(person: any) {
        const payload = { username: person.username, sub: person._id };
        return {
            access_token: this.jwtService.signal(payload),
        };
    }
}
Right here, we created the validateUser technique to verify if a person from the person.mannequin matches a person file from the database. If there isn’t a match, the strategy returns a null worth.
We additionally created the login technique which makes use of the jwtService.signal technique to generate a JWT entry token for the returned person from the validate from our LocalStrategy.
Now, add the code snippet beneath to the auth/auth.controller.ts file to create a route for the person login.
import { Controller, Request, Submit, UseGuards } from '@nestjs/widespread';
import { AuthService } from './auth.service';
import { AuthGuard } from '@nestjs/passport';

@Controller()
export class AuthController {
    constructor(personal authService: AuthService) { }

    @UseGuards(AuthGuard('native'))
    @Submit('auth/login')
    async login(@Request() req) {
        return this.authService.login(req.person);
    }
}
Right here, we used the @UseGuards() decorator to implement authentication when a person requests the login route. With the AuthGuard class, we’re in a position to authenticate a person utilizing the native technique.
Testing the appliance
Now let’s check the appliance utilizing Postman. We’ll begin with the signup route.
First, begin the appliance:
npm run begin
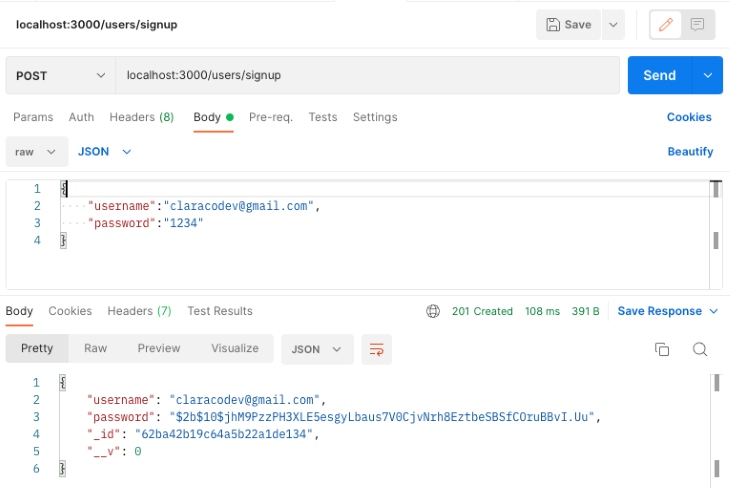
Subsequent, open Postman and check the signup route by sending a put up request to the endpoint. localhost:3000/customers/signup.
Now, check the login endpoint by sending a put up request to the endpoint. localhost:3000/auth/login.
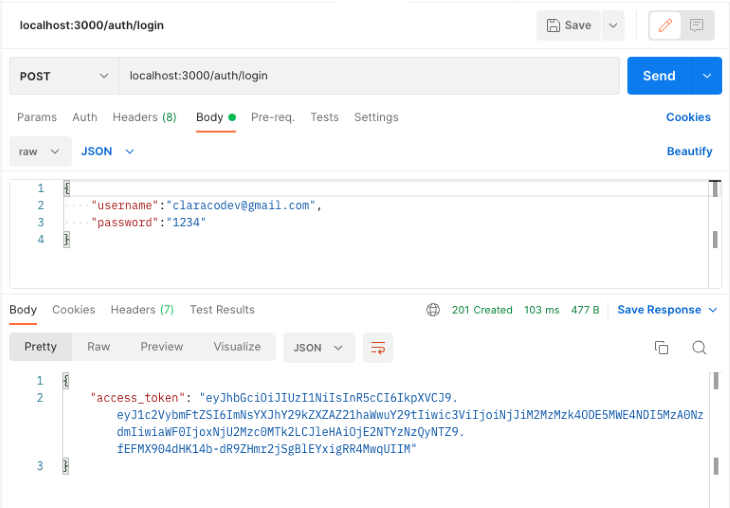
If the username and password exist within the database, the person will obtain an access_token as proven above. With the access_token, the person will be capable of entry the protected routes within the API.
Conclusion
On this tutorial, we offered an outline of NestJS after which demonstrated easy methods to implement JWT person authentication on a NestJS API.
Now that you’ve this data, how will you deal with person authentication in your subsequent Nest mission? To be taught extra about NestJS JWT authentication, consult with the official documentation.
LogRocket: Full visibility into your net and cellular apps

LogRocket is a frontend software monitoring answer that permits you to replay issues as in the event that they occurred in your personal browser. As a substitute of guessing why errors occur, or asking customers for screenshots and log dumps, LogRocket helps you to replay the session to rapidly perceive what went mistaken. It really works completely with any app, no matter framework, and has plugins to log extra context from Redux, Vuex, and @ngrx/retailer.
Along with logging Redux actions and state, LogRocket data console logs, JavaScript errors, stacktraces, community requests/responses with headers + our bodies, browser metadata, and customized logs. It additionally devices the DOM to file the HTML and CSS on the web page, recreating pixel-perfect movies of even essentially the most advanced single-page net and cellular apps.
