
In earlier steps, we have deployed Django with AWS ECS, linked it to the PostgreSQL RDS, and arrange GitLab CI/CD
On this step, we’re going to:
- Join Namecheap area to Route53 DNS zone.
- Create an SSL certificates with Certificates Supervisor.
- Reroute HTTP visitors to HTTPS and disable ALB host for Django utility.
- Add
/well being/route for Well being Checks.
Establishing Namecheap API
I have already got a site title on Namecheap. So I select to attach the Namecheap area to an AWS Route53 zone. However you may register area with AWS Route53.
First, let’s allow API entry for Namecheap. Look by this information to obtain APIKey and add your IP to the whitelist.
Second, add the Namecheap supplier to Terraform undertaking. Add to the supplier.tf file following code:
terraform {
  required_providers {
    namecheap = {
      supply  = "namecheap/namecheap"
      model = ">= 2.0.0"
    }
  }
}

supplier "namecheap" {
  user_name   = var.namecheap_api_username
  api_user    = var.namecheap_api_username
  api_key     = var.namecheap_api_key
  use_sandbox = false
}
In variables.tf add:
# Namecheap
variable "namecheap_api_username" {
  description = "Namecheap APIUsername"
}
variable "namecheap_api_key" {
  description = "Namecheap APIKey"
}
Additionally add TF_VAR_namecheap_api_username and TF_VAR_namecheap_api_key variables to .env to supply values to the corresponding Terraform variables.
TF_VAR_namecheap_api_username=YOUR_API_USERNAME
TF_VAR_namecheap_api_key=YOUR_API_KEY
Import .env variables with export $(cat .env | xargs) and run terraform init so as to add a Namecheap supplier to the undertaking.
Connecting Area to AWS
Now, let’s create a Route53 zone for the Namecheap area and arrange AWS nameservers. Thus, all DNS queries will likely be routed to the AWS Route53 nameservers, and we will handle DNS data from the AWS Route53 zone.
Add to the variables.tf following code:
# Domains
variable "prod_base_domain" {
  description = "Base area for manufacturing"
  default = "example53.xyz"
}
variable "prod_backend_domain" {
  description = "Backend net area for manufacturing"
  default = "api.example53.xyz"
}
Add a route53.tf file:
useful resource "aws_route53_zone" "prod" {
  title = var.prod_base_domain
}

useful resource "namecheap_domain_records" "prod" {
  area = var.prod_base_domain
  mode   = "OVERWRITE"

  nameservers = [
    aws_route53_zone.prod.name_servers[0],
    aws_route53_zone.prod.name_servers[1],
    aws_route53_zone.prod.name_servers[2],
    aws_route53_zone.prod.name_servers[3],
  ]
}
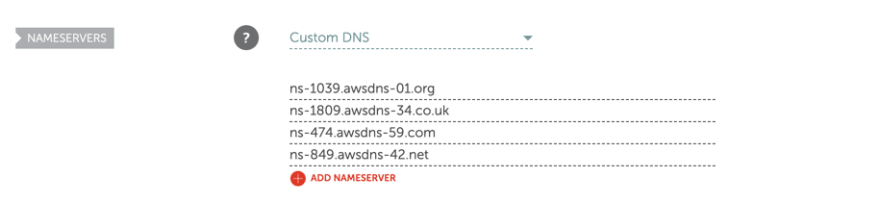
Run terraform apply. Examine nameservers on Namecheap:
Creating SSL Certificates
Now, let’s create an SSL certificates and arrange DNS A file for api.example53.xyz area.
Add to the route53.tf following code:
...

useful resource "aws_acm_certificate" "prod_backend" {
  domain_name       = var.prod_backend_domain
  validation_method = "DNS"
}

useful resource "aws_route53_record" "prod_backend_certificate_validation" {
  for_each = {
    for dvo in aws_acm_certificate.prod_backend.domain_validation_options : dvo.domain_name => {
      title   = dvo.resource_record_name
      file = dvo.resource_record_value
      sort   = dvo.resource_record_type
    }
  }

  allow_overwrite = true
  title            = every.worth.title
  data         = [each.value.record]
  ttl             = 60
  sort            = every.worth.sort
  zone_id         = aws_route53_zone.prod.zone_id
}

useful resource "aws_acm_certificate_validation" "prod_backend" {
  certificate_arn         = aws_acm_certificate.prod_backend.arn
  validation_record_fqdns = [for record in aws_route53_record.prod_backend_certificate_validation : record.fqdn]
}

useful resource "aws_route53_record" "prod_backend_a" {
  zone_id = aws_route53_zone.prod.zone_id
  title    = var.prod_backend_domain
  sort    = "A"

  alias {
    title                   = aws_lb.prod.dns_name
    zone_id                = aws_lb.prod.zone_id
    evaluate_target_health = true
  }
}
Right here we’re going to create a brand new SSL certificates for api.example53.xyz, validate the SSL certificates through DNS CNAME file, and add DNS A file to Load Balancer.
Apply adjustments with terraform apply and look forward to certificates validation. Normally, it takes as much as a number of minutes. However in some instances, it might probably take a number of hours. You may examine extra data right here.
Redirecting HTTP to HTTPS
Now let’s use the issued SSL certificates to allow HTTPS. Change the useful resource "aws_lb_listener" "prod_http" block within the load_balancer.tf with the next code:
# Goal listener for http:80
useful resource "aws_lb_listener" "prod_http" {
  load_balancer_arn = aws_lb.prod.id
  port              = "80"
  protocol          = "HTTP"
  depends_on        = [aws_lb_target_group.prod_backend]

  default_action {
    sort = "redirect"
    redirect {
      port        = "443"
      protocol    = "HTTPS"
      status_code = "HTTP_301"
    }
  }
}

# Goal listener for https:443
useful resource "aws_alb_listener" "prod_https" {
  load_balancer_arn = aws_lb.prod.id
  port              = "443"
  protocol          = "HTTPS"
  ssl_policy        = "ELBSecurityPolicy-2016-08"
  depends_on        = [aws_lb_target_group.prod_backend]

  default_action {
    sort             = "ahead"
    target_group_arn = aws_lb_target_group.prod_backend.arn
  }

  certificate_arn = aws_acm_certificate_validation.prod_backend.certificate_arn
}
Right here we redirect unsecured HTTP visitors to HTTPS and add a listener for the HTTPS port. Apply adjustments and examine https://api.example53.xyz URL. You need to see Django beginning web page.
Establishing the ALLOWED_HOSTS variable
Now, let’s present the ALLOWED_HOSTS setting to the Django app. It is essential to forestall HTTP Host header assaults. So, Django Software ought to solely settle for our area api.example53.xyz within the host header.
Now Django accepts any area, for instance, Load Balancer’s area. Go to https://prod-1222631842.us-east-2.elb.amazonaws.com to examine this truth. You may ignore the warning about an invalid SSL Certificates and see that Django responds to this host.

Additionally, let’s disable a Debug mode and take away the SECRET_KEY worth from the code to enhance safety. Add the TF_VAR_prod_backend_secret_key variable with a random generated worth to the .env, run export $(cat .env | xargs), and specify this var in variables.tf:
variable "prod_backend_secret_key" {
  description = "manufacturing Django's SECRET_KEY"
}
Subsequent, cross the area title and SECRET_KEY in ecs.tf, arrange SECRET_KEY, DEBUG, and ALLOWED_HOSTS variables in backend_container.json.tpl and apply adjustments:
locals {
  container_vars = {
    ...

    area = var.prod_backend_domain
    secret_key = var.prod_backend_secret_key
  }
}
"atmosphere": [
  ...
  {
    "name": "SECRET_KEY",
    "value": "${secret_key}"
  },
  {
    "name": "DEBUG",
    "value": "off"
  },
  {
    "name": "ALLOWED_HOSTS",
    "value": "${domain}"
  }
],
Now now we have all mandatory atmosphere variables on ECS. Transfer to the Django app and alter settings.py:
# SECURITY WARNING: preserve the key key utilized in manufacturing secret!
SECRET_KEY = env("SECRET_KEY", default="ewfi83f2ofee3398fh2ofno24f")

# SECURITY WARNING: do not run with debug turned on in manufacturing!
DEBUG = env("DEBUG", forged=bool, default=True)

ALLOWED_HOSTS = env("ALLOWED_HOSTS", forged=record, default=["*"])
Right here we obtain SECRET_KEY, DEBUG, and ALLOWED_HOSTS variables from env variables. We offer default SECRET_KEY to permit operating the appliance domestically with out specifying SECRET_KEY within the .env file.
Well being Examine
All person’s requests would have Host header api.example53.xyz. However, we even have well being examine requests from a load balancer.
AWS load balancers can robotically examine our container’s well being. If the container responds accurately, the load balancer considers that concentrate on is wholesome. In any other case, the goal will likely be marked as unhealthy. Load balancer routes visitors to wholesome targets solely. Thus, person requests would not hit unhealthy containers.
For HTTP or HTTPS well being examine requests, the host header incorporates the IP handle of the load balancer node and the listener port, not the IP handle of the goal and the well being examine port.
We do not know the Load Balancer IP handle. Additionally, this IP might be modified after a while. Subsequently, we can not add the Load Balancer host to the ALLOWED_HOSTS.
The answer is to put in writing a customized middleware that returns a profitable response earlier than the host checking within the SecurityMiddleware.
First, go to the infrastructure, change the well being examine URL in load_balancer.tf to /well being/, and apply adjustments:
useful resource "aws_lb_target_group" "prod_backend" {
  ...
  health_check {
    path = "/well being/"
    ...
  }
}
Return to the Django undertaking and create django_aws/middleware.py:
from django.http import HttpResponse
from django.db import connection


def health_check_middleware(get_response):
    def middleware(request):
        # Well being-check request
        if request.path == "/well being/":
            # Examine DB connection is wholesome
            with connection.cursor() as cursor:
                cursor.execute("SELECT 1")

            return HttpResponse("Wholesome!")

        # Common requests
        return get_response(request)

    return middleware
Add this middleware to the settings.py earlier than the SecurityMiddleware:
MIDDLEWARE = [
    'django_aws.middleware.health_check_middleware',
    'django.middleware.security.SecurityMiddleware',
    ...
]
Run python handle.py runserver and examine 127.0.0.1:8000/well being/ URL in your browser. You need to see the textual content response Wholesome!.
Commit and push adjustments, look forward to the pipeline and examine the Load Balancer area once more https://prod-57218461274.us-east-2.elb.amazonaws.com/. Now, we get a Dangerous Request error. Additionally, we did not see a traceback or different debug data, so we will ensure that the debug mode is disabled.

Additionally, navigate to https://prod-57218461274.us-east-2.elb.amazonaws.com/well being/ in your browser to examine health_check_middleware. We get the Wholesome! response. So, the Load Balancer will be capable of examine containers’ well being with out offering the proper Host header.

Congratulations! We have efficiently arrange a site title, created well being checks, disabled the debug mode, and eliminated SECRET_KEY worth from the supply code. Don’t forget to push infrastructure code to GitLab.
You’ll find the supply code of backend and infrastructure initiatives right here and right here.
In case you want technical consulting in your undertaking, try our web site or join with me instantly on LinkedIn.
