In Could 2022, Meta (the corporate previously referred to as Fb, which owns WhatsApp) introduced that they had been opening up the WhatsApp Enterprise API to the general public. This text intends to welcome you to Meta’s world of alternatives, the place WhatsApp chatbots may also help you generate leads, obtain orders, schedule appointments, run surveys, take buyer suggestions, present scalable buyer help, ship invoices and receipts, and extra.
This tutorial will dive deep into the technical bits of constructing a WhatsApp chatbot from scratch via the next sections:
By the tip of this tutorial, you should have created your individual WhatsApp chatbot, as proven within the video beneath:
Our tutorial focuses on a easy mom-and-pop ecommerce store that sells home items and quick vogue. The enterprise can have a WhatsApp chatbot the place prospects can browse and purchase from the ecommerce retailer.
Each ecommerce retailer wants merchandise (costs, names, descriptions and so on.), and for this tutorial, we are going to use the dummy merchandise from FakeStoreAPI.
Conditions
Earlier than we proceed, this text assumes that:
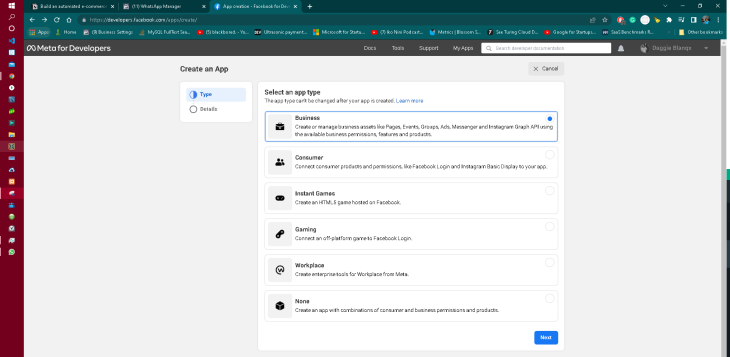
Step one to utilizing any of Meta’s APIs is to create an app on the Meta dashboard, which is free to do.
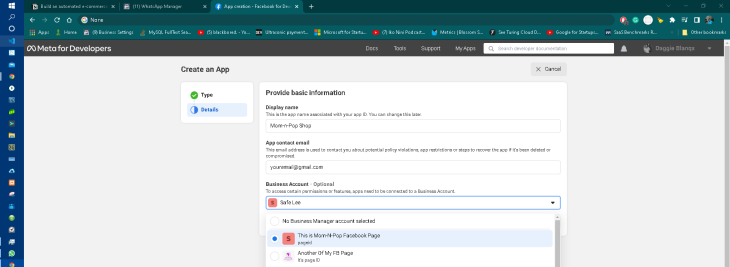
- Subsequent, fill within the title of your app and your electronic mail deal with, after which choose the web page/enterprise that you simply need to affiliate with this app
Extra nice articles from LogRocket:
- After submitting the shape, you may be ushered right into a display that appears like this:
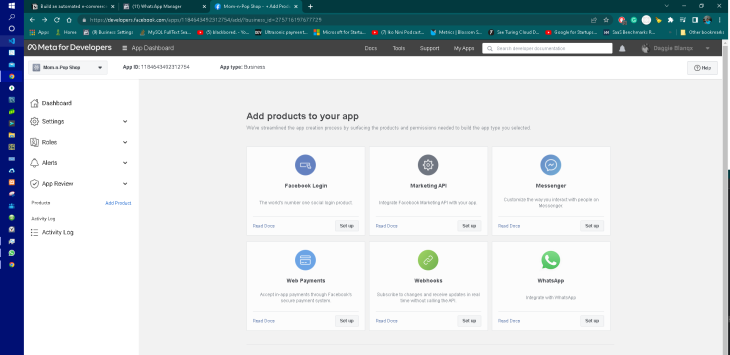
On this display, choose WhatsApp and click on its Arrange button.
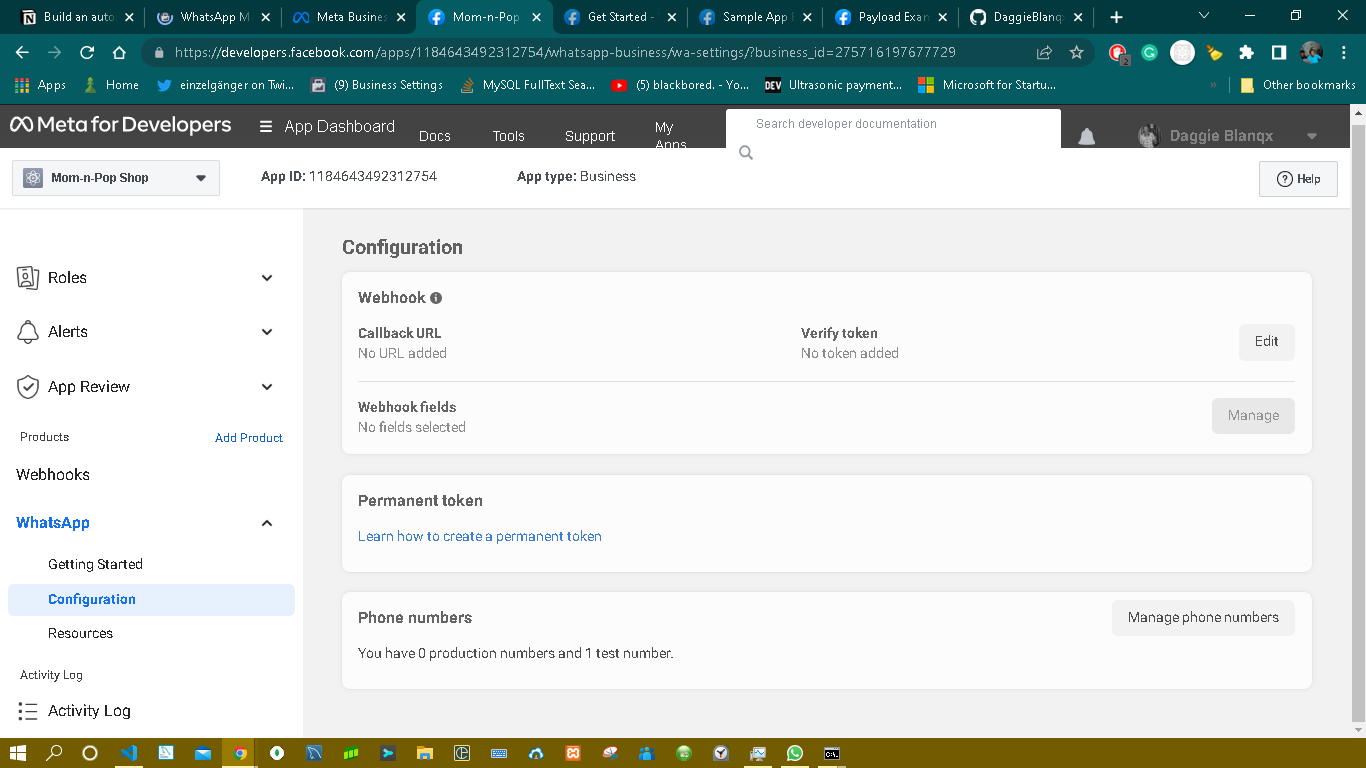
You’ll then be ushered into a brand new display, as proven beneath.
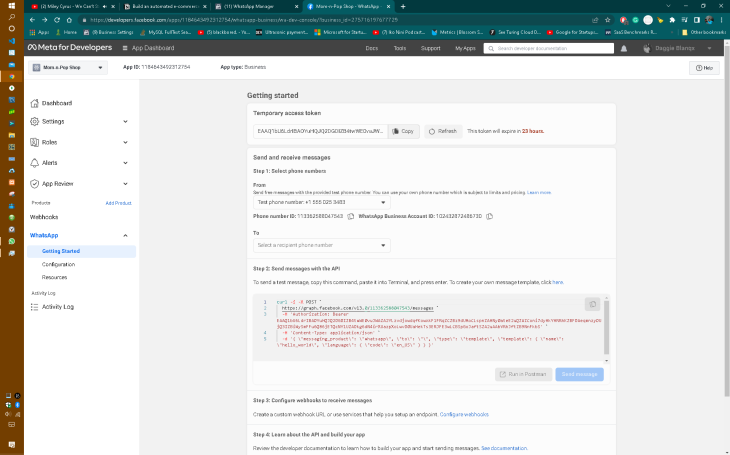
On this display, be aware of:
- The App ID, which is the ID related to our Meta app. Mine is
1184643492312754 - The Momentary entry token, which expires after 24 hours. Mine begins with
EAAQ1bU6LdrIBA… - The Check cellphone quantity, which we’ll use to ship messages to prospects. Mine is
+1 555 025 3483- The Cellphone quantity ID. Mine is
113362588047543 - The WhatsApp Enterprise Account ID. Mine is
102432872486730
- The Cellphone quantity ID. Mine is
Please notice that the short-term entry token expires after 24 hours, at which era we’ll have to renew it. Whenever you swap your app to dwell mode, you possibly can apply for a everlasting entry token, which we don’t have to do as our app is in growth mode.
The cellphone quantity ID and WhatsApp enterprise account ID are tied to the take a look at cellphone quantity.
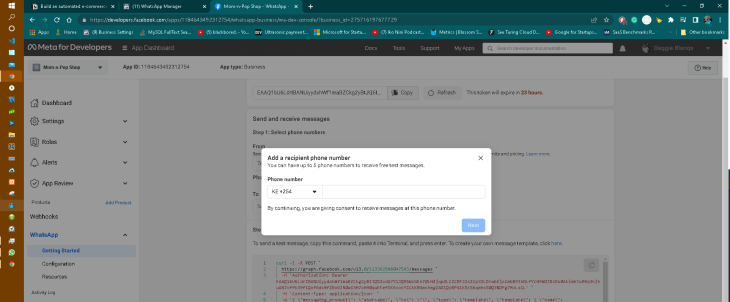
Subsequent, let’s add a cellphone quantity to make use of for receiving messages.
In growth mode, Meta restricts us to 5 recipient numbers for causes to do with stopping spam/misuse. In dwell/manufacturing mode, the quantity represents the cellphone numbers of our prospects.
Click on Choose a recipient cellphone quantity and add your individual WhatsApp quantity, as proven within the screenshot beneath:
After including your recipient quantity, you will note a display that appears just like the one beneath. If it’s your first time including your cellphone quantity to Meta platforms — equivalent to Fb Pages, Meta Enterprise suite, or the Meta developer dashboard — you’ll obtain an OTP message from Fb Enterprise that prompts you to confirm that you simply really personal the recipient quantity.
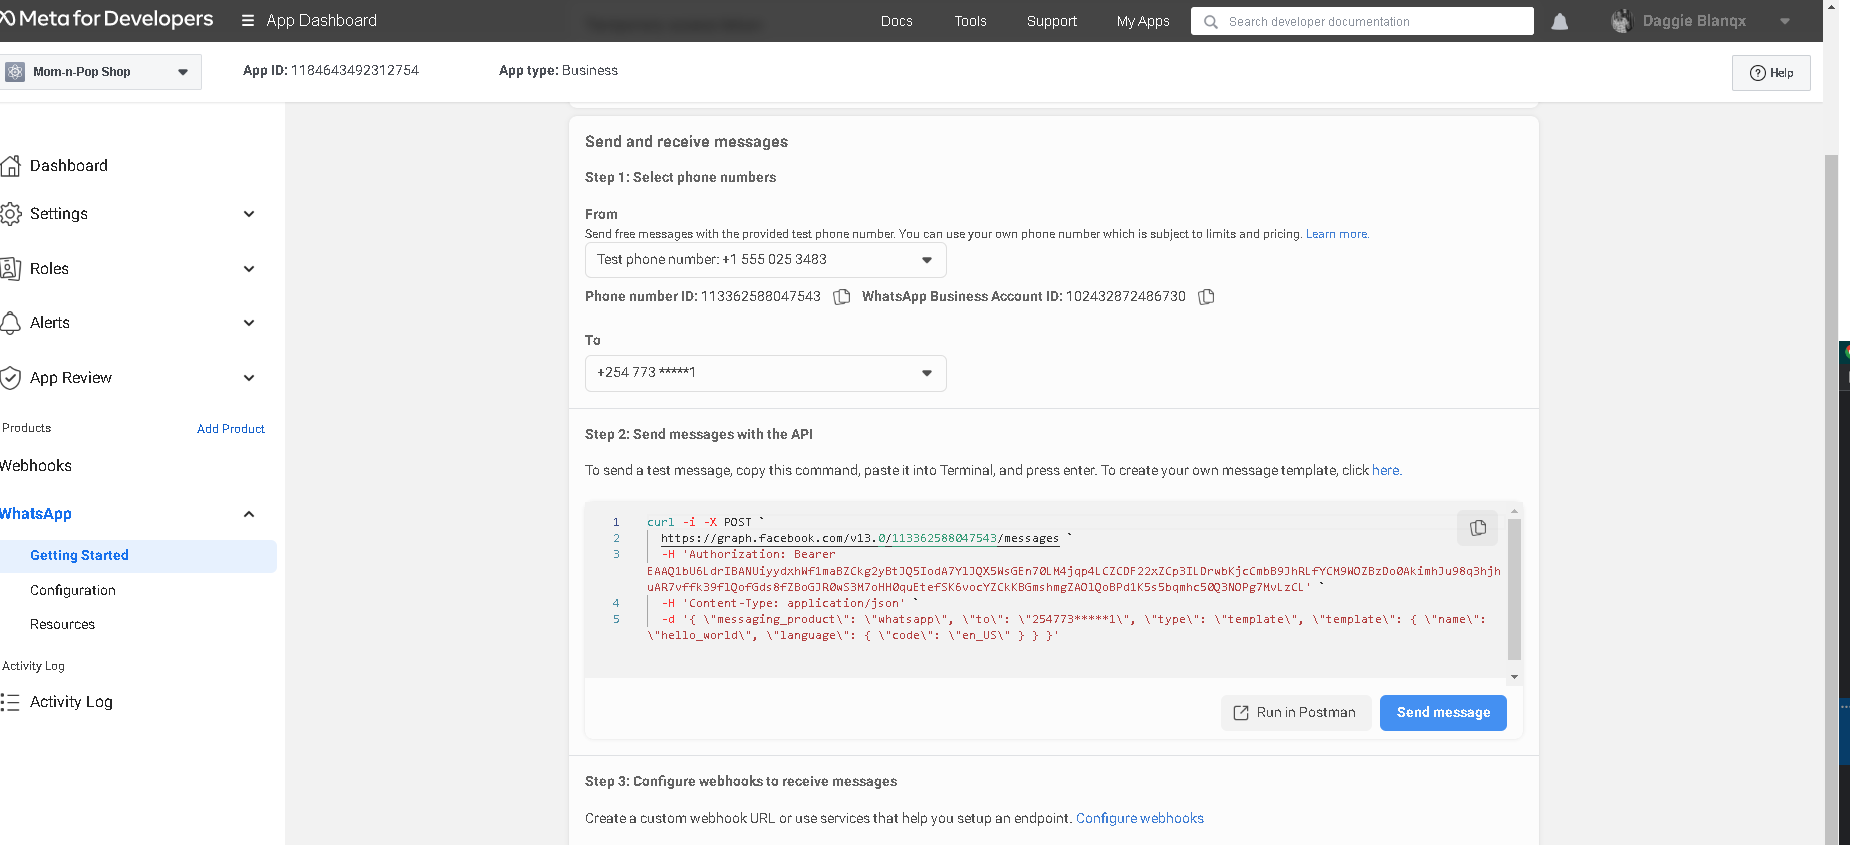
Testing our setup
Let’s take a look at if every part as much as this step labored nicely. We’ll do that by clicking the Ship Message button.
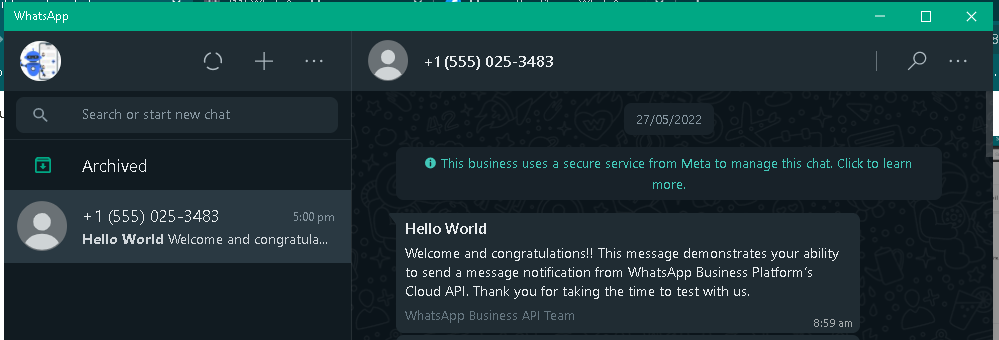
If all is nicely, it is best to see a message in your WhatsApp inbox out of your take a look at quantity.
Up so far, we’re doing nicely! Take a pause and open your code editor. Don’t shut your browser tab but as a result of we can be again within the Meta Developer dashboard in a couple of minutes.
Step 2: Establishing webhooks to obtain messages
Now that our setup can efficiently ship messages, let’s arrange a technique to obtain messages. Time to get our fingers soiled and immerse ourselves in writing code. All of the code we’ll write for this tutorial is in this GitHub repository.
Create a brand new folder to include our challenge. Open this folder in a terminal and run the beneath script:
npm init ---yes
Subsequent, we set up some packages:
npm set up specific pdfkit request whatsappcloudapi_wrapper
npm set up nodemon --dev
Right here’s a short clarification of every:
- The
specificpackage deal is vital for establishing our server. The server will include a route that may act as our webhook - The
pdfkitpackage deal can be used to generate invoices for our prospects after they take a look at - The
requestpackage deal will assist us run fetch requests to the FakeStoreAPI - The
whatsappcloudapi_wrapperhelps us ship and obtain WhatsApp messages
Subsequent, we’re going to create three recordsdata:
./app.js./.env.js./routes/index.js
In our ./.env.js file, sort within the beneath code:
const manufacturing = ;

const growth = ;

const fallback = {
    ...course of.env,
    NODE_ENV: undefined,
};

module.exports = (surroundings) => {
    console.log(`Execution surroundings chosen is: "${surroundings}"`);
    if (surroundings === 'manufacturing') {
        return manufacturing;
    } else if (surroundings === 'growth') {
        return growth;
    } else {
        return fallback;
    }
};
In the identical ./.env.js file:
- Exchange the worth of
Meta_WA_accessTokenwith the short-term entry token on your Meta app - Exchange the worth of
Meta_WA_SenderPhoneNumberIdalong with your cellphone quantity ID - Exchange the worth of
Meta_WA_wabaIdalong with your WhatsApp Enterprise Account ID - Set your individual worth for the
Meta_WA_VerifyToken. It may be both a string or quantity; you will note how we use it within the webhooks step
The code above first imports the present surroundings variables and destructures them, then provides new surroundings variables and exports the mix of the 2 as an object.
Within the file ./app.js file, insert the beneath code:
course of.env = require('./.env.js')(course of.env.NODE_ENV || 'growth');
const port = course of.env.PORT || 9000;
const specific = require('specific');

let indexRoutes = require('./routes/index.js');

const major = async () => {
    const app = specific();
    app.use(specific.json());
    app.use(specific.urlencoded({ prolonged: false }));
    app.use("https://weblog.logrocket.com/", indexRoutes);
    app.use('*', (req, res) => res.standing(404).ship('404 Not Discovered'));
    app.pay attention(port, () =>
        console.log(`App now operating and listening on port ${port}`)
    );
};
major();
The primary line of the code block above merely imports the ./.env.js file and assigns it to course of.env, which is a globally accessible object in Node.js.
Within the file ./routes/index.js, insert the beneath code:
'use strict';
const router = require('specific').Router();

router.get('/meta_wa_callbackurl', (req, res) => {
    attempt {
        console.log('GET: Somebody is pinging me!');

        let mode = req.question['hub.mode'];
        let token = req.question['hub.verify_token'];
        let problem = req.question['hub.challenge'];

        if (
            mode &&
            token &&
            mode === 'subscribe' &&
            course of.env.Meta_WA_VerifyToken === token
        ) {
            return res.standing(200).ship(problem);
        } else {
            return res.sendStatus(403);
        }
    } catch (error) {
        console.error({error})
        return res.sendStatus(500);
    }
});

router.put up('/meta_wa_callbackurl', async (req, res) => {
    attempt {
        console.log('POST: Somebody is pinging me!');
        return res.sendStatus(200);
    } catch (error) {
                console.error({error})
        return res.sendStatus(500);
    }
});
module.exports = router;
Subsequent, open the terminal and run:
nodemon app.js
The Specific server will run on port 9000.
Subsequent, open one other, separate terminal and run:
ngrok http 9000
This command exposes our Specific app to the broader web. The purpose right here is to arrange a webhook that WhatsApp Cloud can ping.
Pay attention to the URL that ngrok assigns to your Specific server. In my instance, ngrok issued me this URL: https://7b9b-102-219-204-54.ngrok.io. Hold each the Specific server and the ngrok terminal operating.
Subsequent, let’s resume our work within the Meta Developer dashboard. Scroll to the half titled Configure Webhooks to obtain messages, and click on Configure Webhooks. The hyperlink will show a web page that appears just like the screenshot beneath:
Click on the Edit button and a pop-up will present up.
Within the Callback URL subject, paste within the URL that ngrok issued to you and append it with the callback route, as within the ./routes/index.js directive. My full URL, on this case, is https://7b9b-102-219-204-54.ngrok.io/meta_wa_callbackurl.
Within the Confirm token subject, enter the worth of the Meta_WA_VerifyToken because it seems in your ./.env.js file.
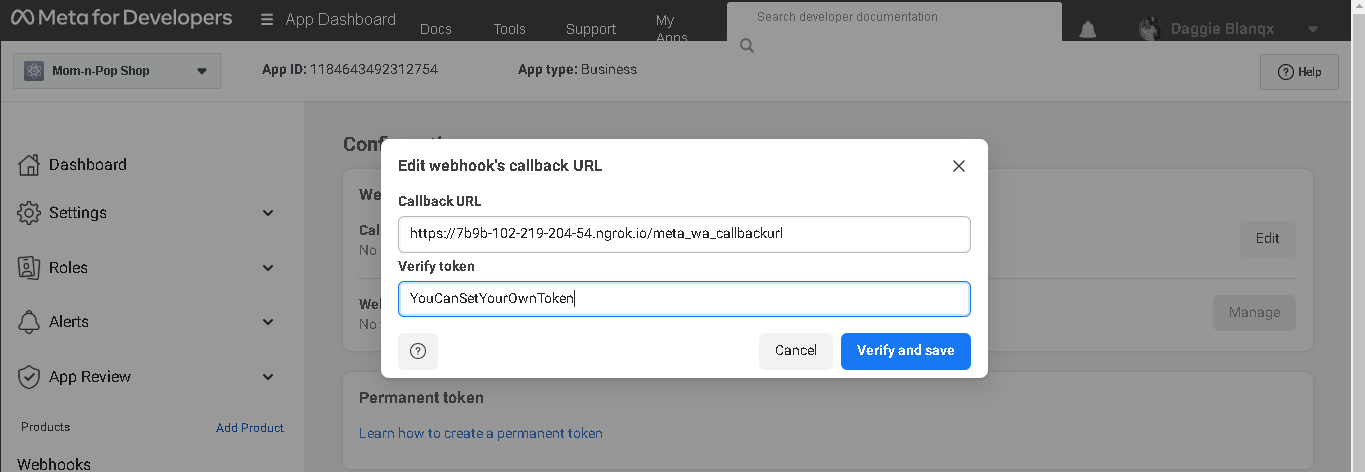
Then click on Confirm and save.
In the event you configured this nicely, you will note a console.log message in your Specific server’s terminal that claims:
GET: Somebody is pinging me!
Configuring our Specific server
Now, let’s make our Specific server obtain subscription messages from Meta.
On the identical Meta Builders dashboard display, click on Handle and a pop-up will seem.
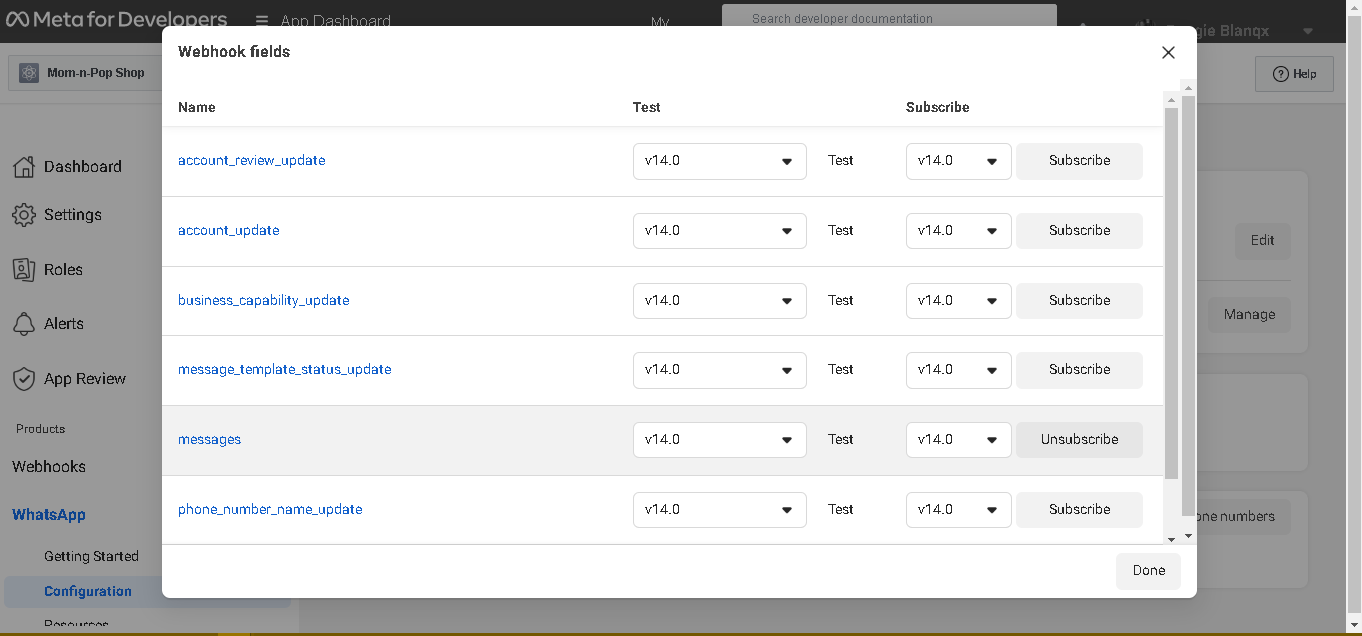
Choose Messages and click on Check, which is on the identical row.
You must see a console.log message in your Specific server’s terminal that claims:
POST: Somebody is pinging me!
In the event you noticed this, get again to the identical pop-up and click on Subscribe in the identical message row. Afterwards, click on Completed.
Step 3: Writing our enterprise logic
Configuring an ecommerce information supply
First, we’ll arrange our logic to fetch information from FakeStoreAPI, generate a PDF bill, and generate a dummy order pick-up location. We’ll wrap this logic right into a JavaScript class, which we’ll then import into our app’s logic.
Create a file and title it ./utils/ecommerce_store.js. On this file, paste the next code:
'use strict';
const request = require('request');
const PDFDocument = require('pdfkit');
const fs = require('fs');

module.exports = class EcommerceStore {
    constructor() {}
    async _fetchAssistant(endpoint) {
        return new Promise((resolve, reject) => {
            request.get(
                `https://fakestoreapi.com${endpoint ? endpoint : "https://weblog.logrocket.com/"}`,
                (error, res, physique) => {
                    attempt {
                        if (error) {
                            reject(error);
                        } else {
                            resolve({
                                standing: 'success',
                                information: JSON.parse(physique),
                            });
                        }
                    } catch (error) {
                        reject(error);
                    }
                }
            );
        });
    }

    async getProductById(productId) {
        return await this._fetchAssistant(`/merchandise/${productId}`);
    }
    async getAllCategories() {
        return await this._fetchAssistant('/merchandise/classes?restrict=100');
    }
    async getProductsInCategory(categoryId) {
        return await this._fetchAssistant(
            `/merchandise/class/${categoryId}?restrict=10`
        );
    }

    generatePDFInvoice({ order_details, file_path }) {
        const doc = new PDFDocument();
        doc.pipe(fs.createWriteStream(file_path));
        doc.fontSize(25);
        doc.textual content(order_details, 100, 100);
        doc.finish();
        return;
    }

    generateRandomGeoLocation() {
        let storeLocations = [
            {
                latitude: 44.985613,
                longitude: 20.1568773,
                address: 'New Castle',
            },
            {
                latitude: 36.929749,
                longitude: 98.480195,
                address: 'Glacier Hill',
            },
            {
                latitude: 28.91667,
                longitude: 30.85,
                address: 'Buena Vista',
            },
        ];
        return storeLocations[
            Math.floor(Math.random() * storeLocations.length)
        ];
    }
};
Within the code above, we’ve created a category known as EcommerceStore.
The primary methodology, _fetchAssistant, receives an endpoint that it makes use of to ping fakestoreapi.com.
The next strategies act as question builders for the primary methodology:
getProductByIdreceives a product ID after which will get information pertaining to that particular productgetAllCategoriesfetches the entire classes which might be in fakestoreapi.comgetProductsInCategoryreceives a class of merchandise after which proceeds to fetch the entire merchandise in that particular class
These question builders will invoke the primary methodology.
Shifting on, the strategy generatePDFInvoice receives a bit of textual content and a file path. It then creates a PDF doc, writes the textual content on it, after which shops the doc within the file path offered.
The tactic generateRandomGeoLocation merely returns a random geolocation. This methodology can be helpful once we ship our store’s order pick-up location to a buyer who desires to choose up their merchandise.
Configuring buyer periods
To deal with our buyer journey, we have to maintain a session that features a buyer profile and their cart. Every buyer will, subsequently, have their very own distinctive session.
In manufacturing, we might use a database like MySQL, MongoDB, or one thing else resilient, however to maintain our tutorial lean and brief, we are going to use ES2015’s Map information construction. With Map, we are able to retailer and retrieve particular, iterable information, equivalent to distinctive buyer information.
In your ./routes/index.js file, add the next code simply above router.get('/meta_wa_callbackurl', (req, res).
const EcommerceStore = require('./../utils/ecommerce_store.js');
let Retailer = new EcommerceStore();
const CustomerSession = new Map();

router.get('/meta_wa_callbackurl', (req, res) => {//this line already exists. Add the above traces
The primary line imports the EcommerceStore class, whereas the second line initializes it. The third line creates the client’s session that we are going to use to retailer the client’s journey.
Initializing our WhatsApp Cloud API
Keep in mind the whatsappcloudapi_wrapper package deal that we put in earlier? It’s time to import and initialize it.
Within the ./routes/index.js file, add the next traces of code beneath the Specific router declaration:
const router = require('specific').Router(); // This line already exists. Under it add  the next traces:

const WhatsappCloudAPI = require('whatsappcloudapi_wrapper');
const Whatsapp = new WhatsappCloudAPI({
    accessToken: course of.env.Meta_WA_accessToken,
    senderPhoneNumberId: course of.env.Meta_WA_SenderPhoneNumberId,
    WABA_ID: course of.env.Meta_WA_wabaId,
});
The next values are surroundings variables we outlined in our ./.env.js file:
course of.env.Meta_WA_accessTokencourse of.env.Meta_WA_SenderPhoneNumberIdcourse of.env.Meta_WA_wabaId
We initialize the category WhatsAppCloudAPI with the three values above and title our occasion Whatsapp.
Subsequent, let’s parse all the info that’s coming into the /meta_wa_callbackurl POST webhook. By parsing the physique of the requests, we will extract messages and different particulars, just like the title of the sender, the cellphone variety of the sender, and so on.
Please notice: All of the code edits we make from this level can be completely made within the
./routes/index.jsfile.
Add the next traces of code beneath the opening bracket of the attempt{ assertion:
attempt { // This line already exists. Add the beneath traces

        let information = Whatsapp.parseMessage(req.physique);

        if (information?.isMessage) {
            let incomingMessage = information.message;
            let recipientPhone = incomingMessage.from.cellphone; // extract the cellphone variety of sender
            let recipientName = incomingMessage.from.title;
            let typeOfMsg = incomingMessage.sort; // extract the kind of message (some are textual content, others are photos, others are responses to buttons and so on...)
            let message_id = incomingMessage.message_id; // extract the message id
        }
Now, when a buyer sends us a message, our webhook ought to obtain it. The message is contained within the webhook’s request physique. To extract helpful info out of the physique of the request, we have to go the physique into the parseMessage methodology of the WhatsApp occasion.
Then, utilizing an if assertion, we verify whether or not the results of the strategy accommodates a legitimate WhatsApp message.
Contained in the if assertion, we outline incomingMessage, which accommodates the message. We additionally outline different variables:
recipientPhoneis the variety of the client who despatched us a message. We’ll ship them a message reply, therefore the prefix “recipient”recipientNameis the title of the client that despatched us a message. That is the title they’ve set for themselves of their WhatsApp profiletypeOfMsgis the kind of message {that a} buyer despatched to us. As we are going to see later, some messages are easy texts, whereas others are replies to buttons (don’t fear, it will make sense quickly!)message_idis a string of characters that uniquely identifies a message we’ve obtained. That is helpful once we need to do duties which might be particular to that message, equivalent to mark a message as learn
Up so far, all appears nicely, however we are going to affirm shortly.
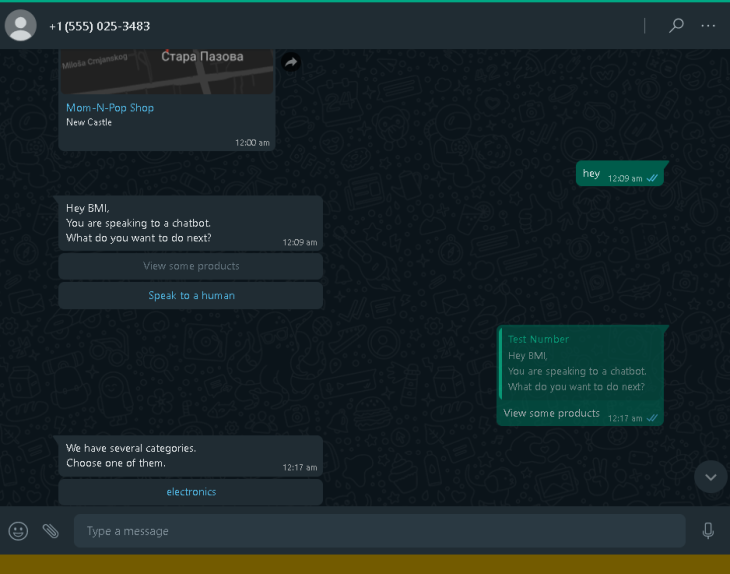
Understanding and responding to our buyer’s intent
Since our tutorial is not going to dive into any type of AI or pure language processing (NLP), we’re going to outline our chat stream with easy if…else logic.
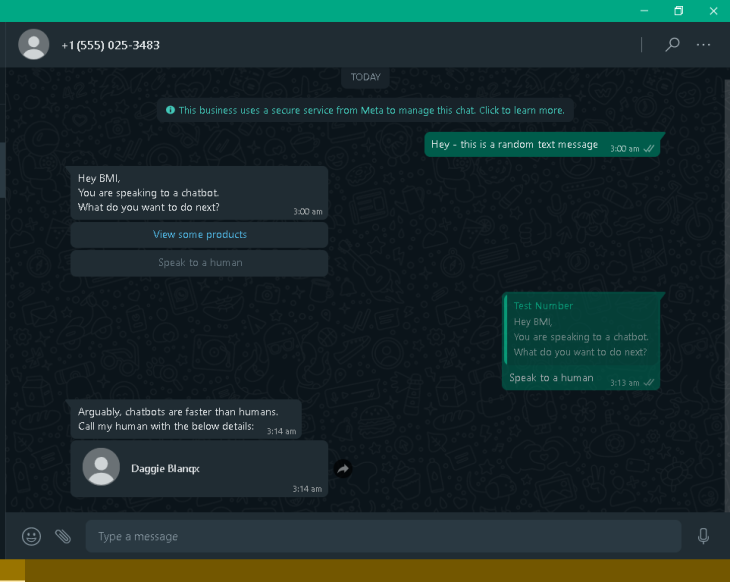
The dialog logic begins when the client sends a textual content message. We received’t take a look at the message itself, so we received’t know what they meant to do, however we are able to inform the client what our bot can do.
Let’s give our buyer a easy context, to which they will reply with a selected intent.
We’ll give the client two buttons:
- One which lets us know they need to converse to an precise human, not a chatbot
- One other to browse merchandise
To do that, insert the next code beneath message_id:
if (typeOfMsg === 'text_message') {
    await Whatsapp.sendSimpleButtons({
        message: `Hey ${recipientName}, nYou are talking to a chatbot.nWhat do you need to do subsequent?`,
        recipientPhone: recipientPhone,
        listOfButtons: [
            {
                title: 'View some products',
                id: 'see_categories',
            },
            {
                title: 'Speak to a human',
                id: 'speak_to_human',
            },
        ],
    });
}
The if assertion above solely lets us deal with textual content messages.
The sendSimpleButtons methodology permits us to ship buttons to a buyer. Pay attention to the title and id properties. The title is what the client will see, and the id is what we’ll use to know which button the client clicked.
Let’s verify if we did this proper. Open your WhatsApp app and ship a textual content message to the WhatsApp enterprise account.
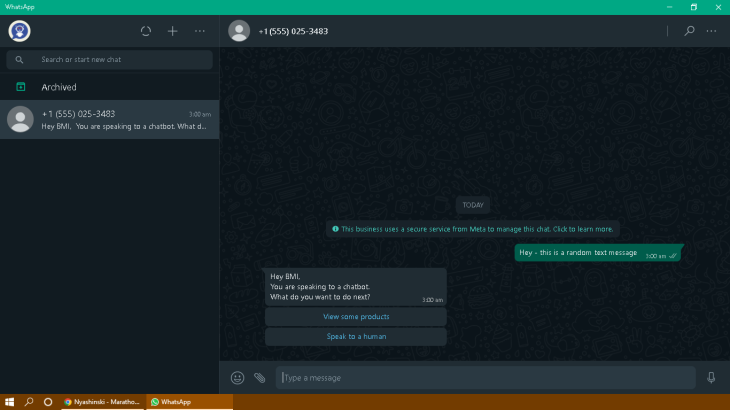
In the event you get a response just like the screenshot above, congratulations! You simply despatched your first message through the WhatsApp Cloud API.
Because the buyer might click on both of the 2 buttons, let’s additionally maintain the Converse to a human button.
Exterior the if assertion of the text_message logic, insert the next code:
if (typeOfMsg === 'simple_button_message') {
let button_id = incomingMessage.button_reply.id;
if (button_id === 'speak_to_human') {
await Whatsapp.sendText({
recipientPhone: recipientPhone,
message: `Arguably, chatbots are quicker than people.nCall my human with the beneath particulars:`,
});
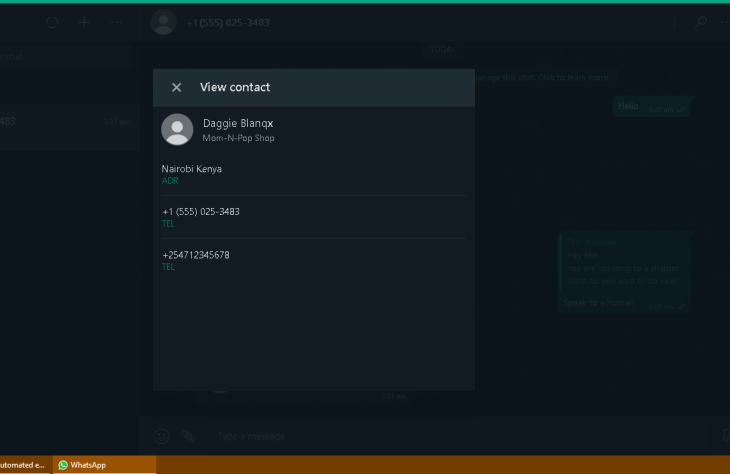
await Whatsapp.sendContact({
recipientPhone: recipientPhone,
contact_profile: {
addresses: [
{
city: 'Nairobi',
country: 'Kenya',
},
],
title: {
first_name: 'Daggie',
last_name: 'Blanqx',
},
org: {
firm: 'Mother-N-Pop Store',
},
telephones: [
{
phone: '+1 (555) 025-3483',
},
{
phone: '+254712345678',
},
],
},
});
}
};
The above code performs two actions:
- Sends a textual content message to inform the person they’ll obtain a contact card, utilizing the
sendTextmethodology - Sends a contact card utilizing the
sendContactmethodology
This code additionally detects the person’s intent utilizing the ID of the button the person clicked (in our case, the ID is the incomingMessage.button_reply.id), after which it responds with the 2 motion choices.
Now, return to WhatsApp and click on Converse to a human. In the event you did this proper, you will note a reply that appears as follows:
Whenever you click on the contact card you obtained, it is best to see the next:
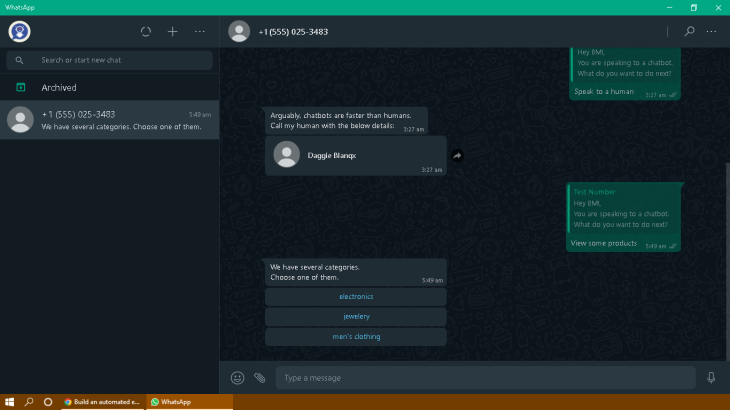
Subsequent, let’s work on the View some merchandise button.
Contained in the simple_button_message if assertion, however slightly below and outdoors the speak_to_human if assertion, add the next code:
if (button_id === 'see_categories') {
    let classes = await Retailer.getAllCategories();
    await Whatsapp.sendSimpleButtons({
        message: `We have now a number of classes.nChoose one among them.`,
        recipientPhone: recipientPhone,
        listOfButtons: classes.information
            .map((class) => ({
                title: class,
                id: `category_${class}`,
            }))
            .slice(0, 3)
    });
}
Here’s what the above code does:
- The
ifassertion ensures that the person clicked the View some merchandise button - Fetches product classes from
FakeStoreAPIthrough thegetAllCategoriesmethodology - Limits the variety of buttons to 3 utilizing the array methodology —
slice(0,3)— as a result of WhatsApp solely permits us to ship three easy buttons - It then loops via every class, making a button with a
titleand a novel ID that’s prefixed withcategory_ - With the
sendSimpleButtonsmethodology, we ship these buttons to the client
Return once more to your WhatsApp app and click on See extra merchandise. In the event you did the above steps proper, it is best to see a reply that appears just like the screenshot beneath:
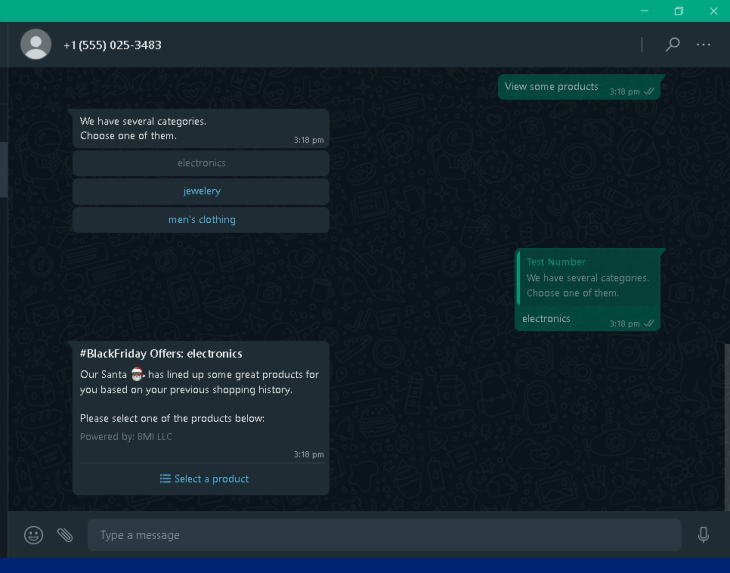
Fetching merchandise by class
Now, allow us to create the logic to get merchandise within the class that the client chosen.
Nonetheless contained in the simple_button_message if assertion, however beneath and outdoors the see_categories if assertion, add the next code:
if (button_id.startsWith('category_')) {
    let selectedCategory = button_id.break up('category_')[1];
    let listOfProducts = await Retailer.getProductsInCategory(selectedCategory);

    let listOfSections = [
        {
            title: `🏆 Top 3: ${selectedCategory}`.substring(0,24),
            rows: listOfProducts.data
                .map((product) => {
                    let id = `product_${product.id}`.substring(0,256);
                    let title = product.title.substring(0,21);
                    let description = `${product.price}n${product.description}`.substring(0,68);

                    return {
                        id,
                        title: `${title}...`,
                        description: `$${description}...`
                    };
                }).slice(0, 10)
        },
    ];

    await Whatsapp.sendRadioButtons({
        recipientPhone: recipientPhone,
        headerText: `#BlackFriday Gives: ${selectedCategory}`,
        bodyText: `Our Santa 🎅🏿 has lined up some nice merchandise for you primarily based in your earlier buying historical past.nnPlease choose one of many merchandise beneath:`,
        footerText: 'Powered by: BMI LLC',
        listOfSections,
    });
}
The if assertion above confirms that the button the client clicked was certainly the button that accommodates a class.
The very first thing we do right here is extract the particular class from the ID of the button. Then, we question our FakeStoreAPI for merchandise that belong to that particular class.
After querying, we obtain the checklist of merchandise inside an array, listOfProducts.information. We now loop via this array, and for every product in it we extract its value, title, description, and ID.
We append product_ to the id, which is able to assist us choose up a buyer’s choice within the subsequent step. Be sure to trim the size of the ID, title, and outline in accordance with WhatsApp Cloud API’s radio button (or checklist) restrictions.
We then return three values: ID, title, and outline. Since WhatsApp solely permits us a most of 10 rows, we are going to restrict the variety of merchandise to 10 utilizing the array methodology .slice(0,10).
After that, we invoke the sendRadioButtons methodology to ship the merchandise to the purchasers. Pay attention to the properties headerText, bodyText, footerText, and listOfSections.
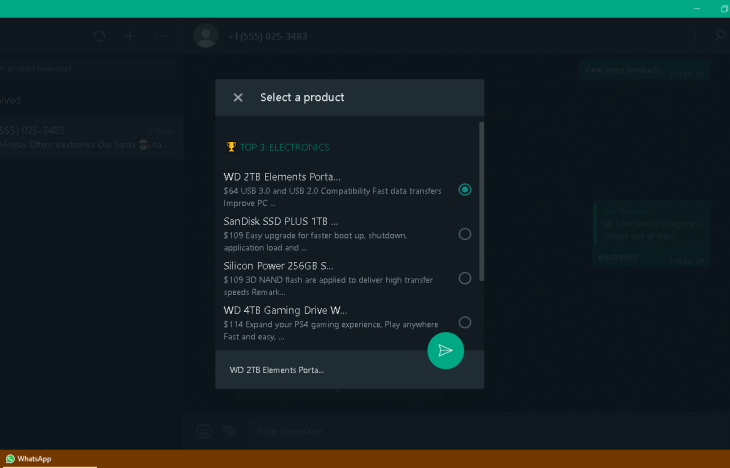
Return to the WhatsApp app and click on any class of merchandise. In the event you adopted the directions proper, it is best to see a reply that appears just like the screenshot beneath:
Whenever you click on Choose a product, it is best to see the next display:
 At this level, prospects can choose a product they discover fascinating, however can we all know what they’ve chosen? Not but, so allow us to work on this half.
Exterior the simple_button_message if assertion, allow us to add one other if assertion:
if (typeOfMsg === 'radio_button_message') {
    let selectionId = incomingMessage.list_reply.id; // the client clicked and submitted a radio button

}
Contained in the above if assertion and slightly below the selectionId, add the next code:
if (selectionId.startsWith('product_')) {
    let product_id = selectionId.break up('_')[1];
    let product = await Retailer.getProductById(product_id);
    const { value, title, description, class, picture: imageUrl, ranking } = product.information;

    let emojiRating = (rvalue) => ;

    let textual content = `_Title_: *${title.trim()}*nnn`;
    textual content += `_Description_: ${description.trim()}nnn`;
    textual content += `_Price_: $${value}n`;
    textual content += `_Category_: ${class}n`;
    textual content += `$ consumers favored this product.n`;
    textual content += `_Rated_: ${emojiRating(ranking?.price)}n`;

    await Whatsapp.sendImage({
        recipientPhone,
        url: imageUrl,
        caption: textual content,
    });

    await Whatsapp.sendSimpleButtons({
        message: `Right here is the product, what do you need to do subsequent?`,
        recipientPhone: recipientPhone,
        listOfButtons: [
            {
                title: 'Add to cart🛒',
                id: `add_to_cart_${product_id}`,
            },
            {
                title: 'Speak to a human',
                id: 'speak_to_human',
            },
            {
                title: 'See more products',
                id: 'see_categories',
            },
        ],
    });
}
The above code does the next:
- Extracts the product ID from the radio button the client clicked
- Queries FakeStoreAPI with that product ID
- When it receives and extracts the product’s information, it codecs the textual content. WhatsApp makes use of underscores to render textual content in italics, whereas asterisks render textual content in daring
- Render star emoji utilizing the
emojiRatingoperate. If a ranking is 3.8, it would render three star emojis - Attaches the product’s picture to the rendered textual content and sends it utilizing the
sendImagemethodology
After this, we ship the client an inventory of three buttons utilizing the sendSimpleButtons. One provides the client a chance so as to add merchandise to their cart. Pay attention to the button ID that’s prefixed with add_to_cart_.
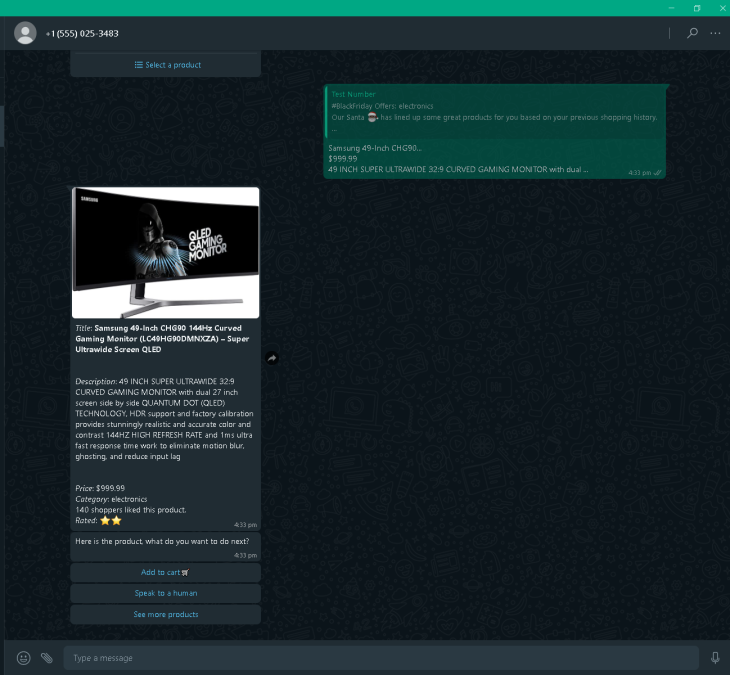
Now, return to your WhatsApp app and choose a product. In the event you adopted the directions accurately, it is best to see a reply that appears like the next screenshot:
Constructing periods to retailer buyer carts
To maintain observe of the merchandise a buyer provides to their cart, we have to have a spot to retailer the cart objects. Right here is the place CustomerSession comes into play. Let’s add some logic to it.
Exterior the radio_button_message if assertion, and slightly below the message_id declaration, add the next code:
let message_id = incomingMessage.message_id; // This line already exists. Add the beneath traces...

// Begin of cart logic
if (!CustomerSession.get(recipientPhone)) {
    CustomerSession.set(recipientPhone, {
        cart: [],
    });
}

let addToCart = async ({ product_id, recipientPhone }) => {
    let product = await Retailer.getProductById(product_id);
    if (product.standing === 'success') {
        CustomerSession.get(recipientPhone).cart.push(product.information);
    }
};

let listOfItemsInCart = ({ recipientPhone }) => {
    let whole = 0;
    let merchandise = CustomerSession.get(recipientPhone).cart;
    whole = merchandise.scale back(
        (acc, product) => acc + product.value,
        whole
    );
    let rely = merchandise.size;
    return { whole, merchandise, rely };
};

let clearCart = ({ recipientPhone }) => {
    CustomerSession.get(recipientPhone).cart = [];
};
// Finish of cart logic

if (typeOfMsg === 'text_message') { ... // This line already exists. Add the above traces...
The code above checks whether or not a buyer’s session has been created. If it has not been created, it creates a brand new session that’s uniquely recognized by the client’s cellphone quantity. We then initialize a property known as cart, which begins out as an empty array.
The addToCart operate takes in a product_id and the variety of the particular buyer. It then pings the FakeStoreAPI for the particular product’s information and pushes the product into the cart array.
Then, the listOfItemsInCart operate takes within the cellphone variety of the client and retrieves the related cart, which is used to calculate the variety of merchandise within the cart and the sum of their costs. Lastly, it returns the objects within the cart and their whole value.
The clearCart operate takes within the cellphone variety of the client and empties that buyer’s cart.
With the cart logic achieved, let’s construct the Add to Cart button. Contained in the simple_button_message if assertion and beneath its button_id declaration, add the next code:
if (button_id.startsWith('add_to_cart_')) {
    let product_id = button_id.break up('add_to_cart_')[1];
    await addToCart({ recipientPhone, product_id });
    let numberOfItemsInCart = listOfItemsInCart({ recipientPhone }).rely;

    await Whatsapp.sendSimpleButtons({
        message: `Your cart has been up to date.nNumber of things in cart: ${numberOfItemsInCart}.nnWhat do you need to do subsequent?`,
        recipientPhone: recipientPhone,
        listOfButtons: [
            {
                title: 'Checkout 🛍️',
                id: `checkout`,
            },
            {
                title: 'See more products',
                id: 'see_categories',
            },
        ],
    });
}
The above code extracts the product ID from the button the client clicked, then invokes the addToCart operate to avoid wasting the product into the client’s session’s cart. Then, it extracts the variety of objects within the buyer’s session’s cart and tells the client what number of merchandise they’ve. It additionally sends two buttons, one among which permits the person to take a look at.
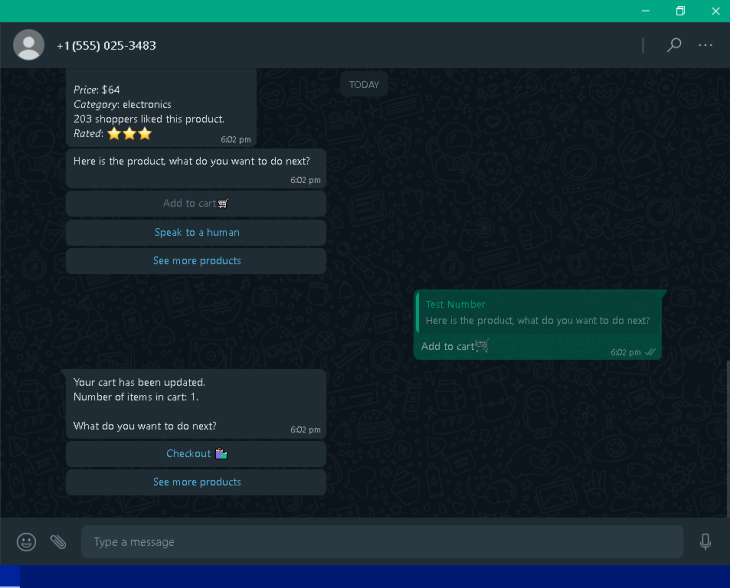
Pay attention to the button ID and return to your WhatsApp app. Click on Add to cart. In the event you adopted the directions nicely, it is best to see a reply that resembles the beneath screenshot:
Now that our prospects can add objects to the cart, we are able to write the logic for trying out.
Writing the checkout logic
Contained in the simple_button_message if assertion however outdoors the add_to_cart_ if assertion, add the next code:
if (button_id === 'checkout') {
  let finalBill = listOfItemsInCart({ recipientPhone });
  let invoiceText = `Listing of things in your cart:n`;

  finalBill.merchandise.forEach((merchandise, index) => {
      let serial = index + 1;
      invoiceText += `n#${serial}: ${merchandise.title} @ $${merchandise.value}`;
  });

  invoiceText += `nnTotal: $${finalBill.whole}`;

  Retailer.generatePDFInvoice({
      order_details: invoiceText,
      file_path: `./invoice_${recipientName}.pdf`,
  });

  await Whatsapp.sendText({
      message: invoiceText,
      recipientPhone: recipientPhone,
  });

  await Whatsapp.sendSimpleButtons({
      recipientPhone: recipientPhone,
      message: `Thanks for buying with us, ${recipientName}.nnYour order has been obtained & can be processed shortly.`,
      message_id,
      listOfButtons: [
          {
              title: 'See more products',
              id: 'see_categories',
          },
          {
              title: 'Print my invoice',
              id: 'print_invoice',
          },
      ],
  });

  clearCart({ recipientPhone });
}
The above code does the next:
- Will get all of the objects within the cart and places them inside
finalBill - Initializes a variable
invoiceText, which is able to include the textual content we’ll ship to the client in addition to the textual content that can be drafted into the PDF model of the bill- The
forEachloop merely concatenates thetitleandvalueof every product to the bill
- The
- The
generatePDFInvoicemethodology (the identical one we outlined in ourEcommerceStoreclass) takes within the particulars of the order, drafts a PDF doc, and saves it within the file path in our native listing/folder that we offered it with - The
sendTextmethodology sends a easy textual content message containing the order particulars to the client sendSimpleButtonssends some buttons to the client. Pay attention to the Print my bill button and its ID- Lastly, the
clearCartmethodology empties the cart
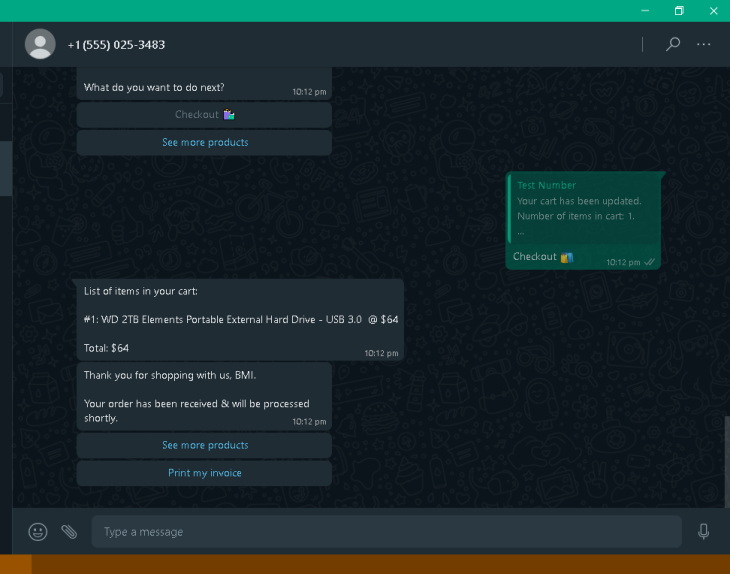
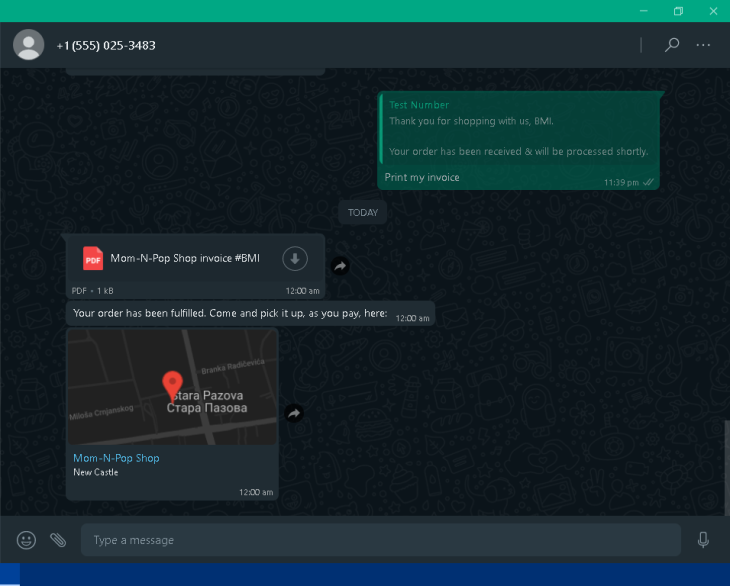
Now, swap again to your WhatsApp app and click on Checkout. In the event you adopted the directions nicely, you will note a reply that resembles the next screenshot:
At this level, the client ought to obtain a printable PDF bill. Because of this, allow us to work on some logic relating to the Print my bill button.
Writing our printable bill logic
Contained in the simple_button_message if assertion however outdoors the checkout if assertion, add the next code:
if (button_id === 'print_invoice') {
  // Ship the PDF bill
  await Whatsapp.sendDocument({
      recipientPhone: recipientPhone,
      caption:`Mother-N-Pop Store bill #${recipientName}`
      file_path: `./invoice_${recipientName}.pdf`,
  });

  // Ship the situation of our pickup station to the client, to allow them to come and choose up their order
  let warehouse = Retailer.generateRandomGeoLocation();

  await Whatsapp.sendText({
      recipientPhone: recipientPhone,
      message: `Your order has been fulfilled. Come and choose it up, as you pay, right here:`,
  });

  await Whatsapp.sendLocation({
      recipientPhone,
      latitude: warehouse.latitude,
      longitude: warehouse.longitude,
      deal with: warehouse.deal with,
      title: 'Mother-N-Pop Store',
  });
}
The code above will get the PDF doc generated within the earlier step from the native file system and sends it to the client utilizing the sendDocument methodology.
When a buyer orders a product on-line, additionally they have to understand how they may obtain the bodily product. Because of this, we generated some random coordinates utilizing the generateRandomGeoLocation methodology of the EcommerceStore class and despatched these coordinates to the client utilizing the sendLocation methodology to allow them to know the place they will bodily choose up their product.
Now, open your WhatsApp app and click on Print my bill.
In case you have adopted the above directions accurately, it is best to see a reply that appears just like the screenshot beneath:
Displaying learn receipts to prospects
Lastly, you could have famous that the verify marks beneath the messages are grey, as a substitute of blue. This means that the messages we despatched didn’t return learn receipts even though our bot was studying them.
Grey ticks may be irritating to prospects, and for that reason, we have to work on displaying the blue ticks.
Exterior the simple_button_message if assertion and earlier than the closing curly brace of the information?.isMessage if assertion, add the next code:
await Whatsapp.markMessageAsRead({ message_id });
This easy one-liner marks a message as learn as quickly as we’ve responded to it.
Now, open your WhatsApp app and ship a random textual content message. Are you seeing what I’m seeing?
In case your earlier chats have been up to date with blue ticks, then 🎉 congratulations! You’ve gotten reached the tip of this tutorial and discovered a couple of issues alongside the way in which.
Closing ideas
With a grand whole of two billion month-to-month lively customers, ignoring WhatsApp as an ecommerce technique is a certain technique to fall behind your enterprise’s competitors, and since most of your prospects are already utilizing WhatsApp of their day-to-day actions, why shouldn’t your enterprise meet them there?
I hope this tutorial has been useful in demystifying the WhatsApp Cloud API, and I hope you had some enjoyable alongside the way in which. In case you have questions on this let me know on Twitter or LinkedIn @daggieblanqx. Let me know what different matters you might discover fascinating, and don’t forget to share this text along with your tech circles.
LogRocket: See the technical and UX causes for why customers don’t full a step in your ecommerce stream.

LogRocket is sort of a DVR for internet and cellular apps and web sites, recording actually every part that occurs in your ecommerce app. As an alternative of guessing why customers don’t convert, LogRocket proactively surfaces the foundation explanation for points which might be stopping conversion in your funnel, equivalent to JavaScript errors or useless clicks. LogRocket additionally screens your app’s efficiency, reporting metrics like consumer CPU load, consumer reminiscence utilization, and extra.
Begin proactively monitoring your ecommerce apps — attempt free of charge.
