
It is a pretty simple article that I wrote in order that I can consult with it after I want one thing sooner or later. I attempted to cowl the basics in addition to some extremely magical issues that can give each new Linux consumer the sensation that they’ve superpowers at their fingertips.
On this article, we are going to begin with essentially the most fundamental Linux instructions and progress to understanding how all the pieces works in Linux terminals till studying about some tremendous cool stuff just like the pipe command, together with the tee and xargs instructions & on the identical time additionally, you will find out about varied instructions and utilities that we’ll use whereas we’re practising the identical, and eventually, we are going to use some very useful Linux utilities to reinforce the productiveness, so with out additional ado, let’s get began.

Frequent Instructions in Linux
Lets begin with essentially the most fundamental bash instructions beginning with the echo command.
The echo command prints the strings handed as arguments. That is largely utilized in shell scripts to print the standing out to the terminal.
// Fundamental Syntax
// echo [option] [string]

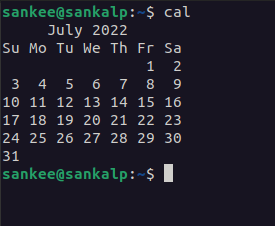
Now, in case you’re lazy like me and wish to open a calendar in a GUI, merely use the cal command, which can print a easy calendar within the terminal itself.
// Fundamental Syntax
// cal [[month] yr]

$ cal
$ cal 12 12
// It will print the Dec'12 calendar

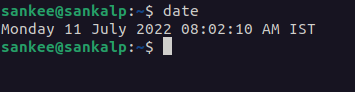
The Date command is usually used to print the date to the terminal and and to set the system date. Utilizing date command, it’s doable to print date in several codecs and in addition to calculate dates.
// Fundamental Syntax
// date [OPTION]... [+FORMAT]

$ date
// prints day of the week, day of the month, month, yr, time and timezone
// Sunday 19 June 2022 12:39:26 PM IST
Should you want to reuse one of many instructions out of your terminal session with out having to retype the total command, you could use the historical past command, which can output the entire instructions from that terminal session.
// SYNTAX
$ historical past

Should you want to rerun certainly one of these instructions, simply enter the command line quantity preceded by an ! mark.

Knowledge Streams
Now that we’re aware of the fundamentals of the command line, let’s learn the way all the pieces within the Linux command line capabilities in order that we are able to optimise the varied utilities and enhance our productiveness. Let’s examine Linux command line information streams:
There are 3 totally different Knowledge Streams in Linux as follows:
- Normal Enter, abbreviated as
stdin - Normal Output, abbreviated as
stdout - Normal Error, abbreviated as
stderr
Normal Enter consists solely of the instructions you enter into the terminal to carry out out explicit operations. Normal output is the output that prints out of your instructions in your terminal display, and Normal Error is the message that outputs errors out of your instructions in your terminal.

Right here the ls command is the Normal Enter for the terminal and the checklist of directories printed on the display is the Normal Output.
As a result of these are information streams, we are able to ship them someplace apart from your terminal, similar to we are able to write them to a file. These information streams even have quantity designations as follows:
| Normal Enter | 0 |
|---|---|
| Normal Output | 1 |
| Normal Error | 2 |
We will write the output of those instructions to totally different information utilizing redirection operators. Redirection operators in linux are as follows:
| Enter Redirection | < |
|---|---|
| Output Redirection | 1> |
| Output Redirection (appends) | 1>> |
| Error Redirection | 2> |
| Error Redirection (appends) | 2>> |
Lets attempt redirection operators by redirecting a few of the outputs in motion:
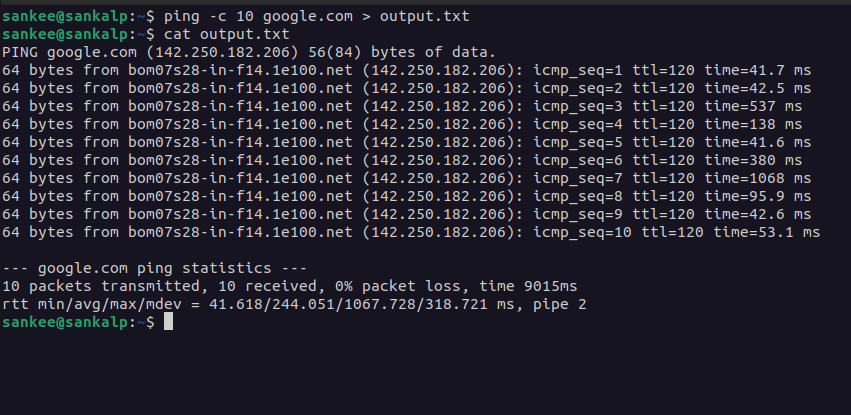
Lets use the ping command to verify the connectivity between the native machine and the server.

Now I m getting the output on the identical display, lets redirect the output of the next command to output.txt file.
$ ping -c 10 google.com > output.txt
And now you will see that nothing prints in your terminal display after working this command.

It is because you redirected the output to the output.txt file utilizing > redirection operator. Now lets verify if the redirection course of executed efficiently or not through the use of the cat command to print the contents of output.txt file.
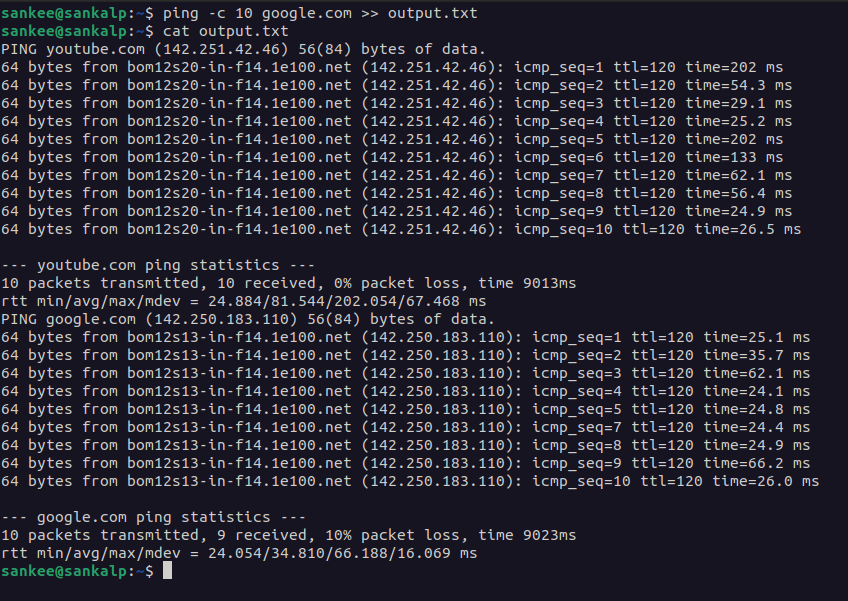
You may see that the output.txt file now simply incorporates the usual output of the ping command with youtube.com because the vacation spot, quite than google.com. It is because the > redirection operator truncates the usual output to the information when writing, however the >> redirection operator appends the info to the identical file. Strive with appending the info utilizing the ping command and >> redirection operator, with totally different locations redirecting to the identical output.txt file.
And, as proven within the above picture, quite of clearing and writing to the output.txt file, the info is appended to it this time. Now attempt the next ping command however with an invalid vacation spot in order that we generate an error from the command.
$ ping -c 10 google.m >> output.txt

Now lets redirect the error message utilizing error redirection operator: 2>> to the errors.txt file utilizing the next command after which print the contents of it utilizing the cat command.
$ ping -c 10 google.m >> output.txt 2>> errors.txt

And, as you’ll be able to see, the error message was efficiently redirected to the errors.txt file.
Do you know that? In Linux, all the pieces, actually all the pieces, is taken into account a file, and terminals aren’t any exception. As a result of terminals are thought-about information, you could redirect the output of 1 command from one terminal display to a different hahah. All it’s a must to do is open two totally different terminals in your machine and determine the file names of your two totally different terminals utilizing the tty command.

You’ll now use the next command to redirect the usual output out of your /dev/pts/0 terminal to your /dev/pts/1 terminal:
$ echo "Good day from /dev/pts/0" >> /dev/pts/1

As you’ll be able to see, we have been in a position to efficiently redirect the usual output from one terminal to the opposite. And I do know you’re feeling like a superhero now having tremendous energy in your palms ahaha!
Now, let’s speak about one other utility that may assist you to enhance your effectivity with terminals. That is the Linux Pipe Command, which lets you mix two or extra instructions such that the output of 1 command turns into the enter to the following.
The syntax is simple; merely insert a vertical image (|) between the 2 instructions.
// SYNTAX

$ command 1 | command 2 | command 3 | command N
For instance you wish to know what number of configs you are utilizing in certainly one of your initiatives. As an alternative of opening the file and counting one after the other, you will use the pipe command with the phrase depend utility to depend the variety of strains in that particular file. To learn the variety of strains in a file, use the cat command to show the file contents and the wc command to print the variety of strains and join them utilizing the pipe command:
$ cat config/dev.env | wc -l
// prints 3
Should you want to use the ping command however are solely within the outcomes, you could use the ping command with few choices and the tail command to easily show the outcome/abstract of the ping course of. To do the identical factor, use the next command:
$ ping google.com -Ac 10 | tail -3
The -Ac choices are the identical as those we used with the ping command; the -A possibility quickens the process, the -c 10 possibility specifies the variety of packets to cease after and the pipe command feeds the output of the ping command to the tail command, which outputs the final specified strains of output, which on this case is 3. The next is the output of the previous command:

Tee Command
Assume you wish to retailer the outcomes of the identical ping command to 1 file whereas additionally saving every packet’s data to a different, and right here is the place the Tee command is useful. It’s important to use the Tee command with the pipe command to execute totally different operations on the identical customary output of those instructions.
// Syntax
$ tee [options] [files]
Now, use the next command to retailer the ping command outcome to the outcomes.txt file and the packet particulars to the packets.txt file:
$ ping google.com -Ac 10 | tee packets.txt | tail -2 >> outcomes.txt
The tee packets.txt command will redirect the output of the ping command to the packets.txt file whereas additionally filtering the packets data utilizing tail -2 and storing the statistics to the outcomes.txt file.
Xargs Command
Now that you’ve closely used pipes and redirections together with your ping command and if you wish to do away with all of the information in your machine, you’ll be able to both use the rm -rf command to delete information by typing every file identify in your terminal or you’ll be able to merely use the xargs utility, which lets you deal with the stdout of 1 command as an argument to the following. Assuming that all your information are in a single listing, all it’s a must to do is print the information in that listing utilizing the ls command after which use the pipe command with xargs to cross the output to the next command to take away the entire information, which is rm -rf.
$ ls | xargs rm -rf

As you’ll be able to see, we had 10 totally different information earlier, and we eliminated all of them with only one command utilizing the xargs utility, which passes the output of 1 command as arguments to the next command. It’s possible you’ll alternatively make a brand new file referred to as filesToBeDeleted.txt and enter the names of all of the information you want to take away, after which use the cat and rm -rf instructions, together with the pipe and xargs instructions, to do the identical.
$ cat filesToBeDeleted.txt | xargs rm -rf
Aliases
Think about you are working with Docker and whereas printing all of the containers, your output display is simply as clear as my future; hardly comprehensible lol.

And also you begin googling stuff to format the output, and as traditional, Google comes via with a customized command for formatting the output of Docker containers that appears like this:
$ docker ps -a --format="IDt{{.ID}}nNAMEt{{.Names}}nPicturet{{.Picture}}nPORTSt{{.Ports}}nCOMMANDt{{.Command}}nCREATEDt{{.CreatedAt}}nSTATUSt{{.Standing}}n"
And now, due to this practice command, your output display is clearly separated and really straightforward to know:

After a couple of days, you start engaged on another docker mission and end up in want of the customized formatting command once more, which leads to the distraction of repeatedly Google all the pieces for a similar command each every so often, and that is when Linux Alias is useful! Alias means that you can construct a shortcut for such daunting lengthy instructions in order that you do not have to Google them on a regular basis. Aliases are categorised into two varieties: non permanent and everlasting. Non permanent Aliases can be utilized all through the identical session, however as soon as the terminal is closed, the alias can’t be utilized in one other session.
Creating Non permanent Aliases is kind of simple; the syntax is as follows.:
// SYNTAX

$ alias <identify>=`<someDauntingCommand>`

// The command must be in quotes and there must be no
// white areas between alias identify, `=` signal and command.
Open your terminal and run the next command to create an alias for the customized docker format command:
$ alias dockerformat='docker ps -a --format="IDt{{.ID}}nNAMEt{{.Names}}nImaget{{.Picture}}nPORTSt{{.Ports}}nCOMMANDt{{.Command}}nCREATEDt{{.CreatedAt}}nSTATUSt{{.Standing}}n"'
And now all it’s a must to do is simply use your shortcut command or the alias you created proper now that’s dockerformat in your terminal and look ahead to the magic

As beforehand talked about, non permanent aliases are solely efficient so long as you don’t shut the terminal window, and it’s round this level the place you’ll be able to discover everlasting aliases.
It’s essential to use the identical syntax as for non permanent aliases when creating everlasting aliases, however you will need to reserve it to a file. Let’s create a everlasting alias on your identical docker containers customized formatting command.
- Create a brand new file named
.bash_aliasesin your/residencelisting. If you need you’ll be able to truly add these aliases into the identical.bashrcfile however for maintaining issues tidy and seperate we will likely be utilizing.bash_aliasesfile. To create a file use the next command:
$ nano .bash_aliases

// nano is an easy terminal-based textual content editor.
- Now, within the
.bash_aliasesfile, add your aliases utilizing the identical command that we used to create the non permanent alias.
alias dockerformat='docker ps -a --format="IDt{{.ID}}nNAMEt{{.Names}}nImaget{{.Picture}}nPORTSt{{.Ports}}nCOMMANDt{{.Command}}nCREATEDt{{.CreatedAt}}nSTATUSt{{.Standing}}n"'
- Whenever you’ve completed including your alias to the file, hit
Ctrl+Oafter whichEnterkey to put it aside, thenCtrl+Xto exit the nano textual content editor and return to the terminal. - Now, use the next command to inform your terminal to search for customized instructions in your freshly created
.bash_aliasesfile:
$ supply ~/.bash_aliases
- Aaah, that is it, you have efficiently added the everlasting alias to your machine. Try it out through the use of your newly added everlasting alias.

Alias’ Story Time*: (The nice deal of Dumbfuckery I did!)*
Please just remember to should not overriding any shell builtin command with your individual alias command, or else your terminal will at all times consider that you’re making an attempt to make use of your alias quite than the unique builtin command. I discovered the shutdown -P now command extremely useful for each time I wanted to show off my machine (simply as soon as a month however sure ), however typing the whole command was not very simpler, so I made an alias for the shutdown command and named it
 sh. So, after a month or so, after I wished to change my terminal from bash to shell, the built-in command for doing so is, yeah in fact, sh, and each time I used sh, my machine used to close down abruptly, and I wasted my complete day figuring out why that was occurring for no purpose, after which after hours of googling, my thoughts requested me to verify aliases, and I used to be like huhhhhh! Please don’t override any built-in command with a purpose to save your self hours of totally pointless googling.
DMs are open right here
