
Utilizing movement sensors in sport improvement is an effective way to reinforce a participant’s expertise. In one of the vital traditional use instances, movement sensors detect the orientation of a participant’s gadget and use it to maneuver the participant round.
On this put up, we’ll go over the fundamentals of utilizing movement sensors in a Unity software. This may be utilized to any app, whether or not it’s an off-the-cuff cell sport, AR or VR expertise, or one that features options counting on a way of motion.
Idea of labor
On this article, we’re going to create a set of two examples. The primary one might be easy, you’ll be taught to learn values from a gyroscope, accelerometer, and different sensors, after which output them to a textual content subject.
The second instance might be a bit extra fascinating. We’ll construct a PlayerController prototype for a first-person sport the place a participant can transfer and go searching simply by tilting and orienting a cell gadget.
In each examples, we’ll be utilizing the newer InputSystem. There’s additionally a legacy means of working with gyroscopes and accelerometers in Unity, however I’m not going to cowl that in the present day. I assume you have got a minimum of a primary understanding of the Unity engine, although I’ll unfold the tutorial in small steps.
As an enormous fan of studying by doing, I encourage you to observe alongside. I additionally advocate experimenting with these examples by yourself to solidify your new information!
However earlier than we bounce into motion, let’s briefly discuss gyroscopes and accelerometers.
Understanding sensors and motion
Gyroscopes and accelerometers — how do these sensors differ from one another? And the way are they helpful?
You most likely already know that smartphones come geared up with completely different modules and sensors. Amongst them, you may usually discover each a gyroscope and an accelerometer. The concrete implementation of those sensors differs from gadget to gadget, however nearly all cell gadgets have them as of late.
Whereas an accelerometer measures acceleration (therefore its identify), a gyroscope determines a change in orientation or angular velocity. Seeing precise values from every sensor is one of the simplest ways for example what this all means.
Take a look at the next image of telephones mendacity in numerous methods and examine the values from each sensors.
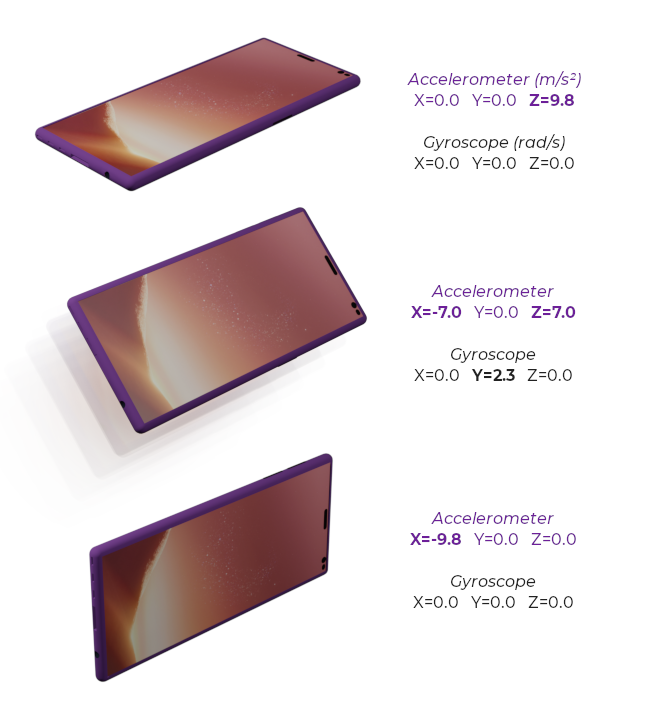
I acquired these values from my telephone utilizing the CPU-Z Android app. As you may see, values from the gyroscope are angular velocities in radians per second alongside every axis. These values are 0.0 when the gadget shouldn’t be rotating in the mean time.
The acceleration is in a normal acceleration unit, meters per second squared. When my telephone lies nonetheless within the first picture, its acceleration sensor studies a 9.8 meters per second squared acceleration alongside the z-axis, whereas the x- and y-axis are 0. That’s as a result of the one acceleration that acts on the gadget is the Earth’s gravity. In principle, the worth could be 1.62 meters per second squared if you happen to had the gadget positioned like that on the moon.
Constructing a Unity app with movement sensors
Now let’s get constructing!
Studying sensor values and outputting as textual content
We’ll begin by constructing a easy Unity software that we will use to learn values from completely different sensors in real-time. Aside from the accelerometer and gyroscope, we’ll be studying values from perspective and gravity sensors.
If you wish to observe alongside, I like to recommend utilizing Unity 2021.3.4f1 and connecting your gadget to your laptop with a USB cable. It’s vital to even have USB debugging enabled, it can assist you to deploy your cell software instantly from the Unity editor.
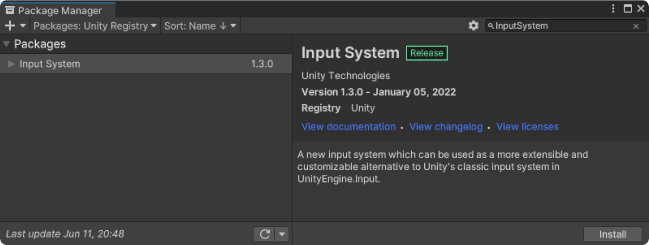
First, after creating a brand new venture in Unity, now we have to import the InputSystem package deal. Open Window → Package deal Supervisor. Choose Unity Registry from Package deal repositories, kind InputSystem within the search subject, choose the package deal, and hit set up.
Then, within the Hierarchy tab, add a brand new sport object to our scene with a Textual content element. You are able to do this by right-clicking and deciding on from the context menu UI → Legacy → Textual content. For this instance, we don’t want all of the bells and whistles of Textual content Mesh Professional.
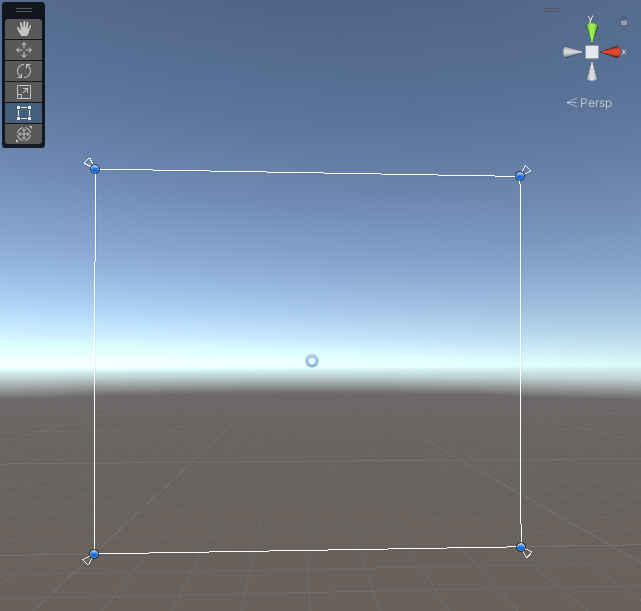
After we added a Textual content, the Unity editor additionally added a Canvas. Textual content is now the kid object of this Canvas. Within the Scene tab, use the Rect Instrument to resize the Textual content object till it covers the complete Canvas. It ought to snap on corners.
Now, within the inspector, change the Anchor Preset to stretch alongside each axes and the properties of the Textual content element to have the precise textual content centered each vertically and horizontally. Then, add a brand new script. Let’s name it SensorsReader.

After we kind the next C# code, we’re able to construct and run the appliance on our cell gadget.
utilizing UnityEngine;
utilizing UnityEngine.InputSystem;
utilizing UnityEngine.UI;

utilizing Gyroscope = UnityEngine.InputSystem.Gyroscope;

[RequireComponent(typeof(Text))]
public class SensorsReader : MonoBehaviour
{
    non-public Textual content textual content;

    void Begin()
    {
        textual content = GetComponent<Textual content>();

        InputSystem.EnableDevice(Gyroscope.present);
        InputSystem.EnableDevice(Accelerometer.present);
        InputSystem.EnableDevice(AttitudeSensor.present);
        InputSystem.EnableDevice(GravitySensor.present);
    }

    void Replace()
    {
        Vector3 angularVelocity = Gyroscope.present.angularVelocity.ReadValue();
        Vector3 acceleration = Accelerometer.present.acceleration.ReadValue();
        Vector3 perspective = AttitudeSensor.present.perspective.ReadValue().eulerAngles; // ReadValue() returns a Quaternion
        Vector3 gravity = GravitySensor.present.gravity.ReadValue();

        textual content.textual content = $"Angular VelocitynX={angularVelocity.x:#0.00} Y={angularVelocity.y:#0.00} Z={angularVelocity.z:#0.00}nn" +
                        $"AccelerationnX={acceleration.x:#0.00} Y={acceleration.y:#0.00} Z={acceleration.z:#0.00}nn" +
                            $"AttitudenX={perspective.x:#0.00} Y={perspective.y:#0.00} Z={perspective.z:#0.00}nn" +
                             $"GravitynX={gravity.x:#0.00} Y={gravity.y:#0.00} Z={gravity.z:#0.00}";
    }
}
On the high, you may see we’re utilizing the UnityEngine.InputSystem namespace. That’s the one we acquired from the InputSystem package deal we put in earlier than. We’re utilizing UnityEngine.UI so we will work with the Textual content element. We additionally need to use the Gyroscope class from the UnityEngine.InputSystem namespace, not the legacy one.
SensorsReader is a MonoBehaviour and we embellished the category with the [RequireComponent(typeof(Text))] attribute. It isn’t necessary, however utilizing this attribute is an effective observe. Our customized SensorsReader element depends upon Textual content in runtime, and never having one would lead to a runtime error. With this attribute, we will catch the difficulty already in compile time which is usually higher.
The category has just one member, the textual content of kind Textual content. We assigned a reference to the Textual content element on the identical object within the Begin technique. We did that utilizing the GetComponent. We additionally enabled Gyroscope, Accelerometer, Angle, and Gravity sensors.
We’re not going to make use of all of them within the second instance, however I extremely advocate experimenting and attempting to give you some use instances for all of them. Be curious and artistic!
Lastly, within the Replace technique, we assign values we learn from sensors to Vector3 structs and show these values in our Textual content element.
And that’s just about it for the primary instance. Now, swap again to Unity Editor, go to File → Construct Settings and swap to the platform your cell gadget runs on.
In Participant Settings, change the default orientation to both portrait or panorama. Then, again within the Construct Settings, choose which gadget you’d wish to run the appliance, assuming you have got a tool related as specified earlier. Hit Construct And Run.
In a number of moments, it’s best to see real-time values from movement sensors in your app. If all the things works, rotate and transfer your gadget whereas watching the values. Attempt to construct a way of orientation alongside the x-, y-, and z-axis earlier than transferring to the ultimate instance.
Getting values from movement sensors in Unity, as you simply noticed, is fairly easy. Let’s proceed to a bit extra superior instance.
Constructing a PlayerController
A PlayerController permits us to go searching and transfer in house based mostly on values from Accelerometer and AttitudeSensor.
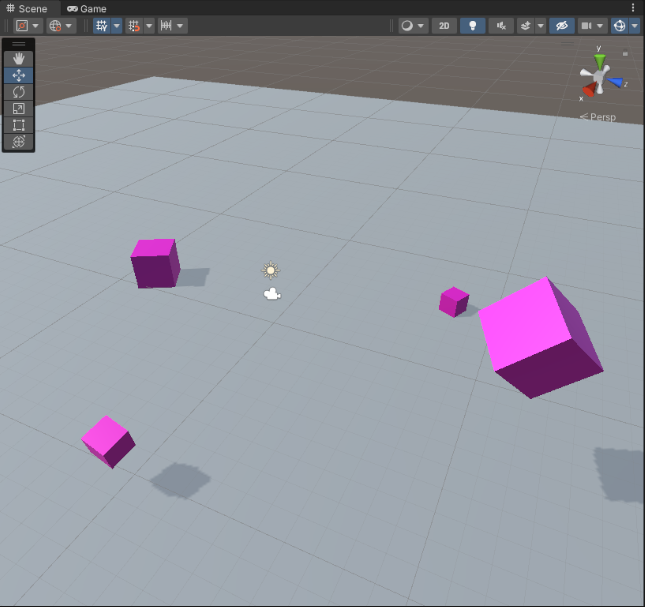
Create a brand new Unity scene and a brand new Airplane within the Hierarchy tab. Transfer it to the world’s origin and place a number of cubes round. The aircraft represents the bottom, and the cubes will function orientation factors.
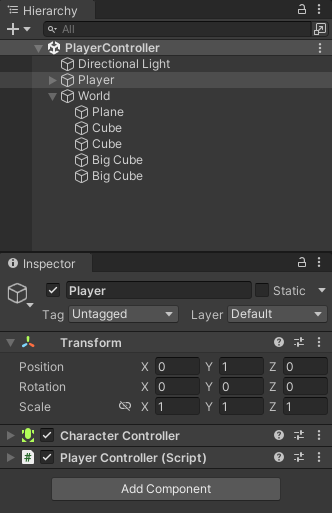
Now, add a brand new empty GameObject on the aircraft, rename it to Participant, and drag the MainCamera onto it. MainCamera turns into its little one object. Then, add a CharacterController element to the Participant and a brand new customized script. Let’s name it PlayerController.
The scene is prepared! Now, we will begin writing the PlayerController script. First, we want a further utilizing assertion, and, although this isn’t necessary, we’ll embellish the category with the RequireComponent attribute.
utilizing UnityEngine;
utilizing UnityEngine.InputSystem;

[RequireComponent(typeof(CharacterController))]
public class PlayerController : MonoBehaviour
The PlayerController class wants only a few members.
non-public CharacterController characterController;

[SerializeField]
non-public float movementSpeed = 3.0f;

non-public Rework rotator;

[SerializeField]
non-public float smoothing = 0.1f;
The SerializeField attribute permits us to edit variables within the Inspector tab whereas protecting their entry modifiers non-public. Nevertheless, bear in mind that the compiler ignores the default worth within the code as soon as Unity serializes the sector. Unity serializes public fields by default.
Within the Begin technique, we assign a reference to CharacterController, allow each Accelerometer and AttitudeSensor, and create a brand new GameObject. We identify this object Rotator. Quickly, we’ll use this object to retailer intermediate rotation in its Rework element.
non-public void Begin()
{
characterController = GetComponent<CharacterController>();

InputSystem.EnableDevice(Accelerometer.present);
    InputSystem.EnableDevice(AttitudeSensor.present);

rotator = new GameObject("Rotator").rework;
rotator.SetPositionAndRotation(rework.place, rework.rotation);
}
Within the Replace technique, we name the Transfer after which the LookAround strategies in each body. These strategies, which we’ll write proper after Replace, are the essence of our PlayerController.
non-public void Replace()
{
Transfer();
LookAround();
}
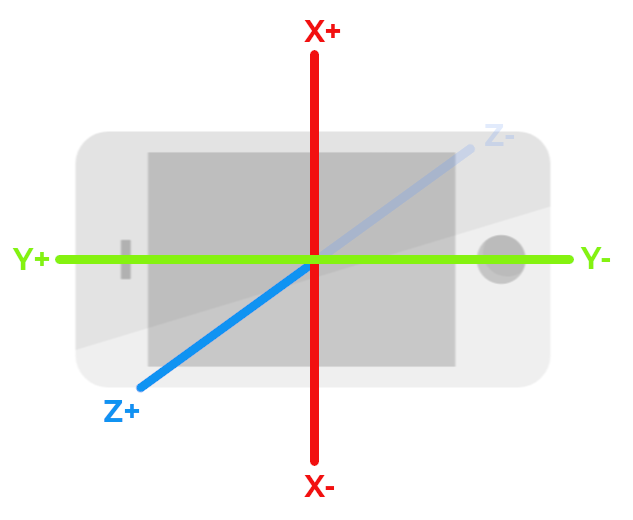
Let’s begin with the Transfer technique. We learn values from Accelerometer and use the acceleration alongside the x and z axes to create a motion course. Our transfer course might be a Vector3, and this 3D vector will inform the CharacterController how briskly and during which course the Participant needs to be transferring.
We don’t need to transfer alongside the y-axis (up and down), so we preserve y as 0. Alongside the z-axis (ahead and backward), we instigate the motion by tilting the gadget ahead and backward. Alongside the x-axis (left and proper), we need to strafe. Nevertheless, we have to inverse the z worth as a result of the coordinate system orientation corresponds with the gadget’s perspective.
We multiply acceleration by moveSpeed and by Time.deltaTime to have the motion pace unbiased of the body charge. How this works is exterior the scope of this put up, however if you happen to don’t know, I extremely advocate getting familiarized! You can begin right here within the Unity documentation.
Earlier than making use of the transfer course to CharacterController, we have to rework it from the native house to the world house. The distinction between native and world house is omnipresent in sport improvement. However, once more, that’s exterior the scope of this put up.
non-public void Transfer()
{
Vector3 acceleration = Accelerometer.present.acceleration.ReadValue();

Vector3 moveDirection = new(acceleration.x * movementSpeed * Time.deltaTime, 0, -acceleration.z * movementSpeed * Time.deltaTime);
Vector3 transformedDirection = rework.TransformDirection(moveDirection);

characterController.Transfer(transformedDirection);
}
The ultimate piece of code on this instance is the LookAround technique. On this technique, we learn the perspective from AttitudeSensor. This worth is a quaternion. If this time period is new to you, take it from right here that they’re generally utilized in video games to signify a rotation.
We assign perspective because the rotation of our rotator. We rotate the rotator 180 levels alongside the z-axis in its native house in a single step, 90 levels alongside the x-axis, and 180 levels within the y-axis on this planet house within the second step.
We do that as a result of we wish the ultimate rotation to match the orientation after we maintain the gadget within the Panorama Left place. This happens when the left within the portrait place is now the underside.
Ultimately, we apply the rotation from the rotator to this object, although in a roundabout way. It’s utilized through spherical interpolation, also referred to as Slerp. Unity has us coated and offers a static technique of the Quaternion class. As a t worth, we use the smoothing issue.
>non-public void LookAround()
{
Quaternion perspective = AttitudeSensor.present.perspective.ReadValue();

rotator.rotation = perspective;
rotator.Rotate(0f, 0f, 180f, Area.Self);
rotator.Rotate(90f, 180f, 0f, Area.World);

rework.rotation = Quaternion.Slerp(rework.rotation, rotator.rotation, smoothing);
}
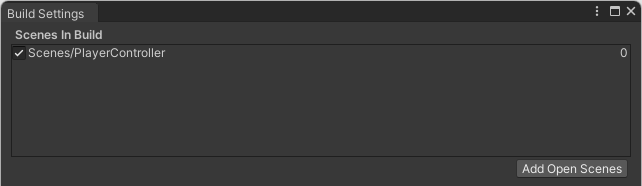
Nearly there! The very last thing you want to do earlier than testing is to change the Default Orientation in Participant Settings from Portrait to Panorama Left and substitute the scene from the earlier instance with the present one in Construct Settings.

Conclusion
And that’s it! You now have a movement sensor-based PlayerController to your Unity tasks!
A Unity venture that comprises each examples is on the market for you in this GitHub repository.
LogRocket: Full visibility into your net and cell apps

LogRocket is a frontend software monitoring answer that permits you to replay issues as in the event that they occurred in your individual browser. As a substitute of guessing why errors occur, or asking customers for screenshots and log dumps, LogRocket allows you to replay the session to rapidly perceive what went improper. It really works completely with any app, no matter framework, and has plugins to log further context from Redux, Vuex, and @ngrx/retailer.
Along with logging Redux actions and state, LogRocket data console logs, JavaScript errors, stacktraces, community requests/responses with headers + our bodies, browser metadata, and customized logs. It additionally devices the DOM to document the HTML and CSS on the web page, recreating pixel-perfect movies of even essentially the most complicated single-page net and cell apps.
