
There are a number of causes you’d need to incorporate Bootstrap into your Subsequent.js software, considered one of which is that Bootstrap comes prebuilt with a ton of utility lessons and elements that make life simpler.
Nonetheless, when integrating bootstrap right into a Subsequent.js software (versus a regular React app), sure errors happen, notably when utilizing Bootstrap JavaScript options corresponding to toggle navbars and modals. And these points are continuously brought on by Subsequent.js’s SSR performance.
Why is Subsequent.js SSR an issue for Bootstrap?
Server-side-rendering (SSR) is a performance of Subsequent.js and different JavaScript libraries/frameworks that permit net purposes to transform HTML information on the server into totally rendered HTML pages for the shopper. Which means that all actions are carried out on the server, and markup information generated because of these processes are rendered to the shopper.
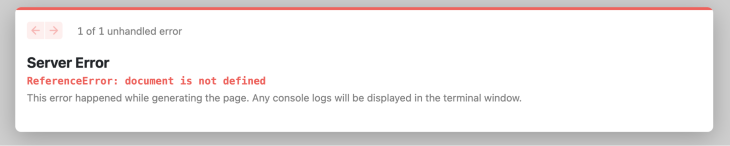
The included JavaScript in Bootstrap, then again, requires the browser’s doc object to perform. And, as a result of Subsequent.js is SSR by default, this suggests that the doc object is just not prepared till the web page is totally loaded, which is why you’d get the next error when trying to make use of Bootstrap’s JavaScript capabilities in a Subsequent.js software:
This text will clarify the right way to repair this error in addition to the right way to successfully use the total capabilities of Bootstrap in a Subsequent.js software.
Including Bootstrap to Subsequent.js
There are a number of approaches to incorporating Bootstrap right into a Subsequent.js software. Nonetheless, the commonest is to put in the Bootstrap bundle. Earlier than we get began, let’s create a brand new Subsequent.js app:
npx create-next-app my-app
Putting in the Bootstrap module
As soon as the undertaking has been created, we are able to simply add the latest steady model of Bootstrap to it by working the next command:
npm set up bootstrap
Following the set up of Bootstrap, we are able to import the minified Bootstrap CSS file into the Subsequent.js entry pages/_app.js file, as proven beneath:
import "bootstrap/dist/css/bootstrap.min.css"; // Import bootstrap CSS
import "../types/globals.css";

perform MyApp({ Element, pageProps }) {
  return <Element {...pageProps} />;
}

export default MyApp;
Like within the code above, you need to just remember to’ve imported Bootstrap earlier than your customized CSS file in order that it might be simpler to override Bootstrap’s default styling with this file (if the necessity arises, in fact).
Utilizing JavaScript options
As beforehand defined, if we immediately import the Bootstrap-bundled JavaScript file, we’ll get a 'doc is just not outlined' error. We could, nevertheless, leverage React’s useEffect() Hook to perform the import:
// src/_app.js

import { useEffect } from "react";

useEffect(() => {
  require("bootstrap/dist/js/bootstrap.bundle.min.js");
}, []);
The useEffect() Hook in React is used to instruct our React elements that they should do one thing after rendering, and on this state of affairs, we’d use it to import the bundled Bootstrap JavaScript file.
With this addition, the whole code for our _app.js file would seem like this:
import "bootstrap/dist/css/bootstrap.min.css";
import "../types/globals.css";
import { useEffect } from "react";

perform MyApp({ Element, pageProps }) {
  useEffect(() => {
    require("bootstrap/dist/js/bootstrap.bundle.min.js");
  }, []);

  return <Element {...pageProps} />;
}

export default MyApp;
Let’s create a easy modal to attempt issues out. Open the default pages/index.js file and change its content material with the next code:
export default perform Residence() {
  return (
    <div className="d-flex
justify-content-center align-items-center">
      <button
        kind="button"
        className="btn btn-primary"
        data-bs-toggle="modal"
        data-bs-target="#exampleModal"
      >
        Launch demo modal
      </button>

      <div
        className="modal fade"
        id="exampleModal"
        tabIndex="-1"
        aria-labelledby="exampleModalLabel"
        aria-hidden="true"
      >
        <div className="modal-dialog">
          <div className="modal-content">
            <div className="modal-header">
              <h5 className="modal-title" id="exampleModalLabel">
                Modal title
              </h5>
              <button
                kind="button"
                className="btn-close"
                data-bs-dismiss="modal"
                aria-label="Shut"
              ></button>
            </div>
            <div className="modal-body">...</div>
          </div>
        </div>
      </div>
    </div>
  );
}
If we run our app with (npm run dev) and preview its output within the browser, we must always observe that all the things works as meant:
Programmatically invoking Bootstrap elements
There are situations the place you’d need to set off Bootstrap elements programmatically somewhat than by including the knowledge property to a button as we did in our earlier instance.
For modals, for instance, the Bootstrap bundle exports a module that enables us to carry out this operation:
import bootstrap from "bootstrap";

 const showModal = () => {
    const myModals = new bootstrap.Modal("#exampleModal");
    myModal.present();
  };
If we run this code, nevertheless, we’ll nonetheless get the 'doc is just not outlined' error as a result of we’d clearly imported Bootstrap into this present web page additionally.
One method to fixing that is to easily use JavaScript destructuring syntax to import the aforementioned module in our customized perform, as proven within the code beneath:
 const showModal = () => {
    const { Modal } = require("bootstrap");
    const myModal = new Modal("#exampleModal");
    myModal.present();
  };
We are able to then name the showModal() perform to simply show our modal:
<button kind="button" className="btn btn-primary" onClick={showModal}>
  Launch demo modal
</button>
Making use of this to a pattern web page, our full code would seem like this:
// pages/index.js

export default perform Residence() {
  const showModal = () => {
    const { Modal } = require("bootstrap");
    const myModal = new Modal("#exampleModal");

    myModal.present();
  };
  return (
    <div className="d-flex">
      <button kind="button" className="btn" onClick={showModal}>
        Launch demo modal
      </button>

      <div
        className="modal fade"
        id="exampleModal"
        tabIndex="-1"
        aria-labelledby="exampleModalLabel"
        aria-hidden="true"
      >
        <div className="modal-dialog">
          <div className="modal-content">
            <div className="modal-header">
              <h5 className="modal-title" id="exampleModalLabel">
                Modal title
              </h5>
              <button
                kind="button"
                className="btn-close"
                data-bs-dismiss="modal"
                aria-label="Shut"
              ></button>
            </div>
            <div className="modal-body">
             . . .
            </div>
          </div>
        </div>
      </div>
    </div>
  );
}
This answer works properly with all Bootstrap elements that help toggle through JavaScript. Beneath is an instance of the way it is perhaps utilized in a carousel:
// pages/index.js

export default perform Residence() {
  const toggleCarousel = (motion) => {
    const { Carousel } = require("bootstrap");
    const carousel = new Carousel("#myCarousel");
    if (motion === "subsequent") {
      carousel.subsequent();
    } else {
      carousel.prev();
    }
  };
  return (
    <>
      {" "}
      <div>
        <button
          className="btn btn-primary"
          onClick={() => toggleCarousel("prev")}
        >
          Prev
        </button>
        <button
          className="btn btn-primary ms-3"
          onClick={() => toggleCarousel("subsequent")}
        >
          Subsequent
        </button>
      </div>
      <div>
        <div
          id="myCarousel"
          className="carousel slide"
          data-bs-touch="false"
          data-bs-interval="false"
          fashion={{ maxWidth: "50%", peak: "80vh", overflow: "hidden" }}
        >
          <div className="carousel-inner">
            <div className="carousel-item energetic">
              <img src="https://picsum.pictures/id/237/700/700" />
            </div>
            <div className="carousel-item">
              <img src="https://picsum.pictures/id/123/700/700" />
            </div>
            <div className="carousel-item">
              <img src="https://picsum.pictures/id/234/700/700" />
            </div>
          </div>
        </div>
      </div>
    </>
  );
}
Working the code above, we get the next output in our browser:

You possibly can alternatively create these Bootstrap elements as customized React elements after which import them into your pages utilizing Subsequent.js’s dynamic import function whereas disabling SSR.
With the Subsequent.js dynamic import function, we’re capable of import elements dynamically and work with them. Whereas the dynamic import permits server-side rendering, we are able to disable it if desired.
Beneath is the right way to import a pattern element on this method:
import dynamic from 'subsequent/dynamic'

const DynamicComponentNoSSR = dynamic(
  () => import('../elements/SampleComponent'),
  { ssr: false }
)
And in our element file situated at ../elements/SampleComponent, we’re capable of run any client-side JavaScript-related code earlier than the element is rendered.
To attempt issues out, let’s create a brand new file, Toast.js, within the root supply of our Subsequent.js undertaking, and paste the next content material into it:
const bootstrap = require("bootstrap");

const Toast = () => {
  const showToast = () => {
    const toast = new bootstrap.Toast("#liveToast");
    toast.present();
  };

  return (
    <div>
      <button kind="button" onClick={showToast} className="btn">
        Present Toast
      </button>

      <div className="toast-container position-fixed p-3 top-0">
        <div
          id="liveToast"
          className="toast"
          function="alert"
          aria-live="assertive"
          aria-atomic="true"
        >
          <div className="toast-header">
            <img src="https://weblog.logrocket.com/handling-bootstrap-integration-next-js/..." className="rounded" alt="https://weblog.logrocket.com/handling-bootstrap-integration-next-js/..." />
            <robust className="me-auto">Bootstrap</robust>
            <small>2 secs in the past</small>
            <button
              kind="button"
              className="btn-close"
              data-bs-dismiss="toast"
              aria-label="Shut"
            ></button>
          </div>
          <div className="toast-body">
            Hiya, world! It is a toast message.
          </div>
        </div>
      </div>
    </div>
  );
};

export default Toast;
The code above is solely a template for a Bootstrap Toast element that we’re triggering programmatically with a customized perform, and as you possibly can see, we’ve additionally imported the Bootstrap module on the high degree of this element.
Now, let’s go to our public/index.js file and dynamically import this element whereas disabling SSR:
import dynamic from "subsequent/dynamic";

const Toast = dynamic(() => import("../Toast"), {
  ssr: false,
});

export default perform Residence() {
  return (
    <>
      <Toast />
    </>
  );
}
If we run our code and click on the button, we must always see that all the things works completely with out throwing any errors:
Conclusion
All through this text, we’ve mentioned the right way to use Bootstrap’s full capabilities in a Subsequent.js software. We additionally analyzed the commonest situation that happens whereas trying to make use of Bootstrap JavaScript options, in addition to the various strategies for resolving this error. I hope this solutions your questions on integrating Bootstrap with Subsequent.js!
LogRocket: Full visibility into manufacturing Subsequent.js apps
Debugging Subsequent purposes might be tough, particularly when customers expertise points which might be tough to breed. For those who’re considering monitoring and monitoring state, robotically surfacing JavaScript errors, and monitoring sluggish community requests and element load time, attempt LogRocket. 

LogRocket is sort of a DVR for net and cell apps, recording actually all the things that occurs in your Subsequent app. As a substitute of guessing why issues occur, you possibly can mixture and report on what state your software was in when a difficulty occurred. LogRocket additionally screens your app’s efficiency, reporting with metrics like shopper CPU load, shopper reminiscence utilization, and extra.
The LogRocket Redux middleware bundle provides an additional layer of visibility into your consumer classes. LogRocket logs all actions and state out of your Redux shops.
Modernize the way you debug your Subsequent.js apps — begin monitoring at no cost.
