
Occasions are one of many integral options of the online as we all know it. With out occasions, the online would most be terribly bland.
Occasions are actions that occur on an internet web page to HTML parts. Any time one thing occurs on an internet web page, you may be positive it’s more than likely an occasion, from when the web page hundreds initially, to the person clicking a button, to closing or resizing a window. They’re all examples of various occasions that occur within the browser.
As a scripting language for the online, JavaScript lets us execute code in response to the incidence of an occasion fired by HTML parts.
For JavaScript frameworks, occasions can be used to cross information simply throughout an software. For instance, React solely helps unidirectional information circulation, which suggests information can solely cross from prime stage elements to decrease stage elements. However with occasions, you’ll be able to pay attention for and react to sure occasions on any element stage.
This text will cowl how we are able to create and use customized occasions in React.
Contents
What are customized occasions?
The browser has a set variety of default occasions out there to varied HTML parts. However then, in some circumstances, the necessity to create a customized occasion arises. For instance, if you happen to’d like to speak to a different element when a dialog element has been closed, one of the simplest ways to realize that may be by way of a customized occasion, as there isn’t a such factor as an “onDialogClose” occasion within the browser.
Customized occasions are often known as “artificial” occasions.
We will create customized occasions utilizing the Occasion constructor. We will now lastly create our non-existent “onDialogClose” occasion as such:
//First, we initialize our occasion
const occasion = new Occasion('onDialogClose');

// Subsequent, we dispatch the occasion.
elem.dispatchEvent(occasion);
If we wished so as to add a bit extra information to our customized occasion, we may accomplish that by way of the CustomEvent interface utilizing the element property:
//First, we initialize our occasion
const occasion = new CustomEvent('onDialogClose', {element: "Most important Dialog"});

// Subsequent, we dispatch the occasion.
elem.dispatchEvent(occasion);
Try this well-written article to be taught extra about customized occasions in JavaScript and tips on how to implement them in your vanilla JavaScript initiatives.
Customized occasions in React
For this text, we’ll construct a demo for example tips on how to make use of customized occasions in our React functions.
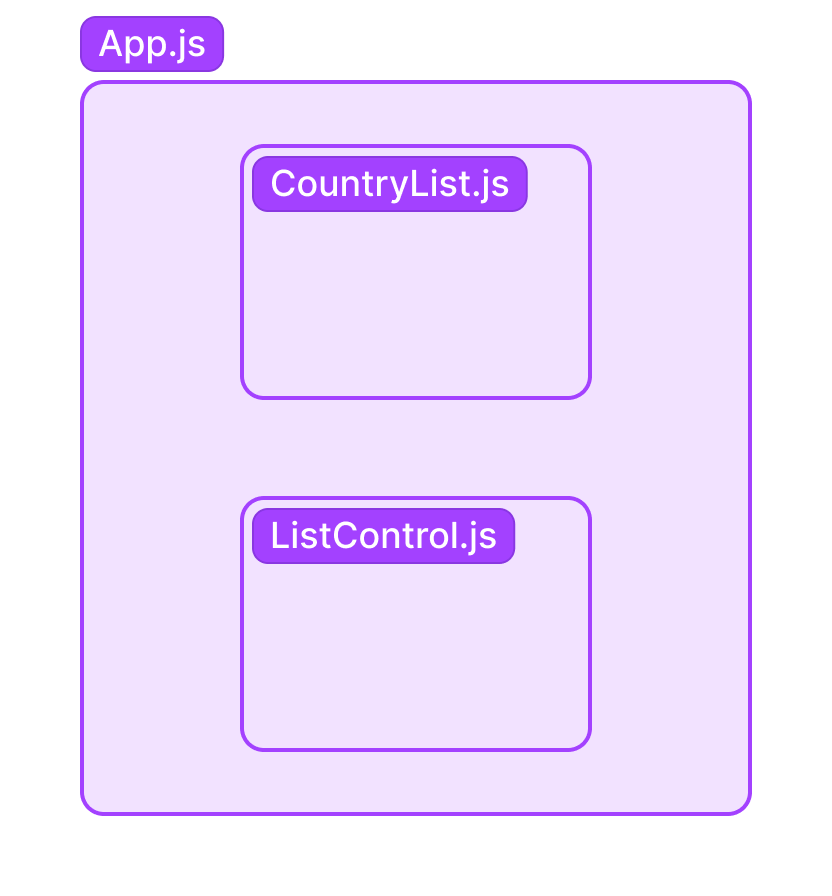
For the demo, our use case could be making an attempt to show and conceal an inventory of African nations, which might be contained is a CountryList.js element and declared in our software’s mother or father element App.js from one other little one element, ListControl.js.
For fetching the listing of African nations, we’ll use the REST nations API.
Let’s dive in!
Undertaking setup
To start with, we’ll create a brand new React undertaking utilizing Create React App.
Subsequent, we’ll create a elements folder within the src folder and create our elements CountryList.js and ListControl.js within it.
The CountryList.js element will render the listing of all nations in Africa from our API endpoint, and the ListControl.js element will include buttons that may both show or cover the listing, relying on its present state.
Additionally, within the root of our src folder, we’ll create an occasions.js file to summary the code for emitting and listening for occasions, so our code is a bit cleaner and reusable.
Constructing a customized occasion in React
When you’ve accomplished the directions above, go forward and duplicate and paste into your code editor the contents of the code blocks under. Don’t fear, we’ll go over all the pieces intimately.
First, the occasion.js file:
//occasions.js

operate subscribe(eventName, listener) {
  doc.addEventListener(eventName, listener);
}

operate unsubscribe(eventName, listener) {
  doc.removeEventListener(eventName, listener);
}

operate publish(eventName, information) {
  const occasion = new CustomEvent(eventName, { element: information });
  doc.dispatchEvent(occasion);
}

export { publish, subscribe, unsubscribe};
Within the occasion.js file, as acknowledged earlier, we’re solely abstracting the logic for making a customized occasion, dispatching the occasion, including occasion listeners and eradicating occasion listeners to be used in different elements of our software.
You may rename the operate names right here to no matter you want, I simply thought this naming sample labored properly with the publisher-subscriber sample 😉
Subsequent up is the CountryList.js element:
//CountryList.js

const CountryList = (props) => {
    return (
        <ul>
            <h2>Checklist of nations in Africa</h2>
            {props.listData.map((el) => {
                return (
                    <li key={el.tld}>
                        <span>
                          <img src={el.flags.svg} alt={el.title.frequent}
                            fashion={{ width: "20px", marginRight: "5px" }} />
                        </span>
                        <span fashion={{fontSize: "20px"}}>{el.title.frequent} </span>
                    </li>
                );
            })}
        </ul>
    );
}
export default CountryList;
This element accepts a prop from its mother or father element which, in response to our diagram above, is App.js. We’ll get to that in a bit.
It shows the info corresponding to nation title and flag from the API. I’ve gone forward so as to add a little bit of inline styling to the listing merchandise so it seems higher.
Subsequent is our ListControl.js element:
import { publish } from "../occasions"
const ListControl = (props) => {
  const showList = () => {
    publish('showList');
  }
  const hideList = () => {
    publish('hideList');
  }
  return (
    <div>
      {
        props.listState ? <button onClick={hideList}>Disguise Checklist</button> :
        <button onClick={showList}>Present Checklist</button>
       }
    </div>
  );
}
export default ListControl;
This element comprises the button management logic for displaying or hiding the listing of nations.
It’s additionally the place occasions for each actions might be dispatched.
We import the publish operate from our occasions file and use it to create the customized occasions and dispatch them.
As well as, this element receives a prop from the App.js element that tells it when the listing is rendered or not, and relying on the state of the listing, renders one among two buttons: “Present listing” and “Disguise listing”.
Final however not least, now we have the mother or father element App.js:
import './App.css';
import { useState, useEffect } from "react";
import ListControl from './elements/ListControl';
import CountryList from './elements/CountryList';
import { subscribe, unsubscribe } from "./occasions";

const App = () => {
  const [isOpen, setIsOpen] = useState(false);
  const [countryList, setList] = useState([]);

  useEffect(() => {
    subscribe("showList", () => setIsOpen(true));
    subscribe("hideList", () => setIsOpen(false));

    async operate fetchData() {
      const apiUrl="https://restcountries.com/v3.1/area/africa";
      const response = await fetch(apiUrl)
      let information = await response.json()
      setList(information)
    }
    fetchData()

    return () => {
      unsubscribe("showList");
      unsubscribe("hideList");
    }
  }, []);

  return (
    <div className="App">
      <h1>Utilizing Customized Occasions In React</h1>
      <ListControl listState={isOpen}></ListControl>
      {
        isOpen ? <CountryList listData={countryList}></CountryList> :
          <h3>
            Click on on the Button above to render the listing of African International locations
          </h3>
      }
    </div>
  );
}
export default App;
The mother or father element first imports all the required elements and React Hooks for it to operate.
Subsequent, we declare our app’s default state with the useState hook.
Keep in mind the ListControl element which creates and dispatches (or “publishes”) the varied customized occasions? Effectively, that is the element the place we pay attention for and “subscribe” to these occasions.
Additionally, when our app is first loaded, the varied occasion listeners get activated after which the fetchData operate is triggered within the useEffect hook, which makes a HTTP request to the API and shops the returned information in our app’s state.
Mainly, when the showLis``t occasion is revealed, the worth of isOpen is modified to true, which in flip shows the listing. And when the hideList occasion is revealed, the worth of isOpen is modified to false and it hides the listing element and returns a message as a substitute.
Within the
useEffecthook, now we have a cleanup return operate, which removes all occasion listeners when the element unmounts. This prevents a number of unused occasion listeners from being created, which might result in a reminiscence leak in our software.
And Voila! right here’s the output of our work thus far.
Conclusion
On this article we discovered about occasions and customized occasions in vanilla JavaScript. We additionally went additional to debate how we may implement the identical sample within a React software.
All of the code for this tutorial is hosted on GitHub right here. Be at liberty to fork it and mess around with the code, and if you happen to cherished this tutorial, please do give it a star.
Additionally, be at liberty to depart your ideas within the remark part under.
Thanks for studying!
Full visibility into manufacturing React apps
Debugging React functions may be tough, particularly when customers expertise points which might be exhausting to breed. When you’re enthusiastic about monitoring and monitoring Redux state, mechanically surfacing JavaScript errors, and monitoring gradual community requests and element load time, strive LogRocket. 

LogRocket is sort of a DVR for internet and cell apps, recording actually all the pieces that occurs in your React app. As a substitute of guessing why issues occur, you’ll be able to combination and report on what state your software was in when a difficulty occurred. LogRocket additionally screens your app’s efficiency, reporting with metrics like shopper CPU load, shopper reminiscence utilization, and extra.
The LogRocket Redux middleware bundle provides an additional layer of visibility into your person periods. LogRocket logs all actions and state out of your Redux shops.
Modernize the way you debug your React apps — begin monitoring totally free.
