
On this publish, we are going to check out Zag, a JavaScript library that employs the state machine strategy to characterize frequent part state patterns.
Utilizing Zag permits you to create a design system with declarative, DRY, and easy state administration logic by outsourcing most of its complexity to the library.
Intro to Zag
There’s an abundance of out-of-the-box UI libraries on the market. But we regularly can’t use them due to the distinctive design necessities we should observe.
And whereas our parts’ design could also be distinctive, the performance usually isn’t. When creating your part from the bottom up, you’ll have to write down your state logic, reinventing the wheel within the course of.
Enter Zag, a library that takes care of the part state logic for you so you’ll be able to give attention to making your parts look nice and depart the internal workings of their state to the state machines.
Zag offers state machines for the commonest UI parts, reminiscent of Menu, Accordion, Dialog, and so on. Yow will discover a complete record of all of the out there state machines in their docs.
If you happen to’re constructing your design system from scratch or have a undertaking with plenty of parts that include overlapping, but barely totally different logic, utilizing Zag can prevent time and headache.
For instance, the identical state machine can be utilized for each vertical and horizontal menus. Doing so permits you to share frequent state logic between parts, conserving your design system DRY.
Why use Zag?
Now let’s cowl why Zag could be the state machine answer for you:
- Initially, Zag is framework agnostic, so it really works with React, Angular, Vue, and even vanilla JavaScript. Nonetheless, it does present adapters for React, Strong, and Vue to make adoption simpler if you happen to occurred to be utilizing these frameworks
- Zag is totally unopinionated about the way you type your parts. You may observe no matter processes and workflows you’re used to. That is in distinction to many different UI libraries that include their styling options that you must be taught and undertake
- You may introduce Zag to your undertaking incrementally, including state machines as you want them. That’s potential as a result of every state machine is obtainable as a separate NPM package deal
- The library is constructed with accessibility in thoughts and handles accessibility considerations like keyboard interactions, focus administration, and aria roles for you
What are state machines?
To raised admire the advantages of Zag and correctly use the library, we have to perceive the idea of state machines.
A state machine, additionally referred to as a finite state machine, is a mathematical mannequin of computation. It’s an summary machine that may be in one in every of a finite variety of states. The machine is in just one state at a time and may change from one state to a different when triggered by an enter (referred to as an occasion).
Within the React group, the state machines have been popularized by XState. They’re usually used to characterize the logic of frequent parts with advanced conduct.
State machines are a pure match for UI parts as a result of they help you mannequin the totally different states {that a} part could be in and the occasions that may set off a state change.
Utilizing out-of-the-box Zag state machines
Now that we coated Zag and state machines, let’s see how we are able to use them in our undertaking.
Pattern utilization instance
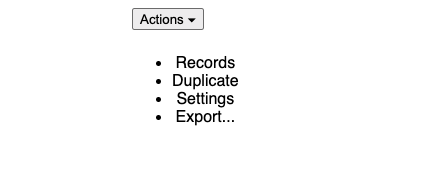
Let’s attempt utilizing a state machine for menus, one of the vital frequent UI parts.
Right here’s what the code for including a state machine to a React part appears like:
import * as menu from "@zag-js/menu";
import { useMachine, useSetup } from "@zag-js/react";

export default operate Menu({ onSelect }: { onSelect: (id: string) => void }) {
  const [state, send] = useMachine(
    menu.machine({ onSelect: (id) => onSelect(id) })
  );

  const ref = useSetup({ ship, id: "1" });

  const api = menu.join(state, ship);

  return (
    <div ref={ref}>
      <button {...api.triggerProps}>
        Actions <span aria-hidden>▾</span>
      </button>
      <div {...api.positionerProps}>
        <ul {...api.contentProps}>
          <li {...api.getItemProps({ id: "information" })}>Data</li>
          <li {...api.getItemProps({ id: "duplicate" })}>Duplicate</li>
          <li {...api.getItemProps({ id: "settins" })}>Settings</li>
          <li {...api.getItemProps({ id: "export" })}>Export...</li>
        </ul>
      </div>
    </div>
  );
}
Within the code above, we’re utilizing the useMachine Hook to create a brand new occasion of the state machine. The onSelect callback that we cross might be triggered when an merchandise is chosen and can obtain its id.
Then, we name the useSetup hook with an object that incorporates the id of our menu and the ship operate from our state machine. useSetup ensures that the part works in several environments (iframes, Electron, and so on.). The operate returns a ref that we add to the basis aspect of our part.
Word: id must be a singular identifier.
Lastly, we name the menu.join operate with our state machine’s state and the ship operate. join interprets the machine’s state into JSX attributes and occasion handlers.
At this level, our state machine is prepared for use, and now we have to apply the JSX knowledge saved within the api variable.
The api incorporates state logic for the entire internal parts that make up a menu: set off, positioner, content material, and menu gadgets. To use the state machine logic to our HTML parts, we use the unfold operator syntax.
And that’s all there’s to it. Now we’ve a functioning (though not the perfect wanting) menu.
Styling
Zag is unopinionated about styling, and you’ve got extra management over the way you need to type your parts. You should use no matter CSS libraries you need or write your types.
Every part often has a number of elements which you can type individually. As we mentioned earlier than, the menu part has the next elements you’ll be able to type: set off, positioner, content material, and menu gadgets.
Zag routinely inserts the data-part attribute to your part’s elements that you need to use to focus on them for styling.
For instance, right here’s what a simplified HTML output of our menu part would appear to be:
<!--HTML-->
<div>
  <button data-part="set off" id="menu:1:set off">
    Actions <span aria-hidden="true">▾</span>
  </button>
  <div data-part="positioner" id="menu:1:popper">
    <ul data-part="content material" id="menu:1:content material">
      <li data-part="merchandise" id="information">
        Data
      </li>
      <li data-part="merchandise" id="duplicate">
        Duplicate
      </li>
      <li data-part="merchandise" id="settins">
        Settings
      </li>
      <li data-part="merchandise" id="export">
        Export...
      </li>
    </ul>
  </div>
</div>
As you’ll be able to see, every half has the data-part attribute that can be utilized in CSS selectors.
For instance, if we need to change the colour of our menu gadgets, we are able to write the next CSS:
[data-part="item"] {
  colour: blue;
}
When a part enters a sure state, Zag routinely provides an HTML attribute to characterize the present state of the part utilizing data-ATTRIBUTE_NAME, the place ATTRIBUTE_NAME is an attribute that represents the present state within the state machine.
For instance, if a menu merchandise is in a disabled state, you’ll be able to goal it in your CSS types utilizing:
[data-part="item"][data-disabled] {
  /* types go right here */
}
And that covers the fundamentals of styling Zag parts.
Including customized occasion handlers
Sometimes you’d add your occasion handlers every time creating an occasion of your machine, as we noticed with our earlier menu instance:
const [state, send] = useMachine(
  menu.machine({ onSelect: (id) => onSelect(id) })
);
Nonetheless, if you wish to add customized occasion handlers to particular elements of the part, you are able to do that as nicely utilizing the mergeProps utility operate Zag offers:
const handleClick = () => {
    // do one thing right here
}

const buttonProps = mergeProps(api.buttonProps, {
    onClick: handleClick,
})
Constructing your individual state machine
Every now and then, you would possibly run right into a case that’s not coated by state machines supplied by Zag. In that case, you’ll be able to construct your individual state machine from scratch utilizing Zag’s createMachine operate.
Defining your state machine mannequin
Making a state machine includes defining all of the potential states and transitions in your part. For instance, let’s say we need to create a machine that represents a easy on/off toggle button:
const machine = createMachine({
  // preliminary state
  preliminary: "lively",
  // the finite states
  states: {
    lively: {
      on: {
        CLICK: {
          // go to inactive
          goal: "inactive"
        }
      }
    },
    inactive: {
      on: {
        CLICK: {
          // go to lively
          goal: "lively"
        }
      }
    }
  }
});
As you’ll be able to see, we first outlined the preliminary state of our machine. Then, for every state, we specified which occasions ought to set off a transition to a different state.
On this case, we solely have one occasion (CLICK) that may occur in each states and it’ll transition to the opposite state.
Creating connector operate
As soon as we’ve our machine, we have to create a connector operate that can care for mapping the machine’s state to JSX props.
The connector operate wants state and ship arguments so it will probably entry the machine’s present state and ship occasions to the machine.
Right here’s what the connector operate for our on/off toggle button would appear to be:
operate join(state, ship) {
  const lively = state.matches("lively");
  return {
    lively,
    buttonProps: {
      sort: "button",
      function: "change",
      "aria-checked": lively,
      onClick() {
        ship("CLICK");
      }
    }
  };
}
Sadly, there’s no approach to write one join operate that may work for all machines. You’ll must create a connector operate particular to every machine because the form of the info in every machine’s state is totally different.
Connecting your parts to your state machine
Lastly, we have to instantiate our machine and use our connector to use the machine’s state to our part:
import { useMachine } from "@zag-js/react";
import { machine, join } from "./toggle";

operate Toggle() {
  const [state, send] = useMachine(machine);
  const api = join(state, ship);

  return <button {...api.buttonProps}>{api.lively ? "ON" : "OFF"}</button>;
}
And that’s all there may be to it.
Conclusion
In conclusion, utilizing state machines and Zag to construct your design system has numerous advantages. State machines make your code extra declarative and predictable.
Zag offers out-of-the-box state machine options for frequent use instances, permitting you to focus on the design of your parts whereas outsourcing the state administration to the library.
LogRocket: Debug JavaScript errors extra simply by understanding the context
Debugging code is all the time a tedious process. However the extra you perceive your errors the better it’s to repair them.
LogRocket permits you to perceive these errors in new and distinctive methods. Our frontend monitoring answer tracks person engagement along with your JavaScript frontends to provide the capacity to seek out out precisely what the person did that led to an error.

LogRocket information console logs, web page load instances, stacktraces, gradual community requests/responses with headers + our bodies, browser metadata, and customized logs. Understanding the impression of your JavaScript code won’t ever be simpler!
