
Github Actions
Learn to automate experiment monitoring with Weights & Biases, unit testing, artifact creation, and plenty extra…

In layman’s phrases, Github Actions allows you to automate a couple of routine and repetitive duties — be it testing code each time it’s deployed on the manufacturing department, checking for good coding practices on PRs, cross-browser code testing, unit-testing, retrieving runs from MLFlow/WandB monitoring, robotically closing stale points, and so on. The checklist is actually countless.
When you can actually write all these Github Actions your self from scratch, I might advise in opposition to reinventing the wheel. As a substitute, a great place to seek for out there actions in your specific use case can be the market. Let’s learn how to make use of them in motion.
Observe: Whereas it might be tempting to run as many actions as the center needs, personal repos have solely a restricted quantity of free minutes (~2000 minutes) and storage (~500MB) out there each month (minutes get reset each month however storage doesn’t). Public repos, nonetheless, haven’t any such limitations for Github Actions utilization. Extra particulars about billing could be discovered right here.
To get began, we have to create .github/workflows listing in our repo and inside create a brand new .yml file. A typical .yml file appears like this:
identify: Github Actions Demo
on:
points:
varieties: [opened, edited, deleted]
jobs:
Job1:
runs-on: ubuntu-latest
steps:
- identify: "That is Step 1 with bash command."
run: echo "hey World"
shell: bash
- identify: "That is step 2 utilizing market motion."
makes use of: actions/checkout@v3
Job2:
.....  Job3:
.....
Few issues to think about:
- We have to outline a
identifyfor the workflow and in addition when this workflow ought to run. The previous could be something you want and the latter must be specified utilizingon. As an illustration, we’d need to run the workflow solely when opening a problem, closing a problem, commenting on a PR, at any time when a label is created, edited, and so on. Try the entire checklist of occasions that may set off a workflow. In our instance, it will likely be triggered anytime somebody opens, edits, and/or deletes a problem. - Right here we’ve outlined three jobs (
job1,job2,job3) however in actuality, you may have any variety of jobs outlined in a single.ymlfile and they’ll all run concurrently when the occasion outlined inonis triggered (there are workarounds for this whereby one can delay operatingjob2tilljob1has been accomplished). - We’ve got the choice of defining a server utilizing
runs-onthat can run your workflow. The steady decisions embodyubuntu-latest,macos-latestandwindows-latest.
Observe: Be conscious of the selection as some Github-hosted runners devour extra minutes than others. From the documentation, evidently jobs that run on Home windows and macOS runners devour minutes at 2 and 10 instances the speed that jobs on Linux runners devour. - The steps inside a job are run sequentially. Be sure you identify a step one thing significant as this helps with debugging in a while.
- The steps inside a job can do considered one of two issues — (a) run a bash command utilizing
run(for instance,echo "hey World") or (b) use a market or third-party Github motion utilizingmakes use of(for instance,actions/checkout@v3— it is a well-liked motion that helps you take a look at a repo and use any of the recordsdata therein as a part of your workflow — we might be protecting it later within the tutorial).
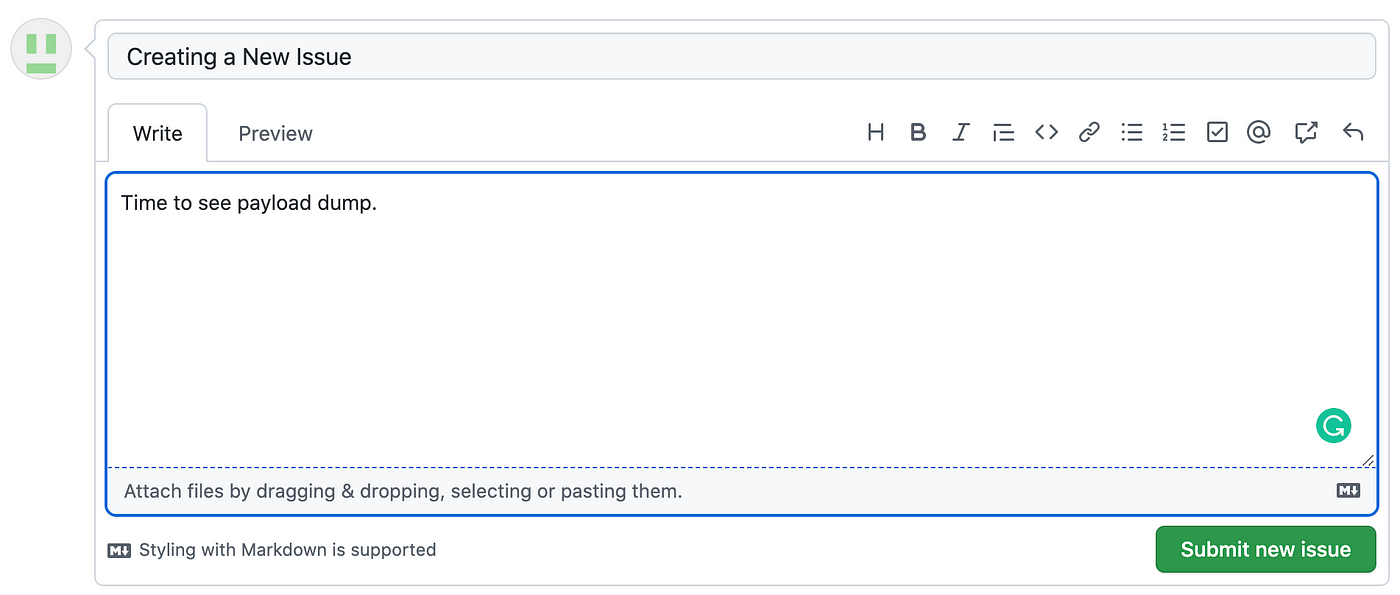
We’ve got a workflow named Dump occasion payload containing a single job known as Remark that might be triggered each time a problem is opened, edited, or deleted.
Earlier than explaining what’s taking place, let’s see it in motion by creating a brand new concern.
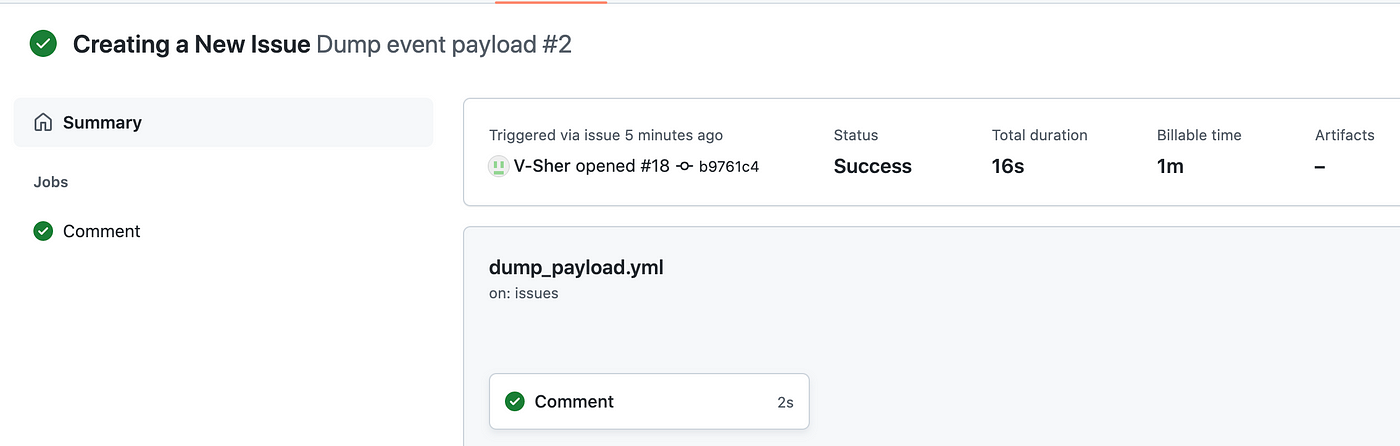
Subsequent, head over to the Actions tab and also you’ll see a yellow dot indicating the workflow is operating. As soon as completed, it would flip inexperienced.

Upon completion, click on on it to see the standing, whole period, and artifacts created (we’ll cowl artifacts later within the tutorial).
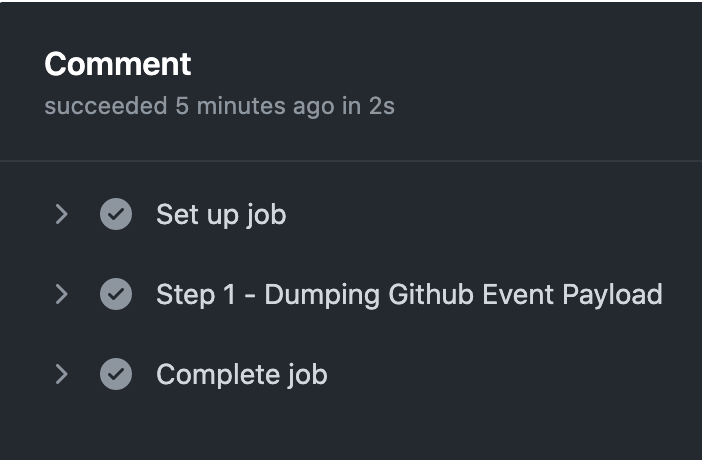
Lastly, stepping contained in the Remarkjob, we should always be capable of see the outputs from all of the steps we outlined within the workflow.
Let’s break down what’s taking place within the workflow.
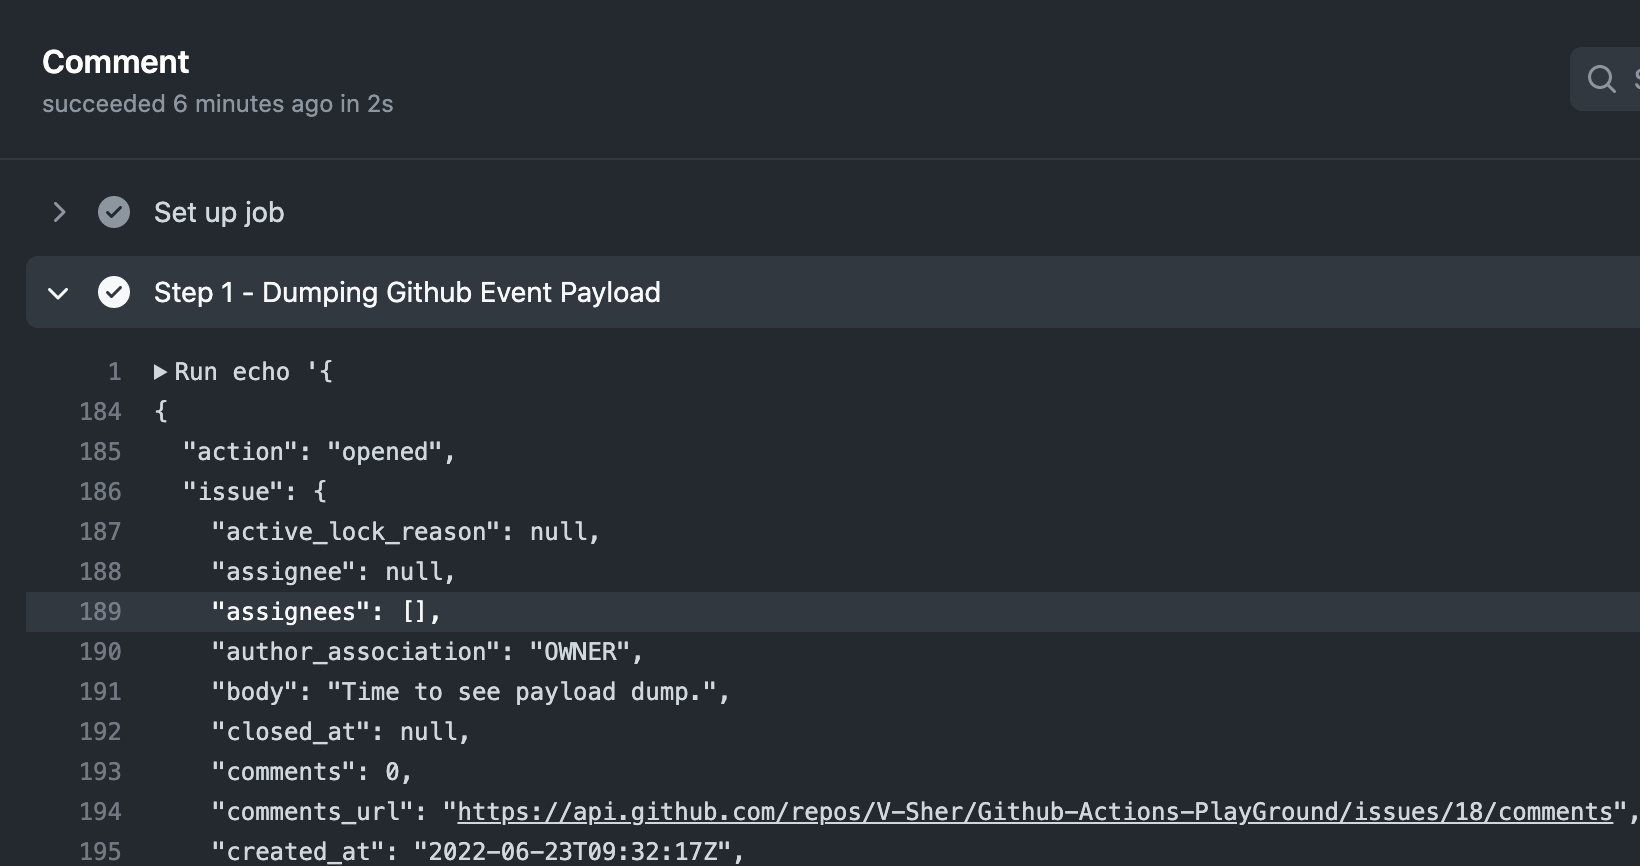
It incorporates a single step that can dump your complete Github occasion payload. I at all times discover it helpful to dump all the things out there within the github.occasion context to the terminal to see details about the occasion that triggered a workflow run. This may normally return a nested dictionary which we’ll fairly print utilizing toJSON().
Observe: There are different contexts you may take a look at like github.ref for the department identify that triggered the workflow run, github.repository for the repo identify, and so on. An entire checklist could be discovered right here.
As you may see within the determine above, the returned context incorporates details about the motion (i.e. opened), details about the problem itself, as an example, the time when it was created, the physique of the problem, the variety of feedback, and so on.
Observe: The knowledge inside github.occasion will rely on the kind of occasion that triggered the workflow. For instance, the contents of github.occasion will fluctuate relying on whether or not a problem is opened vs. a push is made to the foremostdepartment.
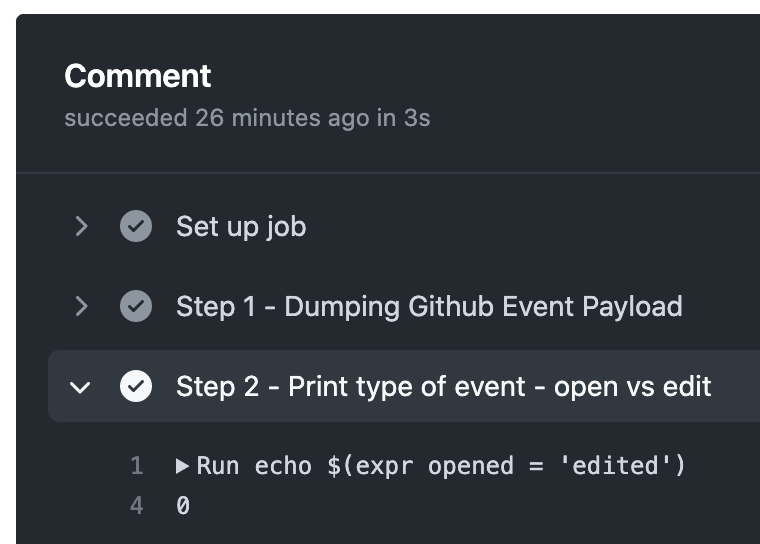
Now that we all know all of the contextual info we’ve at our disposal, we are able to add a brand new Step 2 to the workflow that can echo a few of this info to plain output. Specifically, we’re going to examine whether or not the motion recorded by github.occasion was an issue-edit occasion versus an issue-open occasion.
To see this in motion, we’re going to create a brand new concern, head over to the Actions tab, and test the outputs. As anticipated, it outputs a boolean 0 indicated False.
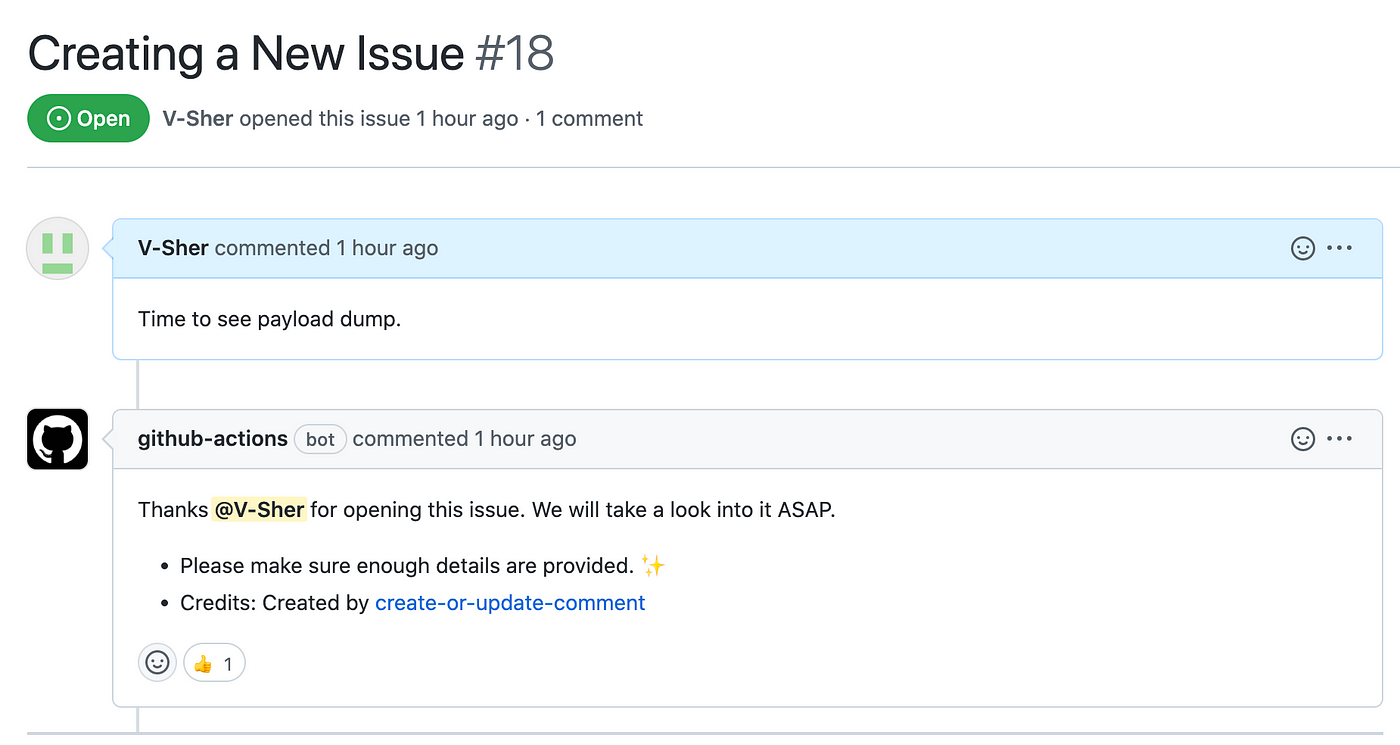
Up till now, we’ve solely added steps that have been operating bash command to print one thing to plain output. As talked about beforehand, we are able to additionally use an motion from the Github market inside a step through the use of makes use of as an alternative of run. To exhibit this, we might be utilizing Peter Evan’s Create-or-Replace-Remark motion to create a remark that robotically thanks the creator of a brand new concern. Its utilization is defined within the Readme and is fairly simple — we should present the problem quantity underneath which the remark must be made, together with the precise physique of the message. Fortunately, we’ve the previous out there to us as a part of the github.occasion.concern context and the latter may very well be something you’d like.
Let’s add Step 3 to take action. We might be including an if clause to make sure this step is run provided that a problem is opened (and never edited or deleted).
To check this, create a brand new concern, and instantly under you need to see the bot message.
Observe: Within the full instance under, I’ve additionally added a couple of further steps for customizing the message primarily based on whether or not the problem was edited or opened.
That is just about all it is advisable to know to get began with the three foremost Github Actions I take advantage of on a day-to-day foundation.
Each time we push commits to a department, we are inclined to run some unit checks utilizing pytestto ensure nothing breaks within the course of.
To emulate the method, let’s assume we at the moment are engaged on a new hello-worlddepartment that has three new additions — two directories ( src and checks) and a necessities.txt file). The listing construction appears like this:
Github-Actions-PlayGround
│   README.md
│   necessities.txt
└───src
│   │   utils.py
└───checks
│   test_example.py
Contents of utils.py (on left) and test_example.py (on proper) are as follows:


utils.py; On proper test_example.pyLastly, we’re able to create a workflow in .github/worklfows/unit_test.yml on the hello-world department that can run the checks inside checks listing anytime a commit is pushed to the department (for now, we’ve solely a single take a look at outlined in checks/test_example.py however you get the thought).
For the workflow to run efficiently, we have to be sure that previous to operating the checks, we should always outline steps that set up the necessities.txt file within the runner setting (see Step 2 under) and add directories to PYTHONPATH, if any (see Step 3 under).
(P.S. In the event you’re nonetheless questioning if/how/why do I want apythonpath, take a look at this article.)
Few issues to think about:
- If we’re operating multiple bash command in a single step, we use a pipe image (
|). As an illustration, see Step 2.
P.S. I’ve added|in different steps merely for neatness. - In Step 3, we might have merely finished the next to set the proper
PYTHONPATH.
- identify: "Step3: Add ./src to PYTHONPATH"
id: first_update_step
run: PYTHONPATH=$GITHUB_WORKSPACE/src
Since I needed to exhibit that we’ve certainly set the pythonpath accurately, in Step 3 we echo the output to $GITHUB_ENV — to be retrieved later in Step 4 utilizing env.PYTHONPATH.
- As beforehand talked about, a step could be any bash command that you could usually run within the terminal, within the last step, i.e. Step 5, we run the unit checks utilizing
pytestcommand.
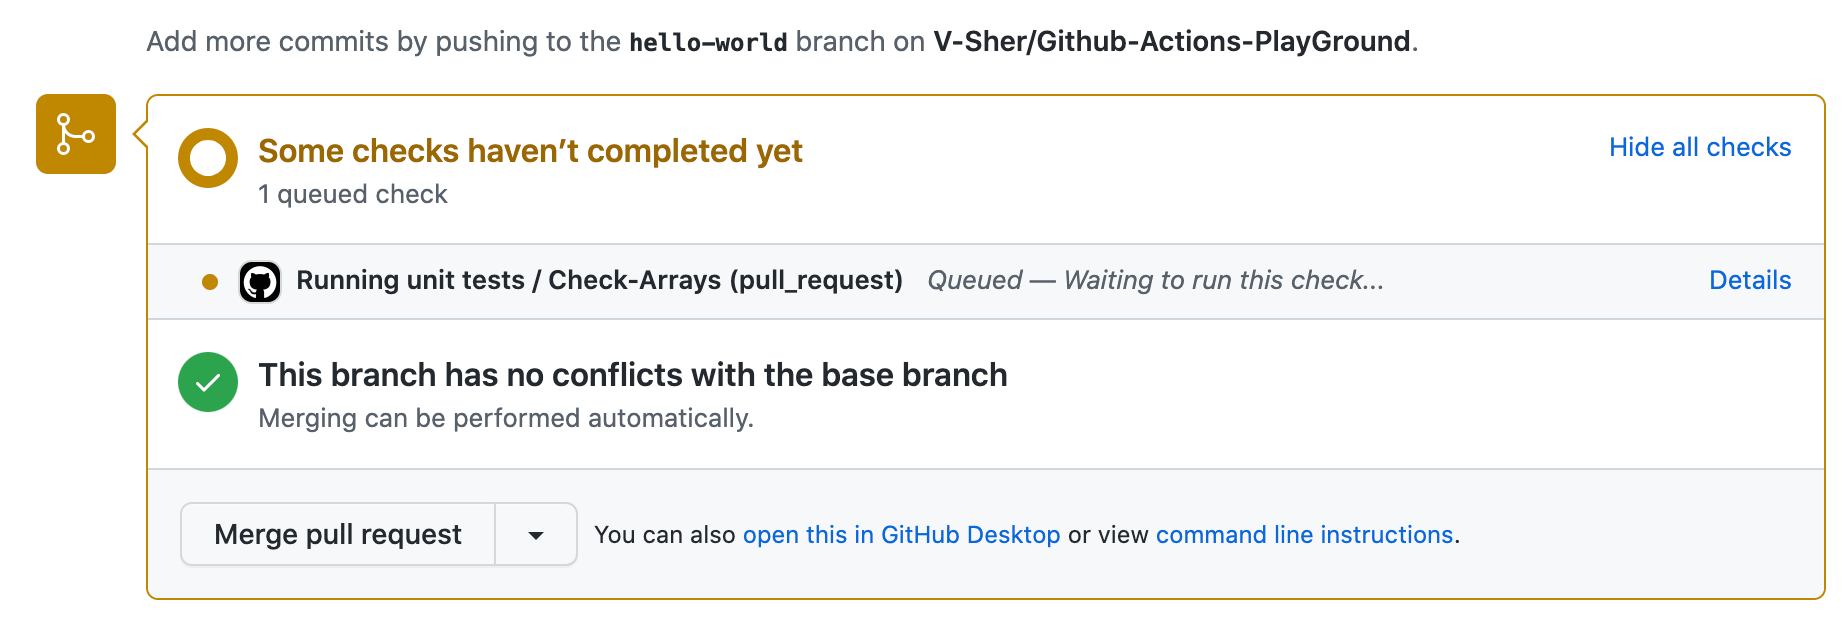
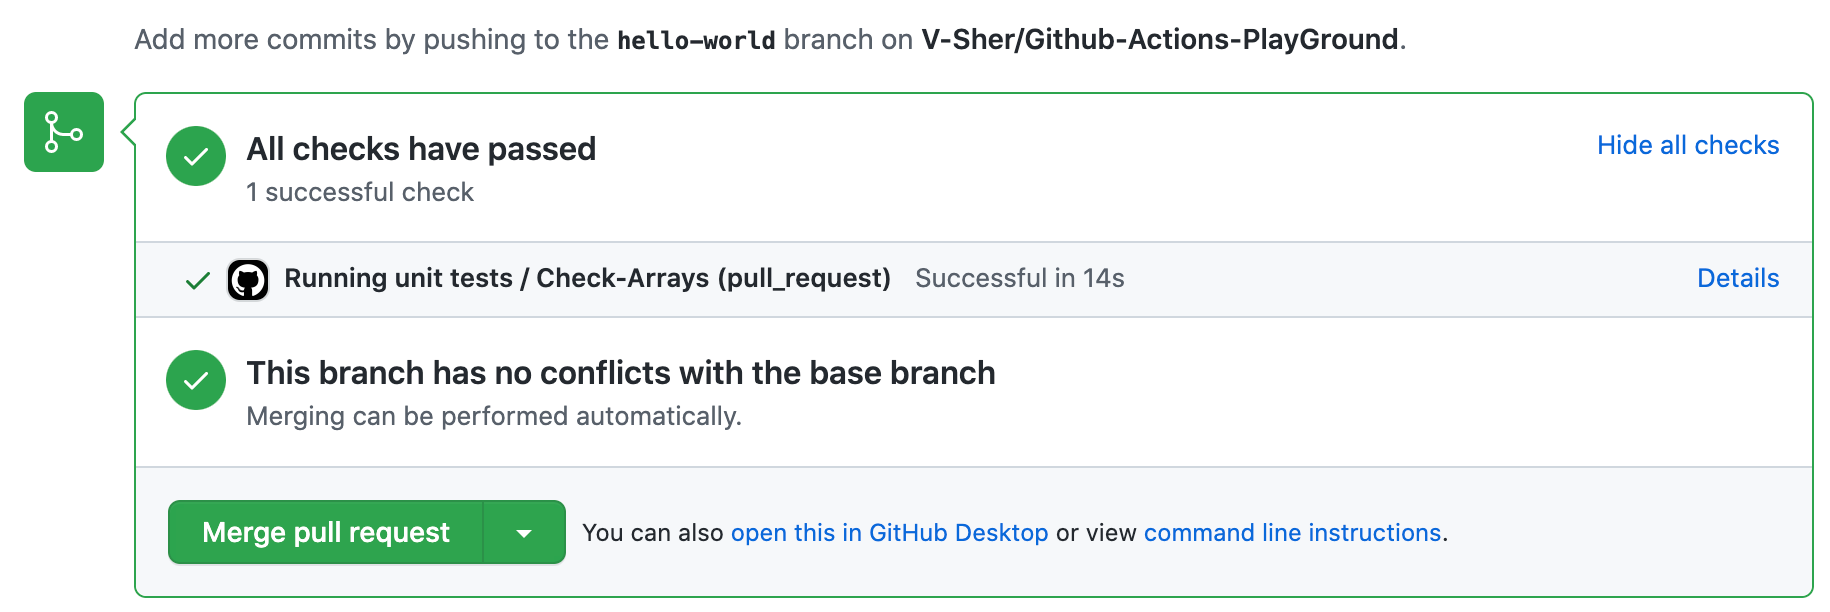
Now comes the enjoyable half — seeing our workflow in motion. Create a PR with this new department hello-world and check out pushing a brand new decide to it. On every push, you’ll see the checks beginning robotically denoted by a yellow marker (see picture on left). As soon as accomplished, they are going to flip inexperienced (see picture on proper).
Tinkering round with hyperparameters is a routine a part of mannequin coaching for any information scientist. Some kind of experiment monitoring (like MLFlow or Weights & Biases (or wandb)) is normally carried out to maintain observe of the outcomes for every totally different mixture of hyperparameters.
Since essential choices (corresponding to whether or not or to not merge the department and use the mannequin in manufacturing) have to be made primarily based on these, it will be significant that we fetch these runs and doc them as a part of the pull request. This helps enhance transparency and accountability throughout code evaluate as everybody can see the mannequin’s efficiency.
To this finish, machine-learning-apps/wandb-action market motion gives an easy-to-use resolution. Let’s see fetch a dummy run (from all of the logged wandb runs right here) by creating a brand new workflow .github/workflows/wandb_runs.ymlwithin the foremost department. We might be constructing this step-by-step.
Observe: The dummy runs I logged have been a part of a undertaking involving Huggingface Transformers. Try this fast demo in the event you’d prefer to know log runs utilizing Wandb with 🤗 Transformers with simply 2 further strains of code. Even if you’re not utilizing Huggingface, wandb will give you the results you want as a result of it’s framework agnostic — which means it will probably log fashions skilled utilizing Pytorch, Tensorflow, Scikit Be taught, Keras, and so on. Try their tutorials for particular frameworks right here.
Detecting set off phrases
First, we want a set off phrase/phrase that when current within the physique of the PR remark, instructs the workflow to fetch a wandb run. Alongside this set off phrase, we should additionally cross the id of the run that we need to be fetched. We might be utilizing a market motion known as machine-learning-apps/actions-chatopsfor attaining the identical.
To make use of this motion, we merely must outline a TRIGGER_PHRASE utilizing with. It may be any string however in our case might be /get-runs.
Observe: You’ll discover this motion additionally requires setting an setting variable known as GITHUB_TOKENutilizing env, nonetheless, GitHub robotically creates a novel GITHUB_TOKEN secret to make use of in your workflow — which means you don’t should do something! You may learn extra about it right here.
As a result of I need to examine all the things that’s returned by this step, I’m going to specify an id with it. Now we are able to use this id with the dot notation (for instance, steps.chatops) to dump all the things onto customary output utilizing toJSON()in Step 3.
To see the workflow in motion, create a brand new PR wishing to merge the commits pushed to the hello-world department with the foremost department. Subsequent, make a brand new remark underneath the PR with the set off phrase and the run id (see picture under):

Observe: You’ll find the run id within the run.id column within the wandb workspace.
Now, let’s head over to the Actions tab to see what’s returned by Step 3.
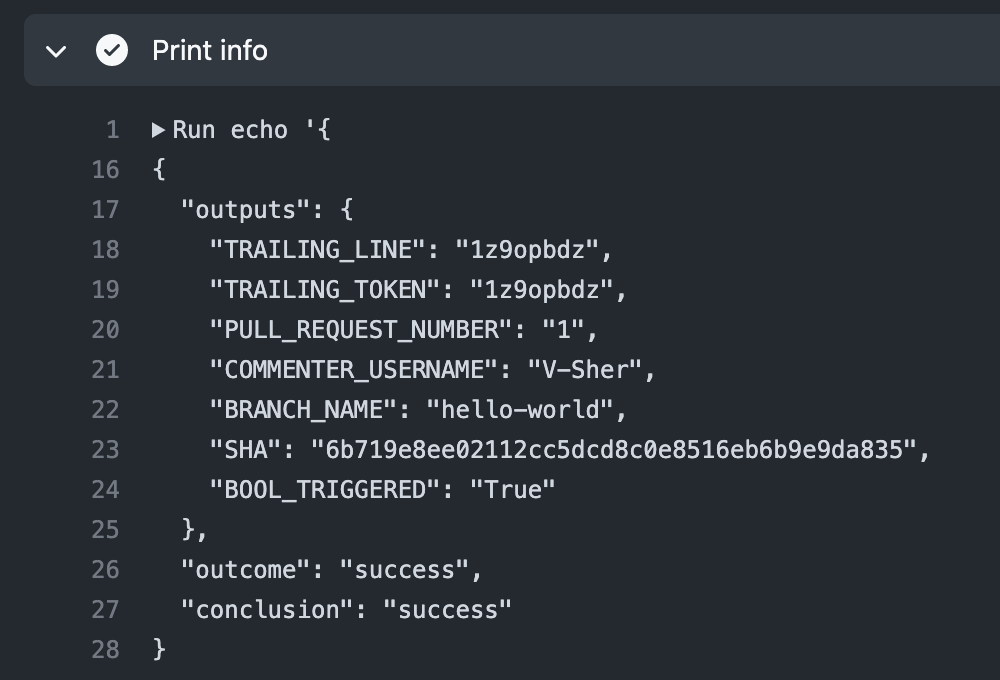
As anticipated, we get some helpful info such because the department identify and commenter’s identify. Additionally, the run id that was handed alongside the set off phrase was saved underneath TRAILING_TOKEN. With that, we’re prepared to maneuver on to Step 4 which can really fetch the runs utilizing machine-learning-apps/wandb-action.
In Step 4, we comply with the tips within the official documentation and supply a couple of obligatory inputs utilizing the with clause.
PROJECT_NAMEis the entity/undertaking identify related along with yourwandbundertaking. Within the code snippet above,entityis vsher andundertakingis GithubActionsDemo.- From dumping the information within the earlier step, we all know we are able to extract the
RUN_IDutilizingsteps.chatops.outputs.TRAILING_TOKEN. - Along with the run specified by
RUN_ID, I might additionally prefer to fetch runs that I’ve manually tagged asbaselineandreferencewithin the weights and biases workspace. This may be finished utilizingBASELINE_TAGS. - Some metrics (
DISPLAY_METRICS) and config variables (DISPLAY_CONFIG_VARS) are additionally outlined. Be certain the column names you cross listed below are additionally logged as a part ofwandblogging and that there isn’t any typo. - One last enter we have to present is the
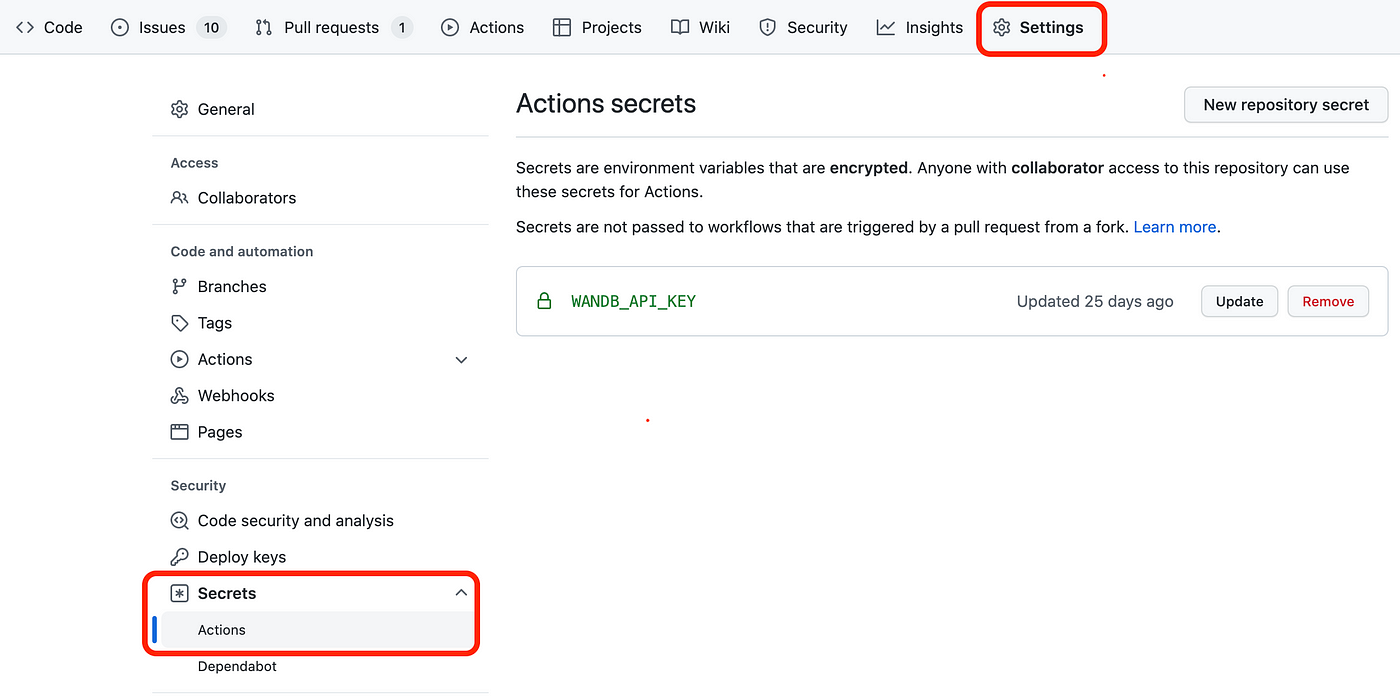
WANDB_API_KEY. After you have logged in to yourwandbaccount, you will discover your API key right here: https://wandb.ai/authorize. Copy it after which head over to Github Settings -> Secrets and techniques (on the left pane) -> Actions and create a New Repository Secret with the identifyWANDB_API_KEYand the worth as the important thing you simply copied!
Lastly, we’re going to dump your complete output from this step utilizing toJSON(steps.wandb). To see this in motion, push a decide to the PR and head over to the Actions tab to examine.
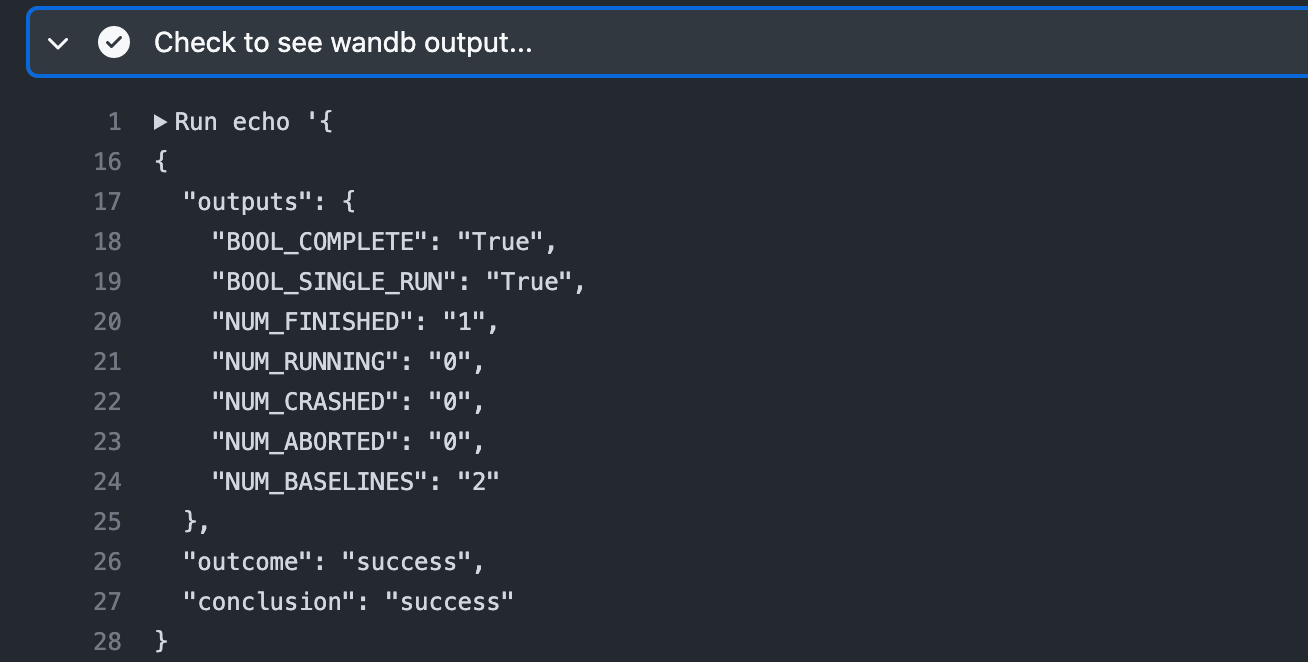
The output is self-explanatory, nonetheless, be happy to test the which means of every of the dictionary keys right here. Extra importantly, we are able to reference any of those outputs utilizing dot notation, as an example steps.wandb.outputs.BOOL_COMPLETE or steps.wandb.outputs.end result.
Creating Artifacts
Now you would possibly marvel, all these steps are wonderful however the place is the precise run that was presupposed to be fetched and displayed within the PR feedback!
Studying by the documentation, one factor to remember is that machine-learning-apps/wandb-action doesn’t show runs in PR feedback however as an alternative saves a csv file known as wandb_report.csv (containing the fetched runs) into the trail specified by the default working listing. Since we’ve checked out the repo utilizing actions/checkout@v3 in Step 1 of the workflow, our csv file might be created in house/runner/work/Github-Actions-PlayGround/Github-Actions-PlayGround.
To confirm this, we’ll add a brand new step that uploads this csv artifact from our workflow utilizing the actions/upload-artifact motion.
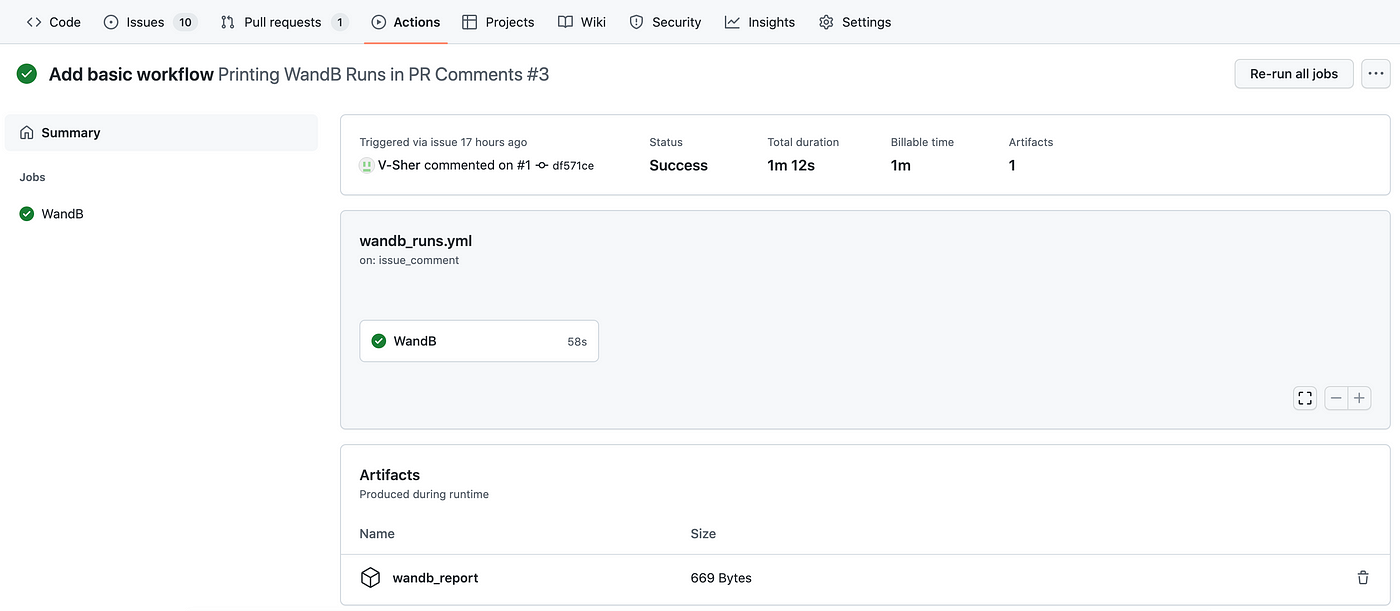
To see this in motion, push a brand new decide to the PR department and head over to the Actions tab. You will notice a newly created wandb_report on the backside of the display screen underneath the Artifacts tab. Be happy to obtain it and examine its contents.
Displaying wandb runs in PR feedback
Now onto essentially the most thrilling step of the workflow — displaying this csv as a markdown formatted remark in a pull request. We’re going to use the usual Github REST API for making a remark.
Observe: A fast detour to showcase how the API works. Utilizing the python requests module, we make a publish API name to the URL : https://api.github.com/repos/{repo-name}/points/{pr_num}/feedback, the place repo-name and pr_num have to be handed explicitly. The physique of the publish request is an easy string reflecting the contents of the remark.
# REST API Instance: Add a easy remark to PRimport requestsurl = f"https://api.github.com/repos/{repo-name}/points/{pr_num}/feedback"
information = {"physique": "Making a brand new remark utilizing API"}
outcome = requests.publish(url=url, headers=headers, json=information)
With the API instance sorted, we’re going to implement comparable performance in a brand new file known as wandb_results.py which we’ll run contained in the workflow. The python script incorporates the requests.publish() technique described above, along with some information body reformatting utilized to the csv file (earlier than passing it because the physique of the message).
Observe: I wish to acknowledge that wandb_results.py is closely primarily based on the code out there right here.
You’ll discover that on the very starting of wandb_results.py, we use three setting variables utilizing os.getenv(...). The previous i.e. GITHUB_REPOSITORY is accessible robotically to the server operating the workflow. The latter two — GITHUB_TOKENand PR_NUM — have to be set within the workflow step (see strains 42–43 under).
FINAL REVEAL
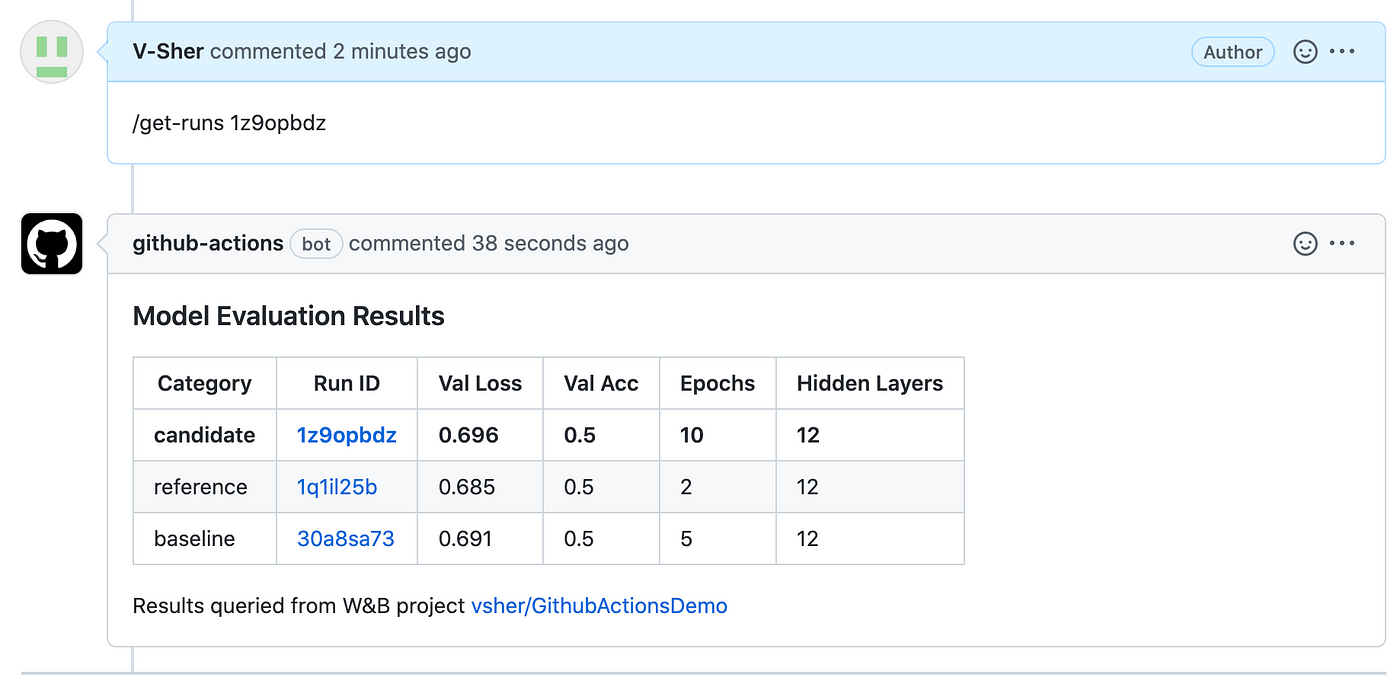
To see our full workflow in motion, head over to the PR and make a brand new remark just like /get-runs <run-id>. Inside a couple of minutes, you need to see the bot displaying the fetched run.
With out going into an excessive amount of element, I’m going to shortly cowl another use case for Github Actions. actions/setup-python lets you take a look at your python scripts on a number of variations. See instance utilization under.
jobs:
construct:
runs-on: ubuntu-latest
technique:
matrix:
python-version: ['2.x', '3.x']
identify: Python ${{ matrix.python-version }} pattern
steps:
- makes use of: actions/checkout@v3
- identify: Arrange Python
makes use of: actions/setup-python@v4
with:
python-version: ${{ matrix.python-version }}
structure: x64
- run: python my_script.py
By now you’d have had a deeper understanding and profound appreciation of the various wonders of Github Actions. Hopefully, by now, you must also be capable of implement them your self utilizing the related documentation. When you have come throughout different helpful time-saving actions in your day-to-day as a knowledge scientist, please do let me know!
As at all times if there’s a neater option to do/clarify a few of the issues talked about on this article, do let me know. On the whole, chorus from unsolicited damaging/trash/hostile feedback!
Till subsequent time ✨
Observe: All photos until in any other case famous are by the creator.
