What in case your customers need to choose one 12 months however see 4 years of knowledge based mostly on the chosen 12 months? Let’s see learn how to construct an answer to sort out this requirement.
One among my shoppers requested me to construct a report in Energy BI with a Slicer for the reporting interval and a visible, which reveals 4 years of knowledge based mostly on the choice within the Slicer. Two years earlier than the chosen interval, the chosen 12 months, and one 12 months after the chosen 12 months.
Once we take a look at a time collection, the info may seem like the desk within the following image, which comprises random information for example:
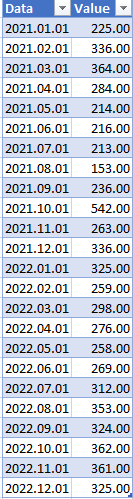
As you’ll be able to see, this dataset relies on months as an alternative of years. However I exploit this desk solely to indicate you the requested output.
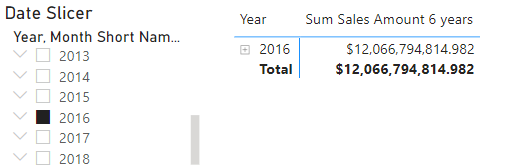
Primarily based on this information, we might get this report after we choose January of 2022, and we need to get six months:

Now, I’ll undergo completely different approaches to unravel this request.
This requirement presents not solely a DAX problem however a knowledge modelling problem as properly. Our present information mannequin with one central Date desk won’t help such a report.
One technique to resolve the request is to create a brand new calculated column within the date desk:
“Actual6years”, IF ( YEAR ( [Date] ) >= YEAR(Now()) — 3
&& YEAR ( [Date] ) <= YEAR(Now()) + 2
,1
,0 ),
Now, you need to use this column to filter your visuals and get the info you want.
Sadly, this strategy just isn’t viable, because the calculated column is calculated solely as soon as, at Refresh time.
This column relies on the final Refresh date. Due to this fact, a Slicer on the date desk won’t change something.
Earlier than we proceed, we have to take a while to consider our information mannequin.
The tables concerned on this request are the next two:

Once we take into consideration how filtering works, we realise that this information mannequin won’t permit us to construct a report as wanted.
The issue is that as quickly as we filter one 12 months from this Date desk, we’ll now not see another 12 months within the Filter context.
And, after we take away the filter context, we won’t get the specified end result both.
For instance, take a look at the next Measure:
Sum Gross sales Quantity 6 years =  VAR SelectedYear = SELECTEDVALUE(‘Date’[Year])  VAR FirstYear = SelectedYear — 3  VAR LastYear = SelectedYear + 2  VAR SelectedDateList = DATESBETWEEN(‘Date’[Date]
,DATE(FirstYear, 1, 1)
,DATE(LastYear, 12, 31)
)  VAR Outcome = CALCULATE([Sum Online Sales]
,REMOVEFILTERS(‘Date’)
,SelectedDateList
)RETURN
Outcome
Right here is the end result:
This result’s that the Filter set with the SelectedDateList Variable replaces any present filter on the Date desk. Now CALCULATE() resets the Filter Context to incorporate all Years between the FirstYear and the LastYear Variables.
The next strategy was impressed by an answer described by Alberto Ferrari from SQLBI a couple of months in the past.
You will discover the unique YouTube movies and the corresponding article within the References part on the finish.
The trick is so as to add a duplicate of the Date desk:
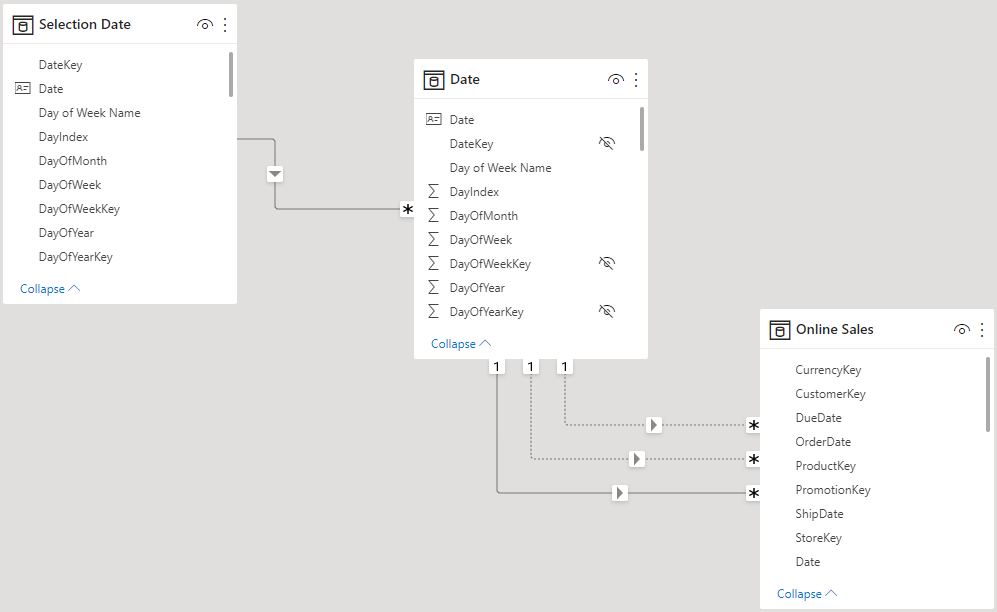
Now, I can use the Choice Date desk in all Slicers and the Date desk in my Visuals. With the CROSSFILTER() perform, I can select to Disable the Relation between the choice Date and the Date desk to control the Filter Context.
I can select to not manipulate the Filter Context, and all Measures will proceed working as earlier than.
Now we’ll see how I can use this Information mannequin to unravel the request.
OK, let’s write our first Measure.
That is the Measure to calculate the primary and the final 12 months wanted within the report. Then, we go the dates between these two years to a CALCULATE() perform:
Sum Gross sales Quantity 6 years =  VAR SelectedYear = SELECTEDVALUE(‘Choice Date’[Year])  VAR FirstYear = SelectedYear — 3  VAR LastYear = SelectedYear + 2  VAR SelectedDateList = DATESBETWEEN(‘Date’[Date]
,DATE(FirstYear, 1, 1)
,DATE(LastYear, 12, 31)
)VAR Outcome = CALCULATE([Sum Online Sales]
,SelectedDateList
)RETURN
Outcome
As you’ll be able to see, I exploit the SELECTEDVALUE() perform to get the chosen Yr from the Choice Date desk.
Then, I get the wanted Years from the Date desk.
The result’s the next:

Now we see the identical (fallacious) end result for every year.
The reason being the identical as earlier than. As a result of we exchange the Filter Context on the Date desk with the content material of the SelectedDateList Variable, we see the identical end result for every Yr within the Desk.
So, now we have to observe a barely completely different route.
To construct the working resolution, I have to change my strategy:
- I have to not exchange the present Filter Context on the Date desk
- I have to take away the Filter Context from the Choice Date desk
- I have to calculate the end result for every year from the Date desk
As talked about above, I can use the CROSSFILTER() perform to Disable the Relationship between the Choice Date and the Date desk. This removes the Filter on the Date desk with out eradicating the Filter Context on the Date desk.
To calculate the end result for every year, I can use the IF() perform.
That is the Measure with the right resolution:
Sum Gross sales Quantity 6 months =  VAR SelectedYear = SELECTEDVALUE(‘Choice Date’[Year])  VAR FirstYear = SelectedYear — 3  VAR LastYear = SelectedYear + 2  VAR Outcome = CALCULATE([Sum Online Sales]
,CROSSFILTER(‘Choice Date’[DateKey]
,‘Date’[DateKey]
,None)
)  VAR ActualDateYear = CALCULATE(SELECTEDVALUE(‘Date’[Year])
,CROSSFILTER(‘Choice Date’[DateKey]
,‘Date’[DateKey]
,None)
)RETURN
IF(ActualDateYear >= FirstYear &&
ActualDateYear <= LastYear
,Outcome
)
On this resolution, I don’t use the DATESBETWEEN() perform to construct a listing of Dates between the primary and the final 12 months. However I exploit the Variables within the IF() perform to ensure to calculate the end result just for the wanted years.
You’ll be able to see the end result within the following image:

To grasp this Measure appropriately, you’ll want to take a look at the end result on a row-by-row foundation.
For instance, take a look at the row for 2017.
The Measure will get the chosen 12 months from the Choice Date Slicer (2016). It calculates the primary and the final 12 months, for which the end result must be calculated (The Variables SelectedYear, FirstYear & LastYear).
The Variable Outcome comprises the Results of the Base Measure [Sum Online Sales] however disables the Relationship between the Choice Date and the Date Tables.
Now, I can get the end result for all years with out additional restrictions.
Because of this, I exploit SELECTEDVALUE to assign the precise 12 months from the Date desk, used within the Visible, to the Variable ActualDateYear.
Do not forget that the Filter Context on the Date desk stays unchanged.
Now, I can use a easy IF() to outline for which years the end result must be displayed.
As you’ll be able to see, the PY Measure nonetheless works with none additional modification, because the filter on the Choice Date Desk filters the info within the Date Desk. This filter is then used within the PY Measure.
The Complete row is empty, as there isn’t a Filter Context from the Choice Date and the Date desk. Due to this fact, the Measure can not return any worth.
If you wish to present a end result within the Complete row, you’ll be able to add one other IF() to the Measure, enclosing the present IF(), to outline the wanted end result for the Complete utilizing the ISFILTERED() perform.
Anyway, there may be nonetheless room for enchancment.
For instance, what occurs when a Consumer selects a couple of Yr within the Choice Date desk?
Now we have to outline which 12 months now we have to make use of because the reference 12 months on this case.
We will use the next Measure after we need to use the final chosen 12 months:
Sum Gross sales Quantity 6 Years MultiYear =  VAR SelectedYear = MAX(‘Choice Date’[Year])  VAR FirstYear = SelectedYear — 3  VAR LastYear = SelectedYear + 2  VAR Outcome = CALCULATE([Sum Online Sales]
,CROSSFILTER(‘Choice Date’[DateKey]
,‘Date’[DateKey]
,None)
)  VAR ActualDateYear = CALCULATE(SELECTEDVALUE(‘Date’[Year])
,CROSSFILTER(‘Choice Date’[DateKey]
,‘Date’[DateKey]
,None)
)RETURN
IF(ActualDateYear >= FirstYear &&
ActualDateYear <= LastYear
,Outcome
)
You should use the MIN() perform for the primary chosen 12 months because the reference 12 months.
The results of this Measure seems like this:

One other fascinating situation is when the consumer needs to pick out a month as an alternative of a 12 months.
How can we resolve this?
Once more, we should outline what the choice of a month means.
Does it imply the primary or the final day of the month?
Relying on this resolution, we mix the EOMONTH(), MAX() and the EDATE() capabilities to calculate the specified end result.
If we need to use the final day of the chosen month because the reference date, we are able to use the next Measure:
Sum Gross sales Quantity 8 months =  VAR MaxSelectedMonth = EOMONTH(MAX(‘Choice Date’[Date]), 0)  VAR Prev5Months = EDATE(MaxSelectedMonth, -5)  VAR Next2Months = EDATE(MaxSelectedMonth, 2)  VAR Outcome = CALCULATE([Sum Online Sales]
,CROSSFILTER(‘Choice Date’[DateKey]
,‘Date’[DateKey]
,None)
)  VAR ActualDate = CALCULATE(
MAX(‘Date’[LastDayOfMonth])
,CROSSFILTER(‘Choice Date’[DateKey]
,‘Date’[DateKey]
,None)
)RETURN
IF(ActualDate >= Prev5Months &&
ActualDate <= Next2Months
,Outcome
)
When assigning a price to the ActualDate Variable, I exploit the LastDayOfMonth column from my Date desk.
This column comprises the Final Day of the Month for every row within the Date desk. With this column, I don’t have to make use of the EOMONTH() perform within the Measure to get the identical end result.
The results of the Measure seems like this:

The options proven listed here are good examples of how we are able to mix a superb information mannequin and our understanding of the Filter Context and the way we are able to manipulate it, to unravel completely different situations.
Though the answer supplied by SQLBI would work as properly, it has some drawbacks:
- I have to resolve which desk can be utilized for which Slicer on which web page
- Relying on the mixture, I’ve to vary the Measures to deal with the 2 Date tables
Anyway, the answer proven right here can be used to create a Calculation Merchandise, as we work with a base Measure to get the Outcome.
No matter which resolution you implement, you’ll want to clarify to the customers of your information mannequin how they have to use the 2 Date Tables.
There’s the potential to get the fallacious end result if the 2 Date tables usually are not used as supposed.
Thanks for studying.
The answer defined right here was impressed by these assets from SQLBI:
and the corresponding article from the SQLBI web site:
Present earlier 6 months of knowledge from single slicer choice — SQLBI
Right here is the follow-up YouTube video with some optimisations:
I exploit the Contoso pattern dataset, like in my earlier articles. You’ll be able to obtain the ContosoRetailDW Dataset free of charge from Microsoft right here.
The Contoso Information may be freely used beneath the MIT License, as described right here.
I enlarged the dataset to make the DAX engine work tougher.
The On-line Gross sales desk comprises 71 million rows (as an alternative of 12.6 million rows), and the Retail Gross sales desk comprises 15.5 million rows (as an alternative of three.4 million rows).
